
DIGITAL LADY SYD SPEAKS OUT ON TOPAZ IMPRESSION
 This is not a formal review of Topaz (see sidebar at my Tidbits Blog for website link) Impression due to some constraints on my time right now, but I did want to give a quick shout out to them for creating for us Photoshop Lovers a new plug-in to fan our “flair for the artistic.” This is Topaz’s first attempt at making a painterly program – it is in a tough competition at this point since painting seems to be all the rage. I have had the opportunity to play around with this little gem for a few weeks and can say that once again, Topaz has a way of creating those little extras which makes you say – oh yeah, that’s really a nice feature!
Two things I really like about this program:
- There is usually not really a lot that needs to be done to make the resulting image much better after applying one of the various presets they have created. I have played around with all the different sliders and settings, and find that adjusting the Stroke brush types is my personal favorite. All the Stroke sliders are really good so it is hard to choose a favorite from them.
- My second really favorite item is that you can change the Hue, Saturation and Lightness of all the individual colors – this makes a huge difference depending on what colors you want to emphasize in the image. There are little red diagonal lines over the areas affected when hovering over each color with your mouse which is very helpful. (Something else I have never seen before.) Topaz has always been a leader in the way color is managed in their plug-ins. ReStyle set the bar very high for other software creators in this regard and Impression is continuing on with this tradition.
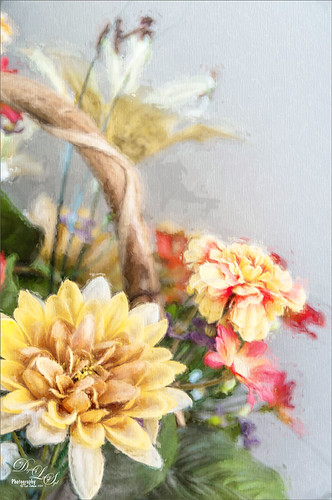
The image above was my first attempt at using Impression and I was totally surprised at how nice it turned out with very little manipulation. This image used one of their early Painting presets so the settings names do not match what was released but I know one of the new Painting presets is very close. I did set the image to Screen blend mode at 82% opacity – it gave a really nice finished look. I also used the Type 06 brush. Switch these brushes up and try different ones with the presets – you get some totally different results! The only other thing done after applying Impression was to use Topaz Detail 3 to sharpen up the focal points (the lower flower and secondary one is the pink and yellow one in the center). A black layer mask was applied (hold down ALT while pressing the layer mask icon in the Layers Panel) and just the centers were lightly painted back in. That was it!
 This little cloud image above was taken with my Android from my front porch here in Florida – got to love our skies! Used the Impression Pointillism II preset and made the follow changes to the preset: Stroke Brush Type 05, Brush Size 0.61, Paint Volume (Thickness) 0.27, Paint Opacity 1.00 (this really made the Impasto pop), Stroke Width -0.04, Stroke Length 0.11, Spill 0.14, and Smudge 0.05; and in Color the Blue Saturation and Lightness were adjusted to give the sky a little more interest. These settings are a little rough since they were developing some of the settings for the program at the time this image was created. But the important thing is that by changing the brush types and those sliders in the Stroke section, some really interesting looks can be achieved. In the above I was leaning toward the bluish tones for the sky so that is what was adjusted. I even love the little stroke effects in the bushes in the foreground. Back in Photoshop there was not much extra work done except to add a selective color adjustment layer (Colors Whites – Yellow -7%, Neutrals Black +5, and Blacks Magenta +4, Yellow +9, and Black -7) – sort of like adjusting blacks, midtones and whites in Levels. Last step was adding a Curves Adjustment Layer and a little more contrast into the light colors (pulled down just a little on corner at 3 – 1 in grid). I really like the results – especially just a little of the red tones peaking through the greenery. I had not even noticed that in the original image.
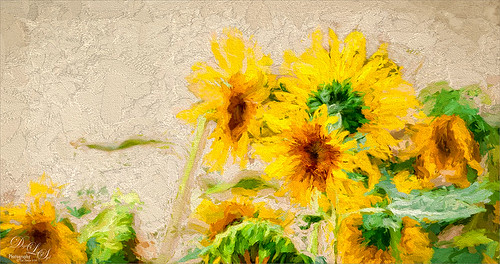 These daisies were taken on the Living With the Land ride at Epcot in Disney World, Orlando, Florida. I just love yellow daisies! I wanted to create an image reminiscent of Van Gogh’s Tournesols (Sunflowers) image although a Van Gogh preset was not used, but instead the Impasto I preset. In Lightroom Seim’s (see sidebar at my Tidbits Blog for website link) Supertone EQ X preset and Hill and Lucas preset were applied. In Photoshop a little clean up was done to the edges and Topaz Impression plug-in was opened. These settings were changed in the preset: Stroke section: Brush Type 05 – for some reason I like this brush for the heavy painted look, Brush Size 0.61 – the larger the number the more painterly it looks, Paint Volume 0.76 – how see through is the effect, Stroke Width -0.34 – at +1 more of a scribble and -1 more realistic – I wanted a slightly realistic look here, Stroke Length 0.19, Spill 0.27 – set to 1 it will spill over the edge, Smudge 0.18 – I am using the very sparingly as it has a bit of the Oil Paint Filter look to it and I do not love that effect all the time, and Coverage 1.00 – do not care for the edging look at this time – if you reduce to less than +1 a Transition slider will appear; Color section Overall Saturation 0.17 and Lightness 0.06, Red Hue 0.29 and Saturation 0.10, Orange Saturation 01.0, Yellow Hue -0.10 and Saturation 0.11, and Green Hue 0.19; Lighting section Brightness 0, Contrast 0.92, and Vignette 0 – Light direction x-0.32 y0.60; and Texture section was left alone. After using the plug-in, I did a little clean up on a New Layer in areas that were a bit overdone, and added a Levels Adjustment Layer to bring back just a little contrast. The last step was on a stamped layer (CTRL+ALT+SHIFT+E) where Nik Viveza 2 was used to just saturate that middle flower a bit to draw the eye to it. This could just as easily be done using Camera Raw’s Radial Filter. It was a really fun working on this image.
What I have done is to go to the Users Manual which downloads with the plug-in (go to Help menu and it is there), and look at what they say each of the sliders do. I made a sheet with what Topaz says they do, and then what settings I like to use for them until I get used to what they do. Like I said, they have done a nice job of creating presets, so they do give you some nice starting places for adjusting your images. The Topaz team said they are continuing to work on adding to this plug-in, so it is great to know they are listening to their clients. That is one reason I love working with Topaz, their customer service is excellent. Impression is totally fun and very addictive – I could do this all day! If you have a chance, download it and see what you think. I will be writing a more thorough blog on this in the near future once I learned some tricks to get great effects. Still learning so better get back to it!…..Digital Lady Syd
Digital Lady Syd Related Blogs:
New Impression of Octopus and Seahorse

You have inspired me to keep at this. I simply was not getting what I liked, and ended up starting in Topaz and then spending a lot of time in either PS or Painter or both, until I was happy with the result.
Thank you so much for taking the time to post this. I truly appreciate it.
09/21/2014 at 9:05 pm
Hey Lisa, I like working between programs because I think that is what makes the image unique. Impression is a good starting place – I am trying to learn to use it with my own painting strokes to get a style that is my own. Thanks for the comment.
09/22/2014 at 9:41 am
Pingback: » New Impression of Octopus and Seahorse Digital Lady Syd's Tidbits Blog
Pingback: Impressions of Impression | Visible History Photoblog
Pingback: Topaz Impression – Release The Artist. | Say It With A Camera
Pingback: MORE PAINTING WITH TOPAZ IMPRESSIONS! | Digital Lady Syd's Fun Photoshop Blog
Pingback: SOME EPCOT FUN! (AND MORE IMPRESSION) | Digital Lady Syd's Fun Photoshop Blog
Pingback: HOW TO COMBINE ALL THOSE TOPAZ PLUG-INS FOR AN ARTSY LOOK! | Digital Lady Syd's Fun Photoshop Blog
Pingback: » Hot Air Balloons the Disney Way Digital Lady Syd's Tidbits Blog
Pingback: » Topaz Impression On a Portrait Digital Lady Syd's Tidbits Blog
Pingback: PAINTERLY PLUG-INS – SO MANY CHOICES, SO MANY CHOICES! | Digital Lady Syd's Fun Photoshop Blog
Pingback: TOPAZ FILTERS AND LANDSCAPES | Digital Lady Syd's Fun Photoshop Blog
Pingback: HOW TO GET THE OIL PAINT FILTER EFFECT BACK? CAN IT BE DONE? | Digital Lady Syd's Fun Photoshop Blog
Pingback: WHAT’S NEW IN TOPAZ IMPRESSION 2? | Digital Lady Syd's Fun Photoshop Blog