When to Use Black & White or Sepia Tone on An Image

This topic has always interested me. There has been so much written on this so I am not going to go over all of it. I have found that for me a little trial-and-error works as good as anything when it comes to this type of processing. Luckily in Lightroom there are presets that will give you a quick look to see how an image will stack up as a monochrome type image, and there are many black and white presets for Photoshop’s ACR (Adobe Camera Raw) that can be downloaded. The St. Augustine, Florida lamp lights RAW file had a really bright blue background and very black wrought iron with little detail. By converting to more of a sepia tone, the detail came out very clear. The really interesting thing is that to get the detail to pop out of the ironwork, an Invert Adjustment Layer set to Soft Light Blend Mode at 92% opacity was used.
…..

When an image just seems overwhelmed by color and I am having trouble controlling the feel, applying a black and white conversion or introducing a slight color effect can calm down the whole image. That is what happened in the above image that was taken near the summit of the large volcano, Mauna Kea on the Big Island in Hawaii, of the Caltech Submillimeter Observatory (apparently to be dismantled in 2016) where the Keck Telescope is also located. The little observatory was lost from view in both the strong browns of the surrounding dirt and foreground gravel and the soft blues of the Mauna Loa volcano in the background and the sky. It was processed totally in Lightroom using the Basics section sliders and a preset I had created from reading David duChemin’s book Vision & Voice – Refining Your Vision in Adobe Photoshop Lightroom. I call it the duChemin Massai Chocolate split-tone & vignette preset. Only those two sections of Lightroom 3 were used to create the preset so it still works with Lightroom 4. In Split Toning the Highlights Hue was set to 34 and Saturation t0 30, Shadows Hue was 0 and Saturation 6, and the Balance slider was set to -25. In the Lens Correction section’s Manual tab, the Lens Vignetting Amount slider was set to -63 and the Midpoint to 18. I have used this preset several times as it has a very nice subtle tonal appeal. That was basically all that was done to make this a much more interesting image.
…..

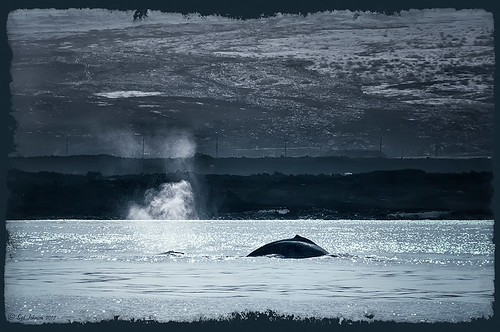
Another one of my favorite images from Hawaii but once again, the detail would have been lost if it had been processed as taken. The original RAW file had very little detail in the rising hillside and water and the color was totally dull – almost a flat-looking black and white. By converting it to a nice cool water tone, the image takes on new life. The image has several filters stacked in Nik Color Efex Pro 4: BW Conversation using Dynamic Contrast method, Photo Stylizer which give it the beautiful blue glow using Method 1 at 28% Strength, Low Key, Lighten/Darken Center, and Detail Extractor using 7 control points to selectively bring out the details in the image. Nik Viveza 2, Imagenomics Noiseware filter, and OnOne PhotoFrame were also used to complete the image.
…..

Here is another example of a very busy and overly bright image that really loses its appeal in color. Since it is the oldest drugstore (built in St. Augustine, Florida, in 1739) in the United States, it already has a that vintage feel to it. Therefore a sepia tone really adds to the effect the image should be portraying. This image was an HDR image taken in bright sunlight during the hottest part of the day. It was processed into a black and white using Nik Silver Efex Pro 2, the the background original was layered on top and a black layer mask was added to bring back a hint of color in the windows. Topaz Lens Effects was used to add a slight vignette effect, and finally OnOne PhotoFrame acid burn controlled 05 was added. For both Topaz and OnOne website links, see sidebar at my Tidbits Blog.
…..
It appears that if you have a really nice image but the colors just do not create the correct effect, or if the image gets lost in all the powerful colors or brightness of the day, give the black and white or sepia tones a shot. You do not have to have one of the mentioned filters – Photoshop has a wonderful Black and White Adjustment layer that also adds any monochrome color. Great way to get a quick impression of whether this effect will work on your image. Definitely do not write off an image just because of color issues – it may turn out to be a great shot!…..Digital Lady Syd
Digital Lady Syd Related Blogs:
The Art Corner: Little Girl Knitting – A Mystery Sculpture!
NIK’s Champion Plug-in – Silver Efex Pro 2
Where Am I?
Topaz B&W Effects Plug-In – A Real Winner!

Leave a comment