
CREATING AN AI SELFIE?
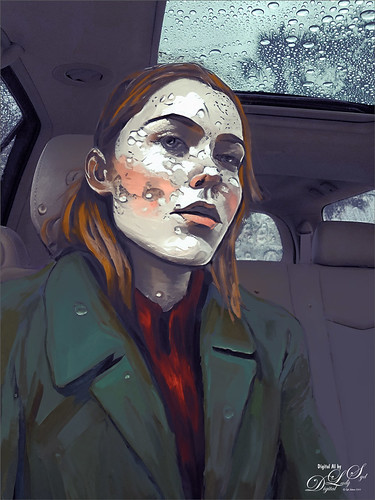
Just had some fun this week – thought I would try Photoshop AI’s Generative Fill on an old selfie pix taken inside my car while it was raining really hard. I also took some texture images of my moon roof with the water drops on it. Dave Kelly’s Gen Fill Photo Action Painting using GF Painting 40 was applied to all the images and then the Contextual Task Bar Generative Fill command using the prompt “Oil Painting” was applied on the first three images and “Cubist Portrait” on the last one. The GF Painting 40 action means that 40% of the image is rather abstract while the GF Painting 80 action gives a more realistic effect. I think using this action is the easiest way to get good results when using the Generative Fill Command. (To get links for action and info about it, go to my short Tidbits Blog Older Woman of Another Generation.) Got lots of variations – some good and some not and sometimes my white coat showed up in a variation. For the image above called Raining Tears, the raindrops appeared on the subject and her coat which I thought was pretty cool!
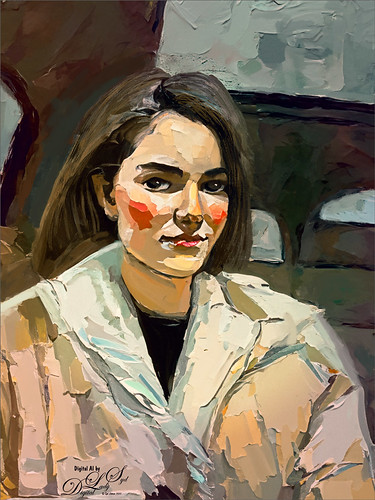
For the above which may be the closest to my actual selfie (well she is a little younger but she has my coat on!), the subject was selected by removing part of the GF Painting 40 action selection (note Dave’s action selects the whole image for setting the brightness in Quick Mask Mode), so the Quick Selection Tool with the ALT key pressed was used to remove the background area from the prompt requirement. With the selection still active, the prompt “Oil Painting” was entered in the field. The interior of my car from the photo was left intact while the subject was oil painted. Felt the background was too realistic, so turned off the subject AI layer, highlighted the original selfie layer, and ran the action again applying GF Painting 80 – then ran the Generative Fill command with the “Oil Painting” prompt. Chose a variation and just turned on the top original AI layer – now had two different strengths of oil painting in the same image. BTW, used an oldie but goodie filter, Topaz Lens Effects applying the Gold Left Reflector preset and the Plush Rose Vignette preset at a 12% opacity – gave a nice warm feel to the image. The brush for clean up was my SJ New Chalk Brush (see settings below).

This image was actually a different variation from the top Raining Teardrops image. Only this time the background was selected, just like it was done in the second image, but cleared so a texture could be added. This time a texture was made using the Stamp Tool for the background. (See end of blog on how to do this.) Used all brushes but the chalk one listed at end. The ear lobe was selected to create an earring using Generative Fill with the prompt saying “Oil Paint Earring.” Otherwise the same workflow.
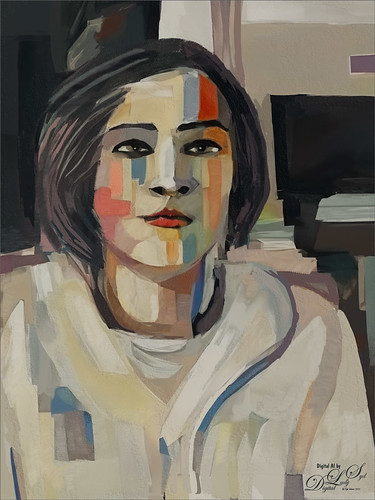
Played action Dave Kelly’s GF Paint 40 and used Generation Fill prompt “Cubist Portrait.” Ran several times but ended up with this variation created in the second generation effort. It did pick up my white jacket also. An Impasto Layer was used to add a touch of texture in the paint strokes on a separate layer and a scatter brush was used to paint over it. (To learn how to do this, check out my older but still good Fun Photoshop Blog and video called How to Create an Impasto Layer Style.) Also painted with a flat square brush areas that had too much impasto on a separate layer above.
As promised, keeping it short. It was fun to try this just to see what it does. As you can see, they are not exactly your image unless you use a very high amount with Dave’s action. It was kind of a crazy but fun thing to do though! Have a good one!…..Digital Lady Syd
ADDITIONAL INFO
Brushes used on these images: And there was a lot of digital painting done using a couple major brushes – Kyle’s Great Brush from his Fall 2023 set (this brush is really great so download it from his “Get More Brushes” link in the Brush Settings hamburger menu); and Grut’s Watercolor Late Never brush that I modified to work as a regular brush blender – works fantastic (Here are the settings if you want them: I call it “SJ – 36% Blender for face-from Grut-W Late Never.” Changed Grut’s Late Never brush in the Options Bar to Size 35 pixels, Mode Normal, Opacity 36%, Flow 100%, Airbrush icon off which is the Buildup in Brush Settings Panel. Then in Brush Settings Panel set Shape Dynamics Size Jitter 0; and uncheck Buildup (should be off if Airbrush icon off in Options Bar) and Protect Texture (not sure why this is even on). I have several variations of this brush, but this one is best for blending, especially with the Great Brush – just sample and blend between colors to smooth them out. Second image brush was just a the Legacy Default Photoshop 36 pixel Chalk brush with a some extra settings: Brush Tip Shape – Angle 15 degrees; Shape Dynamics – on a variation the Angle Jitter Pen Pressure is set to Direction but the main brush has no settings here; Texture – pattern called Pretty Actions Antique but it is basically a medium gray and white marbled look, Scale 87%, Brightness -35, Contrast 75, Texture Each Tip checked, Mode Multiply, Depth 70%, Minimum Depth 63%, Depth Jitter 90%, and Control Pen Pressure; Dual Brush set to Color Burn, Brush Tip oval shaped, Size 200 px, Spacing 29%, Scatter 11%, and Count 7; and Transfer – Opacity Jitter 100%, Control set to Pen Pressure, Minimum 0%, Flow Jitter 0%, Control set to Pen Pressure, and Minimum 0%. (This is a really nice painting brush.) For third image Kyle’s Munch Medium brush was used on the face. The Edvard Munch seven brush set first appeared in 2017 in a 4-part video series called Get Started with Digital Painting Photoshop – they are not part of the PS2021 brushes, but are a free download here at the Adobe Creative Cloud.
Creating the Pattern for behind the 2nd image: First added a new layer, selected the Pattern Stamp Tool and used a brush I created a long time ago called SJ FrenchKiss-Tableau Mirage. (See my older Fun Photoshop Blog How to Paint with a Texture Brush from Your Image with video to show you how to create a brush from any texture.) Obviously French Kiss‘s Tableau Mirage was the texture converted to a brush and made large – 3000 px. I use it all the time for this type of background. On this image Jessica Johnson‘s The Masters Palette Pattern TM103 was selected and just stamped once in blue (note it is not totally opaque) – it can be placed in different places and select different colors for the texture wanted. (Jessica is definitely the Pattern Stamp Queen of Photoshop and has some great ways to using it.) Next created another New Layer and used the same brush with a brownish color and selected a stamp pattern in same set called TM142 – this causes some of the blue to show show through from TM103 but uses the main color light beige color from TM142. Don’t have to use the Pattern Stamp Tool for this.
RELATED DIGITAL LADY SYD BLOGS:
Placing Any Photoshop Generative Fill Variation on a Layer Easily

Fascinating to see the results, especially that they’re all so different from each other.
10/29/2023 at 7:09 am
Pingback: » Another Selfie??? Digital Lady Syd's Tidbits Blog
Pingback: PLACING ANY PHOTOSHOP GENERATIVE FILL VARIATION ON A LAYER EASILY | Digital Lady Syd's Fun Photoshop Blog