
My Favorite Adobe Lightroom 5 Features
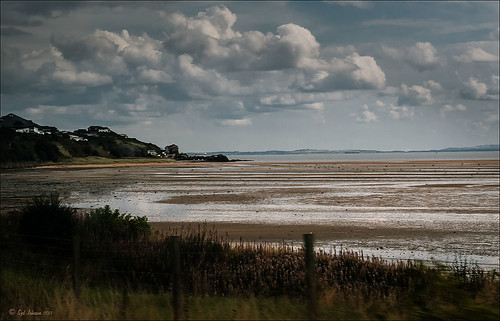 In honor of the new Beta version of Lightroom 5 recently released, I decided to do a little Lightroom blog this week. The image above was taken from a train on the way to St. Andrews – what beautiful and dramatic landscapes they have in Scotland! Everything was done in Lightroom 5 except for one little plant distraction that I could have used the updated Clone Brush in Lightroom to fix, but I just can’t seem to get the results I like. Otherwise, this image showcases the new Radial Filter (which I love!). Now I always go to the Lens Corrections section and check Enable Profile Correction and Remove Chromatic Aberration, and press the Auto button to make sure my image is straight. Then cropping is next. One of the Punchy Sunset presets from David duChemin’s Lightroom 4 Presets Package was applied first as a starting point. Adjusted the exposure slider before going into the Radial Filter. A large oval vignette was dragged out in the in the image and only the Exposure slider was adjusted darker just a little. An Adjustment brush was used to sharpen the houses up on the hillside. Then in the HSL section, the clouds were given a little extra pop by adjusting the blues in the Luminance slider area. The Graduated Filter was pulled down a little from the Lightroom preset that was applied. That was about all there was to it. Really loved the results without too much overall manipulation. This is why I love Lightroom!
….. This image is of some Ostica African Daisies that I planted in my front yard. This image used some Photoshop adjusting to get this look, but I wanted to show how nice Lightroom turned this image into a really good black and white with just a preset applied. It is a good example of an image I would never have tried as a black and white effect, but I recently downloaded this really interesting free Lightroom preset called RM4 Black and White 2. Just applied the preset and did a slight sharpening of the daisy centers. In Photoshop, Topaz (for website link see my Tidbits Blog sidebar) Detail 3 was used to sharpen up the whole image – this is often my first step in Photoshop. On a New Layer a little background clean up was done to make it a nice even black. Next a Darken Layer was created to emphasize the dark lines in the petals (see my The Best Dodging and Burning Technique! blog). Next I did some paint clean up of some of the light shadows on the petals (see my Getting Rid of Those Blown Out Areas in Your Image blog). On a New Layer applied Kim Klassen Cafe‘s Dream Brush Set-kkdreamstamp brush (can find these goodies if you join her Test Kitchen), but a text layer could have been created using a grunge-look font. Kim Klassen’s Archived Set Way Black Frame was used as a frame and turned into a frame overlay by following my How to Create Personal Overlays for Your Images blog.
….. These flowers are actually bright pink Magellan Zinnias with beautiful bright yellow centers. The preset applied was Lightroom’s Black and White Look 3. Then an adjustment brush was used to paint in the different colors on the flowers – created three different areas, one for each color. Last the new Radial Filter was used to add focus to the blue flower, and a little to the purple and yellow flowers. Then the image was taken into Photoshop. A little clean up was done, Kim Klassen’s Cloth & Paper Texture Anne was applied setting the layer to Soft Light at 40%, and finally a Curves Adjustment Layer was applied to add back a little contrast. An OnOne PhotoFrame acid burn controller 15 frame (no long available unfortunately – one of the best frame programs around) was added and a Vibrance Adjustment Layer was used to bright up the colors just a little (Vibrance +21 and Saturation +31). That was it! Lightroom did a pretty good job of colorizing the black and white conversion.
…..
There are several new features in the new Lightroom 5 release and to be honest, I have not even tried most of them. I will definitely upgrade due to just a couple things I really like about the program (and I am not getting into a Cloud discussion since I am on the fence about this one). There were two things that got my attention right away: the new Radial Filter (which was used on the flowers above) which can be applied very subtly, with different parameters, and as many times as you want; and the Upright Adjustment button – now no need to have crooked images ever again. In the Lens Correction section just click the Auto adjustment button, and then go to the Crop Tool to finish it up. It is fabulous and I use it on every image I process. There are some other changes I will probably use like the Slideshow module now can have both still and videos in your slideshows. The Cloning/Healing Brush has been updated but I still struggle getting nice results – still like Photoshop for clean up issues. It does a great job on little spots but more difficult when trying to adjust a larger area.
You should check out the program and see if you like Lightroom. I have used it since Lightroom 1 and have never looked back. It catalogs all my photos for me and keeps me as organized as I am ever going to be with my pictures!
Digital Lady Syd Related Blogs:
Lightroom 5′s New Upright Adjustments Section
How to Use Adobe Camera Raw (ACR) or Lightroom 4 Quickly
New Lightroom and Photoshop 32-bit Processing Capability
Showing Off Your Images with Lightroom
Great Free Plug-in for Lightroom – The Fader!
When to Use Black & White or Sepia Tone on An Image

This topic has always interested me. There has been so much written on this so I am not going to go over all of it. I have found that for me a little trial-and-error works as good as anything when it comes to this type of processing. Luckily in Lightroom there are presets that will give you a quick look to see how an image will stack up as a monochrome type image, and there are many black and white presets for Photoshop’s ACR (Adobe Camera Raw) that can be downloaded. The St. Augustine, Florida lamp lights RAW file had a really bright blue background and very black wrought iron with little detail. By converting to more of a sepia tone, the detail came out very clear. The really interesting thing is that to get the detail to pop out of the ironwork, an Invert Adjustment Layer set to Soft Light Blend Mode at 92% opacity was used.
…..

When an image just seems overwhelmed by color and I am having trouble controlling the feel, applying a black and white conversion or introducing a slight color effect can calm down the whole image. That is what happened in the above image that was taken near the summit of the large volcano, Mauna Kea on the Big Island in Hawaii, of the Caltech Submillimeter Observatory (apparently to be dismantled in 2016) where the Keck Telescope is also located. The little observatory was lost from view in both the strong browns of the surrounding dirt and foreground gravel and the soft blues of the Mauna Loa volcano in the background and the sky. It was processed totally in Lightroom using the Basics section sliders and a preset I had created from reading David duChemin’s book Vision & Voice – Refining Your Vision in Adobe Photoshop Lightroom. I call it the duChemin Massai Chocolate split-tone & vignette preset. Only those two sections of Lightroom 3 were used to create the preset so it still works with Lightroom 4. In Split Toning the Highlights Hue was set to 34 and Saturation t0 30, Shadows Hue was 0 and Saturation 6, and the Balance slider was set to -25. In the Lens Correction section’s Manual tab, the Lens Vignetting Amount slider was set to -63 and the Midpoint to 18. I have used this preset several times as it has a very nice subtle tonal appeal. That was basically all that was done to make this a much more interesting image.
…..

Another one of my favorite images from Hawaii but once again, the detail would have been lost if it had been processed as taken. The original RAW file had very little detail in the rising hillside and water and the color was totally dull – almost a flat-looking black and white. By converting it to a nice cool water tone, the image takes on new life. The image has several filters stacked in Nik Color Efex Pro 4: BW Conversation using Dynamic Contrast method, Photo Stylizer which give it the beautiful blue glow using Method 1 at 28% Strength, Low Key, Lighten/Darken Center, and Detail Extractor using 7 control points to selectively bring out the details in the image. Nik Viveza 2, Imagenomics Noiseware filter, and OnOne PhotoFrame were also used to complete the image.
…..

Here is another example of a very busy and overly bright image that really loses its appeal in color. Since it is the oldest drugstore (built in St. Augustine, Florida, in 1739) in the United States, it already has a that vintage feel to it. Therefore a sepia tone really adds to the effect the image should be portraying. This image was an HDR image taken in bright sunlight during the hottest part of the day. It was processed into a black and white using Nik Silver Efex Pro 2, the the background original was layered on top and a black layer mask was added to bring back a hint of color in the windows. Topaz Lens Effects was used to add a slight vignette effect, and finally OnOne PhotoFrame acid burn controlled 05 was added. For both Topaz and OnOne website links, see sidebar at my Tidbits Blog.
…..
It appears that if you have a really nice image but the colors just do not create the correct effect, or if the image gets lost in all the powerful colors or brightness of the day, give the black and white or sepia tones a shot. You do not have to have one of the mentioned filters – Photoshop has a wonderful Black and White Adjustment layer that also adds any monochrome color. Great way to get a quick impression of whether this effect will work on your image. Definitely do not write off an image just because of color issues – it may turn out to be a great shot!…..Digital Lady Syd
Digital Lady Syd Related Blogs:
The Art Corner: Little Girl Knitting – A Mystery Sculpture!
NIK’s Champion Plug-in – Silver Efex Pro 2
Where Am I?
Topaz B&W Effects Plug-In – A Real Winner!
New Lightroom and Photoshop 32-bit Processing Capability

This new feature is taking the Photoshop world by storm! What a great new addition to Lightroom’s 4.1 upgrade. If you have Lightroom 4, you have got to try this. Matt Kloskowski, one of the NAPP Photoshop Guys, created a nice short video, A New HDR Feature in Lightroom 4.1, on how to process your images using the Merge to HDR in Photoshop, and then bringing the 32-bit tonemapped image back into Lightroom to use with the camera raw sliders. The image above is from the Hilton Waikoloa Village – some of the unusual art that is in this complex. After processing the 32-bit image using Lightroom sliders, Nik Color Efex Pro 4 was applied within Lightroom using these filters: Detail Extractor adding (+) control points on only the sculpture itself, Midnight using Neutral mode, and BiColor User Defined Preset 02 Brown/Pink and using (-) control points on the sculpture. The image was taken back into Photoshop (now as a 16-bit psd file) to add OnOne PhotoFrame acid burn controller 06 (see sidebar for website in my Tidbits Blog), which could have also been added in Lightroom. The Nik plug-in could have been added in Photoshop and a Smart Object used to save the setting – instead I created a Note in Photoshop to recall how the settings were used used in Lightroom.
…..
What is absolutely amazing about this addition to Lightroom is that the images are so sharp and clear with little noise especially in the skies like you get with the other HDR processes. It is totally amazing that neither of these images had any sharpening or noise reduction applied. Wow!

Here is my first attempt at creating a 32-bit image using three bracketed images hand-held of the beach on the perimeter of the Hilton Waikoloa Village – not a very good place to sunbathe but nice and breezy. No other plug-ins were applied to this photo. I was major happy how clear and sharp this image came out. The frame was created using the layer style instructions for my Digital Lady Syd’s Free Layer Style Frames – colors can be sampled from image and changed out easily.
What is happening here is that inside Lightroom you select your bracketed images, right click and Edit In – Merge to HDR. This opens up the HDR program in Photoshop where set the tonemap setting to 32-bit, not 16-bit. Next check the Remove Ghosts box. Close and if you do not have your Preferences set up in Lightroom to save your HDR’s as TIFF’s, you need to do a Save As, name file, and select TIF as your format to bring back into Lightroom. Once back in Lightroom you are free to use all the sliders available to create the look you want on the 32-bit image. The image can be taken back into Photoshop to add your framing or plug-ins if you want, where it is now back at 16-bit mode.
…..

I am still amazed how great these images are looking. This image is of some colorful plants at the entrance to the Lightner Museum, in the old Alcazar Hotel, St. Augustine, Florida. After processing as a 32-bit image in Photoshop and bringing back into Lightroom, the image was taken back into Photoshop and the new Topaz photoFXlab v1.1 plug-in (see sidebar for website in my Tidbits Blog) was opened and the Dynamics slider applied at 55. I also removed a very small amount of noise with Imagenomics Noiseware. This is my free Thin Double Edge layer style frame (see link above) with colors sampled from the image and that was it. This image is incredibly clear!
…..
 My last example once again was processed in Lightroom as a 32-bit hand-held HDR. I did apply a little Nik Color Efex Pro 4 Detail Extractor to the gargoyle only to sharpen it a little. No noise reduction was applied, only my Thin Double Edge Frame layer style applied to the image. Very easy. This image was taken at Flagler College (the old Ponce de Leon Hotel) in St. Augustine, Florida.
I am going to have to go back through my old HDR images and update them. This process is totally amazing if you want a very natural HDR look. Wonderful new feature! It is a pretty easy procedure to follow and the results are definitely worth keeping!…..Digital Lady Syd
Digital Lady Syd Related Blogs:
32-Bit HDR Using Lightroom and CS6
Showing Off Your Images with Lightroom

Thought I would keep it simple this week so here are some nice templates that can be created in Adobe Lightroom 3 and 4. This image is basically a 4-image triptych. It was a lot of fun playing with the different flower effects but I wasn’t quite sure what to do with the images after I finished them – as it turned out, this Lightroom template created a nice way to show them off! If you have ever played around in the Print Module of Lightroom, then you can see it is not too hard to create this type of template and then save the resulting image in the Print Job section as a “Print to JPEG File.” And this is one of the reasons I like processing my images in Lightroom over just using Adobe Camera Raw (ACR) in Photoshop.
For processing of the yellow dahlias in Photoshop:
1st image: Just lightened up the image and applied two Flypaper Textures – Chatsworth Taster and Apple Blush Taster using Russel Brown Texture Panel. (See my blog Russell Brown’s Paper Texture Panel Updated!)
2nd image: Topaz Black and White Effects. See side panel of my Tidbits Blog for website link.
3rd image: Used Nik’s Color Efex Pro 4 and stacked these filters – Film Efex Vintage using Film Type 8, Colorize using Method 6 and a light blue color, and Vignette Blur using Type 3. I loved the dreamy look these filters created.
4th image: Used two different Hue/Saturation Adjustment Layers and two Curves Adjustments Layers and with their layer masks, selectively painted out areas to get the effect I wanted.
…..

This group of images was put together in Lightroom 3 a couple years ago – these signs are from the Jacksonville Landing along the St. Johns River in Florida during one of Scott Kelby’s PhotoWalks (if you get a chance, go do one – they are free and a great way to meet local photo types like yourself). Photoshop Guy Matt Kloskowski, who runs the Adobe Photoshop Lightroom Killer Tips website and blog (it is the best one on Lightroom you will find), offered a free Lightroom Print Preset – Multi-Photo Portrait Grid. I used it here although I had some trouble lining up all the photos the way he did since I use a Canon printer and not an Epson (it uses a page set up which makes it line up different). Still I was able to get this result which I think turned out rather nice.
…..
 Here is another example of using the above preset from Matt to create a little different appearance. A trick to adjusting your image inside the cell once placed is to remember to hold down the CTRL key so the cursor turns into the Hand Tool. You can send unused cells to the back by right clicking in the cell. Also, it is best to create a Quick Collection of the images you think you might want to use (click the little circle in the upper right corner in the Library module) so that they are all in one place for adding to the template. All these images are from previous posts – all but the boat image were done using just Photoshop brushes creatively. (See my blogs Brushing up on Circles!, Create a Winter Scene with Photoshop Brushes and Textures and Tree Brushes and a Little Grunge.
…..

The instructions on how to do the above template are in Scott Kelby’s The Adobe Photoshop Lightroom 3 Book for Digital Photographers where he takes you through the process step by step. He also shows you how to make the top template along with several others. His Lightroom books are the best!
……
I did a Tidbits Blog a while back called Five Image Template Creates Beautiful Collection! that shows another way to do this with templates in Photoshop.
Also I did a free download timeline template for Facebook a couple weeks ago that uses Photoshop to add seven photos as your header – see
Free Timeline Cover Template for Seven of Your Images. An example of how this turns out is shown below.

…..
Lightroom and even Photoshop makes it really fun to show off your images and both use very similar techniques. Sometimes just printing the one image does not look quite right, but putting several in a template as shown in these examples can get some really nice results…..Digital Lady Syd
