
A FEW NEW SELFIE AI TRICKS
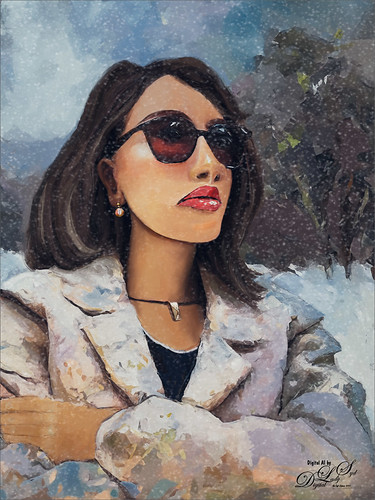
For a few weeks I have been working hard on getting an AI generated effect I like. Still using my same selfie image from previous selfie posts which has helped me figure out what works and what does not on AI portrait images. All of the selfie variations were created by using a prompt “Oil Painting,” but some had more specific information added to the field. This image uses the same brushes (I relisted them at end if you want to see them along with a new Smudge Brush.) Below are the steps that work really well to get some interesting portraits to paint.
Steps for Creating Portraits From Selfies:
- Open selfie. If you want the person to be generated, after you run Dave Kelly’s free Gen Fill Photo Painting Action (usually set to GF Painting 40 for the effect shown in my selfie images – really need to use Dave’s action as it is so easy to use and be sure to try his different Brightness amounts), the selection is the whole image.
- To get a good portrait result, need to either go to Select -> Subject and OK to discard your current selection, or use the Quick Selection Tool or the Lasso Tool to subtract from the selection to get just the subject selected. Run Generative Fill and look at your variations. Can Generate as many as you want.
- Choose a variation you like and run Apply Image (add New Layer and go to Image -> Apply Image and OK) to put it on a new layer. See my last blog Placing Any Photoshop Generative Fill Variation on a Layer Easily.
- For creating a background, in the Generative Fill taskbar select Subject and Invert Selection – in prompt field type what text for type of background wanted. Can change the prompt to read anything and use any type of style. The prompt used here was “oil paint snow scene.”
- Create another Apply Image on a New Layer placed above this layer to create one with these variations merged into one layer.
- Turn off all but the top layer so the brushes used to clean up the image will work faster. On another New Layer above just start painting and have some creative fun!
Some Selfie Tips
- If you want to use Generative Fill to change something like her lips, which were changed from the original variation on the above, select around the lips with the Lasso Tool and run Generative Fill – the prompt used here was “oil painting lips” and three variations appeared. Add a New Layer above for another Apply Image layer, but this time instead of using the default Merged Layer, open the drop-down and select the Generative Fill lips layer. The lips will now appear on its own layer and can easily be manipulated. In this case the lips were reduced a little in size, and a layer mask was applied so just part of the new lips were added into the image. Be sure to turn off the Generative Fill lip layer to work on the Apply Image lip layer. Used paintbrushes on another New Layer above the lips to blend everything together.
- Another really great tip for cleaning up these AI images, which usually have strange things going on in certain areas like the face, is to use Photoshop’s Liquify filter. This image used the Face-Aware Liquify section for the jawline to make it a little less harsh and on the nose, and the Pucker Tool to adjust a little from her ear. This is so incredible!
- It is easy to add jewelry to your subject – just make sure you have a Lasso selection exactly where you want the jewelry to be added. I had trouble getting her necklace to look straight on this image – AI kept making it squiggly. Finally got a selection to fit properly. Used in prompt “oil painting diamond pendant,” and for earring used “Oil Painting Earring” – neither is exactly what I had in mind, but they look pretty good.
- One last thing, 5 AI Generations were run on this image – background, lips, nose, pendant, and earrings. In all cases, an Apply Image was created (just highlight right above the generative fill layer with the correct variation showing), and the original AI generated layers were placed in a turned off group (might want to use a different variation later or rerun the Apply Image if you really mess up the image). Only used the Apply Image layers as the working layers.
- When painting, be sure to go between the regular paint brushes, Mixers and Blender brushes, and Smudge brushes. I am constantly going back and forth. I have my Mixer brush set to A and Smudge Tool set to U in the Keyboard Shortcuts so I can flip between them quickly. And if a brush does not look right, change some of the settings like the spacing or the Angle Jitter Control or Scatter Amount. If you like the brush, just create a brush preset in the Brush Panel.
To finish off the image, just used my regular photo workflow: Black & White Adjustment Layer, Color Lookup Adjustment Table using 3D Lut File FoggyNight from PS at 55% layer opacity, and a Curves Adjustment Layer. The Snow Overlay is from a free set I created at deviantArt – PNG files so no blend mode needs to be used, just adjust the layer opacity (50% here) and use a Layer Mask to remove snow off certain areas with a brush.
All these images were created from my same selfie image and I keep going back to it to run more variations. Once you find a good selfie to use, it seems logical to use it as the template for other images. Hope this blog made this seem a little easier – it is really fun to do!…..Digital Lady Syd
Painting Brushes I am Using for these Selfies.
Using mainly five brushes:
I like Kyle’s new Fall 2023 brush Great Brush (changed Flow to 54% and Smoothing to 12% in the Options Bar) using a small size for adding clumps of color.
Grut’s Watercolor Late Never brush modified to work as a regular brush blender – works fantastic (here are the settings if you want them: I call it “SJ – 36% Blender for face-from Grut-W Late Never.” set brush in the Options Bar to Size 35 pixels, Mode Normal, Opacity 36%, Flow 100%, Airbrush icon off which is the Buildup in Brush Settings Panel. Then in Brush Settings Panel set Shape Dynamics Size Jitter 0; and uncheck Buildup (should be off if Airbrush icon off in Options Bar) and Protect Texture (not sure why this is even on). I have several variations of this brush, but this one is best for blending, especially with the Great Brush – just sample and blend between colors to smooth them out.
David Belliveau’s free Mixer Blender at 15 px
Fay Sirkis Mixer brush called Short Streaky Detail Blender (not sure it is still available anymore) – any small detail brush mixer would probably work to get the hair look.
Smudge Brush was created using Kyle’s All Purpose Blend Smudge Brush and turning off the Spacing in the Brush Tip Space Brush Settings Panel, Shape Dynamics (no Size Jitter and Control for Size Jitter), Angle Jitter set to 3%, and Angle Jitter Control set to Direction; Transfer checked with 0 Strength and no Control; Noise checked, and in Options Bar Strength set to 92%, and Sample All Layer (check or not) – I named this brush SJ-Painterly Smudge Brush and used it on the background. The cool thing about this brush is that if the ALT key is held down when starting to blend, the Foreground Color appears – this is great for adding in a little color to accentuate the blending. Used this brush to blend some of the harsh lines created in the background on the above.

Pingback: CREATING AN AI SELFIE? | Digital Lady Syd's Fun Photoshop Blog
Pingback: PLACING ANY PHOTOSHOP GENERATIVE FILL VARIATION ON A LAYER EASILY | Digital Lady Syd's Fun Photoshop Blog
Sounds like you’re having fun! I really like the textures and colours in the coat – very painterly!
11/27/2023 at 11:20 am
Thanks Ann. Working hard on getting some results that are not totally AI looking but have a bit of a realistic twist to it. It is fun working on my selfie “fan base” – HaHa!
11/27/2023 at 12:53 pm
🙂
11/28/2023 at 5:37 pm
Pingback: A GOOD USE FOR AI? TO LEARN PAINTING TECHNIQUES | Digital Lady Syd's Fun Photoshop Blog