
HOW TO USE THE SMUDGE TOOL
 This week I am including one of my previous Tidbits blogs on the Smudge Tool that I ran a couple years ago. Since I have recently started experimenting again with the Smudge Tool, it seemed appropriate to share that info along with some new tips. And yes, there is still a lot of confusion regarding the Smudge Tool and the newer Mixer Brush Tool.
Smudge Tool Tips
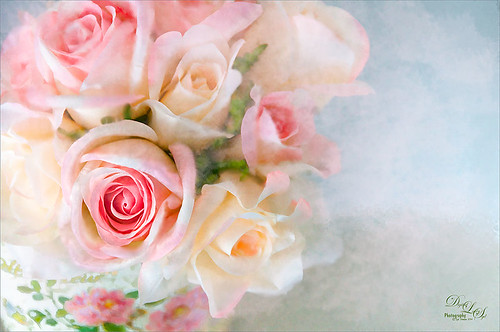
The image above is a good example of using a combination of the Smudge Tool on edges, a Regular Brush Tool for the texture, and Topaz (for website see my Tidbits Blog sidebar) Simplify 4 to overall soften the image. I rarely use just one tool in Photoshop to get results. In this case, the Smudge Tool was set to the Rough Smear Brush – this is apparently a legacy brush from CS2. (To create in Brush Panel start with the Spatter 59 brush and set spacing to 2%, in Scattering section set Scatter to 30% and Count to 1, and check the Transfer and Smoothing sections. In options bar set Mode to Normal and Strength to 80%. Check Sample All Layers if needed.) This brush provided great results for softening up the harsh edges of the flowers and lines where floor and wall met. Many people use a Stipple, Chalk or Pastel brush to start with and create their own Smudge Tool brushes. The image looked really nice just doing a bit of clean up with the Smudge Tool. This is one of the strengths of this often overlooked tool – does a fabulous job of smoothing edges and to me it seems a little faster than going into the Mixer Brushes, which also does this. Try using a short dabbing stroke to get this soft effect. (Other steps: A New Layer was created above and using my favorite Chalk 60 pix brush with Angle Jitter set to 19% in Shape Dynamics, a texture was applied using the brush at a very large size at 20% brush opacity. The last step involved adding a Topaz Simplify effect to just give the whole image a brighter color. You can also add another New Layer and do more Smudging to get the final look you like. This was so easy and pretty simple to do.) These flowers are from Michael’s Arts and Crafts Store – a nosegay in the bridal flowers section placed in a little tin vintage style bucket. Check out the next Section’s image description to get a few more Smudge Tool use tips and what the Strength field in the Options Bar does.
The Photoshop CC Manual offers a couple tips: (1) Select Sample All Layers in the options bar to smudge using color data from all visible layers. If this is deselected, the Smudge tool uses colors from only the active layer. (2) Select Finger Painting in the options bar to smudge using the foreground color at the beginning of each stroke. If this is deselected, the Smudge tool uses the color under the pointer at the beginning of each stroke. (3) Drag in the image to smudge the pixels. Press Alt as you drag with the Smudge tool to use the Finger Painting option. My basic understanding is the the Finger Painting option is not very useful and not used often.
The Smudge Tool can also be very useful on a layer mask to make subtle changes by nudging the edges using a Strength of 50%, Hardness of 0% and Mode of Normal. Try setting the Mode to Darken to push edges inward or Lighten to push edges outward.
Which Tool to Use – the Smudge Tool or the Mixer Brush Tool?
The next section is the content of my previous blog that helps explain a few more things about these tools.
 I ran across an old tutorial that was in the very first Photoshop Creative magazine back in 2006. It was on how to create a digital painting by using the Smudge Tool. Well that was something I had to try out – couldn’t believe I had not tried this before! I really like the Mixer Brushes, which is what I usually use (see my blog Adobe Photoshop CS5’s Mixer Brushes). Once I started playing around with the Smudge Tool using different brushes and sizes and opacities, it was actually fun. My curiosity got the best of me and now I needed to know what IS the difference between the two tools – they create very similar results? I was able to find a reasonable answer on the Internet at Model Mayhem.com. Here is what they said:
“The Smudge Tool simulates the effect you see when you drag a finger through wet paint. The tool picks up color where the stroke begins and pushes it in the direction you drag……The Mixer Brush simulates realistic painting techniques such as mixing colors on the canvas, combining colors on a brush, and varying paint wetness across a stroke.”
I think this is a nice short explanation of what is happening. [Added in new: One of the other big differences is that the Smudge Tool cannot apply color while the Mixer Brush Tool can. The Regular Brush Tool must be used to add color on a layer and the Smudge Tool will then blend the colors with those below.] For my Peach Dahlia I found it was nice to use both tools. It seemed it was easier to blend colors with the Mixer Brush and then smooth edges and shape color using the Smudge Tool. The Photoshop Wow Book for CS3 and CS4 (still my favorite Photoshop book) had a nice section on painting with the Smudge Tool. They recommended using the Natural Brushes that come with Photoshop and start by using short strokes, which samples the color underneath more frequently. Then use a small brush size for detail.
To create this image, first a blank layer was placed on top. Then these two brushes were used to paint: Mixer Brush – created Tool Preset brush with these settings: Stipple Dense 26 pixels from Natural Brushes set (Options Bar: No Current Brush Load, Load the Brush After Each Stroke, Wet 100%, Load 1%, Mix 91%, Flow 100%, Check Sample All Layers). Smudge Brush Tool Preset created using Stipple 54 pixels from Natural Brushes preset with Options Bar set to Mode Normal, Strength 78%, and Checked Sample All Layers. Be sure to save these brushes as Tool Presets so the Options Bar settings are retained – if just saved as brushes, the settings might not be correct. Also, note that if the Finger Painting box is checked in the Smudge Tool options bar, the smear stroke will start with the Foreground color. If turned off, the color under the cursor is sampled first. At 100% Strength, only the first color sampled is applied – at lower settings it fades out the first color and picks up the new one. Then I just alternated mixing and smudging until I liked what I saw. The last step involved adding three textures to the image to give a real painting look: the first one is a light gray canvas texture (I created it by taking a picture of a portion of the canvas on a large oil painting in my dining room – try this – you might really like the results) set to Soft Light at 53% opacity; next ShadowHouse Creations Old Photo 2 set to Overlay at 100% opacity – it provides the interesting edging on the image; and Flypaper Textures Aquaflora taster set to Overlay at 80% opacity. I painted out a little bit of the texture on the top two textures just to direct the eye to the center of the flower. A Curves Adjustment layer was added on top to give just a small contrast boost.
Art History Tool and Smudge Tool Image Frame
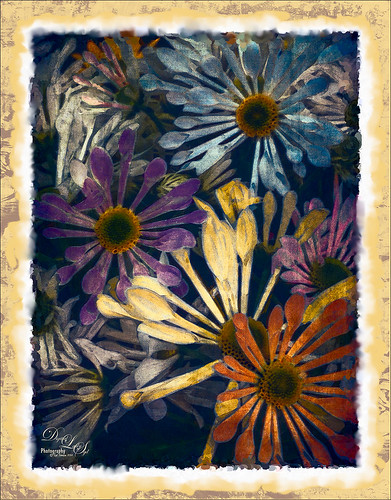 This image is an example of how an image border can be created using the Art History Brush and the Smudge Tool together to get a pretty effect. Basically the technique involves increasing the size of your image by 2 inches all around and creating a Layer Snapshot from the Current Layer in the History Panel. Now just start painting the inside and/or outside edges to get a nice effect. Then use the Smudge Tool – selecting a stipple brush in this case – to smooth the edges. I painted a texture by creating a New Layer and painting with a grunge brush in purple to add some interest to the frame. It is also a good example of how the Smudge Tool can be used to smooth edges. For more info on how to do this, check out the book Beyond Digital Photography by Cher Thereinen-Pendarvis and Donal Jolley – an excellent reference book. Also, these flowers were white daisies that I shot in the grocery with my phone and turned into colorful flowers using 6 Color Fill Layers and Topaz ReStyle plug-in set to Wedgewood Blue and Tan preset.
I am finding I like the Smudge Tool and learning something about it! It is really quite versatile and can give some beautiful painterly results…..Digital Lady Syd
Digital Lady Syd Related Blogs:
Smudging Those Petals!

Thanks for these in-depth discussions. I like to see what someone else is doing with the tools and how I can adapt them to Painter 12 and PSPX (my programs of choice) and I think this is very adaptable!
03/29/2014 at 11:52 am
Thanks for the comment Bonnie. I am just getting into Painter X3 – it is like learning Photoshop but with totally different little quirks! Since my New Years Resolution this year is to learn Painter, I hope to bring more tips to the blog on how to use both programs together effectively. Not completely sure how PSPX works, but I believe it is similar to Photoshop so most of my info will probably work in your program. From what I understand, the Smudge Tool was the basis for which Photoshop’s Mixer Brush was created, so it is not surprising that it gives such good results. Digital Lady Syd
03/31/2014 at 4:26 pm
Pingback: » Smudging Those Petals! Digital Lady Syd's Tidbits Blog
Pingback: HOW TO USE THE ART HISTORY BRUSH-IT REALLY PRETTY NICE! | Digital Lady Syd's Fun Photoshop Blog
Pingback: LOOKING AT THE SMUDGE TOOL – AGAIN | Digital Lady Syd's Fun Photoshop Blog