
HOW TO CREATE AN IMPASTO TEXTURE LAYER STYLE
 This week I am just going to show you how easy it is to add an Impasto Layer to your image to get that added painterly effect. In the past many people were selling these layer styles but it seems to be out of vogue now and they are really easy to create once you understand the steps required. The above image of the Statue of Boadicea in London used three different layers and layer styles to create the unique texturing that appears on the horses and on the people riding in the chariot. First some major clean up was done and a visit to Topaz (see my Tidbits Blog sidebar for website link) Studio to get the wonderful AI Clear applied. I wanted to add an interesting story to the shot so one of my textures that had a lot of color and action in it was added on top and set to Linear Burn at 59% layer opacity . Next the Layer Style textures were added. I decided to create a video describing the steps so you can see how the layer style effect develops.
The basic workflow on creating an Impasto Effect Layer Style is as follows:
- Add a New Layer on top.
- Select a brush you think would work in your image. To start I used the Aploosa 2 brush from a Horse Pattern Pack by horsecrazy at 20 pixels for painting over the horses – you do not have to use this brush. With any brush set to 100% opacity, just dabbed over part of the image that would look good with some impasto effect applied.
- Double click on the layer in the Layers Panel to open up the Layer Style dialog and set the Fill Opacity to 0. Next click on the words Bevel & Emboss. Set the Reset to Default button at bottom and change these settings in the Bevel & Emboss Style: Depth 115, Size 4, Highlight Mode Linear Dodge (Add) and Opacity 20%, and Shadow Mode Linear Burn and Opacity 28%. Now check the Contour box and use the default. Now check the Texture box and open up the dialog – set the Pattern – a Washed Watercolor Paper texture (to load go to the drop-down by the pattern swatch, click on the wheel on the upper right for drop-down, and select Artist Surfaces set) was used for mine, but one you like is fine. Set the Scale to 100 and Depth to +100%.
- Click the New Style button on the right and name your style – mine was named SJ Basic Impasto Layer Style. Now if you click in the Style section at the top of the Layer Style dialog, the new layer style will be at the bottom of the list. I also saved mine to the my library.
- Your dabs on the layer should show some Impasto.
The Texture in the Bevel & Emboss style can be changed to get all kinds of patterns and lines – that is how the background got created in the flowers below. All the sliders in the Bevel & Emboss dialog can be changed to get very different results. Once you start playing with this, it is an amazing way to add texture to a whole image or just a little part of it. And like what was done in the image above, different layers can be used to add different textures in the image. The texture in the brush is usually different from the one in the layer style that creates an even more interesting result. I tried stacking two different impasto layers with different textures and got some very nice effects. And don’t forget that the Pattern can be scaled and dragged around on the image, and the Depth sliders can make a big difference. The actual layer opacity can be changed if the overall effect is too strong. Oh yes – try different kinds of brushes to paint the impasto onto the layer – those with lots of texture can look really great. Lots of fun here!
A couple things to Note:
- If your brush has a different texture that is not in the pattern list, open up your Brush Panel and in the Texture section there is a little square icon with the corner creased – hover over it and it says “Create a new preset from the Current Pattern” – just click it and the texture will be added to the Pattern list at the bottom. Now you can set the Bevel & Emboss texture to the same pattern if you want.
- Also, if you have textures that are not .pat files, just open them in PS and go to Edit -> Define Pattern, name it, and it is placed in your Pattern list with the .pat extension. Anything can become a pattern very easily.
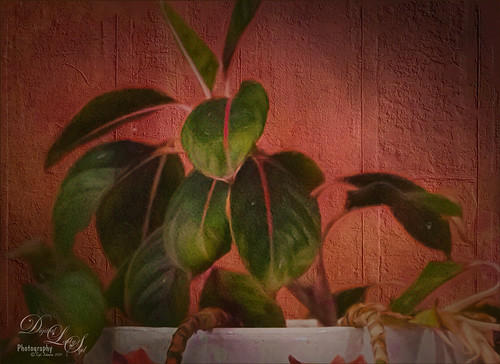 Here is the finished version of the plant shown in the video. As promised the background pattern was created with Texture.com bronze copper texture (no longer free I think) it was converted to a pattern using the Edit -> Create Pattern command (see Note above). If you have a similar type texture, try converting it. The leaves used a PS patterned texture called Ant Farm that created this rather incredible pattern on the flowers when painted with Kyle’s Spatter Brush Supreme Spatter & Texture, a PS brush. The Ant Farm pattern is found in PS’s Patterns set (right click on the upper right cog to add). Just some spotlighting and vignette were added to this image.
Hope everyone sets up one of these layer styles and tries painting on the layer. Check out my Tidbits Blog for another example I will upload on Tuesday. It is quit an interesting look and can really perk up an image. In the meantime, get through these wintertime blues. Have a great week!…..Digital Lady Syd

Excellent tutorial! That’s a great way of adding a more interesting background…all sorts of other possibilities too! 🙂
01/27/2019 at 5:44 am
Thanks Ann – glad you liked it.
01/27/2019 at 9:29 am
Pingback: » My Bird Buddies Digital Lady Syd's Tidbits Blog
I always enjoy learning new ways of post-production with you. Thanks also for the video, makes it visually much clearer.
01/30/2019 at 5:31 pm
I appreciate the nice comment Otto. Coming from you is a real complement.
02/01/2019 at 12:38 pm
A very useful video. Thank you for your tutorials and tips!
02/11/2019 at 10:21 am
Thanks Inese!
02/11/2019 at 2:02 pm
Pingback: DIGITAL LADY SYD’S BEST PHOTOSHOP TECHNIQUES FROM 2019 | Digital Lady Syd's Fun Photoshop Blog
Pingback: HOW TO CONVERT BLACK AND WHITE IMAGES TO COLORFUL PAINTINGS WITH TOPAZ STUDIO 2 | Digital Lady Syd's Fun Photoshop Blog
Pingback: » Cherry Blossoms Digital Lady Syd's Tidbits Blog
Pingback: CREATING AN AI SELFIE? | Digital Lady Syd's Fun Photoshop Blog