Tips for Flower Textures
I have been enjoying adding textures to the beautiful flowers on my porch. Thought I would share where I got some of the textures and some of the techniques used.
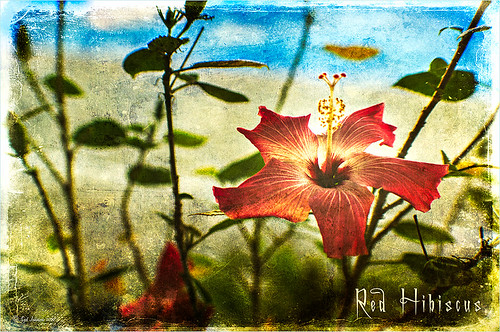
 Three textures created this beautiful effect. The textures used were: ShadowHouse Creations Oil Painting 1 set to Overlay at 100%, ShadowHouse Creations Faux Marble set to Hard Light at 21%, and Blue Color Fill Adjustment layer set to Normal blend mode at 43% opacity and stacked on each other. Using a Color Fill Adjustment layer is an easy way to change a texture to a color you like – this image was very greenish colored from the Faux Marble texture but the adjustment layer was added to turn it into a color combination I liked. Also, the layer mask was painted in to give a bit of a spotlight effect on the flower so it stands out a little more in the image.
…..
 For this image I followed a ShadowHouse Creations tutorial called “Applying and Blending Textures Tutorial” which lists all the textures used in this image and where to download them. This is a very easy technique and I think it turns out quite nice.
…..

Two of my favorite textures, Oil Painting 1 and Marshmellow Skies, by ShadowHouse Creations were used on these pink daisies. The trick to getting a nice blend of textures is to try different blend modes at different opacities and to use layer masks and paint with a very low brush to blend carefully to clear the texture in places that are too heavy. The above image took quite a few attempts until I liked the way the textures blended together. Also, be sure to do all the clean up and color work on your image first and create a composite layer (CTRL+SHIFT+ALT+E) on the top of your layers before adding your textures. This way, if a color is really not working, you can go back to the original corrections if you have to and create a new composite.
…..

This yellow daisy was processed in OnOne Software Perfect Effects program (see sidebar in my Tidbits Blog for website link). It has some great features once you learn how to use them. In this case I layered two presets on top of the original photo – in the Color & Tone category the Tonal Contrast preset and in the Textures category called Warm Swirl. All their presets can be adjusted for your image by going into the Effect Options and applying different drop-down settings or adjusting sliders. Also, you can use the Brush Tool or the Mask Bug to paint in or paint out the effect and at different opacities. OnOne PhotoFrame acid burn controlled 11 was applied and it added more texture around the edge.
…..

This image uses three free textures all by Shadowhouse Creations – Aged and Distressed Vintage 1, Oil Painting 3, and Attic Treasures Creative Texture 7. All his textures are beautiful and he has great tutorials on how to combine the many textures. The first texture was added into a layer mask by opening up the texture in it own document, CTRL +A and CTRL+C to select and copy the texture; ALT+Click on the layer mask to make the layer white; and CTRL+V to place the image into the layer mask. The other two textures were added above and a layer was added with the Snow Drops brush by Frostbo.
…..
With textures there are so many choices – you can make them, find them in plug-ins, and find them on the internet. The more your work with textures, the better you get at applying them. The above tricks really help – the opacities of the layers and brushes are crucial to get a smooth blend. Try out some of these resources and see if you like them as much as I do. Sometimes an image can be perked up with just a bit of textures…..Digital Lady Syd
Digital Lady Syd Related Blogs:
Adding a Texture for Flair!
More Texture Fun!

Pingback: » More Texture Fun! Digital Lady Syd's Tidbits Blog
Pingback: Russel Brown’s Paper Texture Panel – A Real Winner! « Digital Lady Syd's Fun Photoshop Blog
Pingback: Russell Brown’s Paper Texture Panel Updated! « Digital Lady Syd's Fun Photoshop Blog
Pingback: » Soft Bokeh Texture for a Flower Image Digital Lady Syd's Tidbits Blog
Pingback: Creating That Vintage Texture Feel « Digital Lady Syd's Fun Photoshop Blog
Pingback: Texture Resources – So Many Choices! So Many Choices! | Digital Lady Syd's Fun Photoshop Blog