
Using a Template to Create Your Own Unique Valentine

I had a hard time coming up with something to write about this week – writer’s block or creative block or something! Then I came across JennyW47 Flickr site where she used a pretty basic template to create a very cool look. This sounded like a lot of fun so I created two images using a template I created with some different ways to use it. I thought I would teach you how to create it (or download mine if you like), add photos to it, and then make it your own. So lets get going.
Basic steps to creating a template:
1. Create a New Document that is large enough to hold all the photos you want to add. Mine was set to 8 inches X 12 inches, a fairly standard size that will still print out on my printer. To make the document fit on a 4 X 6 inch card, go to Image -> Image Size and change the Width to 4 inches and Height to 6 inches (or change inches to percent and set 50 for both width and height).
2. Create a New Layer.
3. Go to the Rounded Rectangular Shape Tool (in Tool Group with Rectangular Shape Tool) and in Options Bar, change these settings:
– Pixel to Path
– Click on the Gear icon (just to the left of the word Radius) and select Proportion or Fixed Size if you want the template openings to be an exact size. My top opening is set to 7 by 5 to fit that size image. I also check From Center in this box. There are also two square boxes and set to 3 x 2 proportional.
– Set a Radius – I used 30 px to round the edges.
3. Now click in your document and drag out to set shape on your page.
4. Go back to Options Bar and click on Make: Selection button – it turns it into a selection.
5. Since I had my Foreground and Background colors set to black and white, I just clicked ALT+BACKSPACE to fill with black and CTRL+D to deselect the selection.
6. Create a New Layer and repeat process.
7. When finished save the document as a PSD file – you now have a basic template that can be used over and over. When Move Tool is selected, the alignment icons are available so you can make sure the edges are lined up by selecting the affected layers.

This is what my final template looks like for the top image. It is a pretty simple process and you can make many different types of templates. You can even use the Custom Shape tool to create interesting shaped openings.
You may download this PSD template from my Deviant Art page here. Also included is a basic PNG file where the images can be just dragged and lined up under the openings, but there is no easy way to adjust or remove the openings as I will be discussing for the PSD template below. Enjoy!
Steps for adding images to your Template:
Adding images to your templates is pretty easy.
1. Open up the template in Photoshop and in the Layers Panel, highlight the layer where you want your first image to go.
2. Open up the image you would like to add in another window in Photoshop, and then move the image into your template. If your image is a PSD file, I would recommend flattening a copy and save as a JPEG, the move the file in. To do this, select the Move Tool, grab you image (NOT THE LAYER OR THUMBNAIL which I keep doing!), and drag to the Template Image Tab – it will open up this image and you let go of your mouse and drop it. Use the Move Tool to adjust it over the opening the best you can. If you do have a PSD file and you only want to move a layer over, just make sure you have the layer highlighted in the Layers Panel and do the same steps to move it in.
If you are in Adobe Bridge, right click on the image and select Place -> In Photoshop. It opens up as a Smart Object which I always Rasterize right away since you do not need that capability and it gets in the way. Just right click on the layer and select Rasterize from the menu. Can also just go to the Menu and select Layer -> Rasterize. If you Place a PSD file, if you click on the smart object icon in the Layers Panel thumbnail, it will open up as a separate document with all your image layers showing. If you Rasterize it, you will lose that capability and it will be converted to a single layer.
3. Next I clip the image to the black rectangle layer. The easiest way to do this is to highlight the image, ALT+Click between the layers and now you see only what the black box will let you see. If this makes you nervous, highlight the layer, go to Menu and select Layer -> Create Clipping Mask. Note you can clip more than one layer to a bottom layer – New Layers, several Adjustment Layers, and other image layers can all be clipped at the same time.
4. In most cases what you are bringing in will be too large or small. Just click on the image layer and press CTRL+T to Free Transform (in Menu go to Edit -> Free Transform). If you want the image to stay exactly to scale, hold the SHIFT + ALT keys and pull or push on a corner to adjust it. If it is close or does not matter, just drag the edges in and out.
That’s it! You just keep bringing in images and lining up with which ever rectangle you want to fill.
Steps for making the Template your Own:
This is the fun part. There are not major rules to using this template. The image at the top follows the template openings pretty closely but you can see the bottom image does not look like I used the template at all, but I did – there are ways to make the edges disappear.
Let’s talk about the basics in the first image. I wanted to have a theme with my beautiful tulips I bought at the grocery a few weeks ago. I spent a lot of time photographing them and playing with my camera settings, so I got some really nice shots and thought they would create a nice grouping for the template. I am going to go through each element for you.
- The top image was one I created using a different phrase and in very soft light colors. I changed all that in Photoshop before placing in the template – just to help you out I found the Valentine phrase on a blog called Best Valentine Day Quotes and Phrases to Make Her Melt. I actually used a textured background I created in the image. I saved down a copy as a JPEG to drag into the template. Just followed the steps above to add the image.
- Next a close up of my tulip was added – it was also processed first as an image and then brought in. It used one of my favorite textures by Melissa Gallo’s Painted Textures Taupe Canvas, a Black Friday purchase, which gave the beautiful white painterly streaks.
- The pink and white heart image was created using a texture from French Kiss called Pink Corel (and is a free download – scroll down to the end of the article which is very interesting) and Obsidian Dawn’s Hearts Glitter brush using white and a size of 1200 pixels was painted on top of the texture. That was it and it looks so pretty.
- First Brush Hearts brush 11 was added on its own layer in a light pink corel color and was clipped (see Step 3 above on Adding Images to Template section) to the bottom left rectangular layer. I then pasted my flowers (that I selected in one of my tulip images) and used the Warp Tool to make them fit into the Heart that was painted into the opening. A layer mask was added so the flowers would pop out over parts of the heart.
- The little pink heart in the middle was just a New Layer set on top of the layer panel and the Custom Shape Tool was selected. In the Options Bar set the mode to Path and in the Shape field, click on the down arrow and select the Heart that comes with Photoshop. Just drag out to the size you need. A Stroke Layer Style set to light pink and 16 pixels was added. (See last bullet below on how to do this.)
- The Floral Valentine graphic on the left of the bottom opening is a Flowers Swirls Hearts Brush – Sampled Brush 5 with an angle change and set to 506 pixels. The brush layer was copied and each was set to a different color using a Color Fill Adjustment Layer. Then a black layer mask was applied to the top floral graphic and the hearts and flowers were painted back so they appear in a different color. Pretty easy way to get two different colors to show up.
- I decided the image would look best with a black background so at the bottom of the layers panel above the white background layer, I added a New Layer and filled it with black (from Menu go to Edit -> Fill and in Use: set Black.
- To add just a touch of color and detail to the background, a New Layer was added above the black layer and the same Flowers Swirls Hearts Brush-Sampled Brush 5 that was used the Corel Texture image and on the Teddy Bear image below was added with a soft pink color and painted to peek through the sides. The opacity was set to 68%.
- The font is one I bought from Cosmi in the 1990’s – not available anymore but you should be able to find a nice font, probably on your computer even if you did not download one. I like dafont.com for free ones (for personal use only) when I need a new one but there are lots of nice sites available.
- The last step was adding a Layer Style to each of the openings. To get to the Layer Style menu, double click on the Layer thumbnail in Layers Panel and you will see all the different things you can apply to the edges of the template. I just used a Stroke effect set to 16 pixels and after experimenting with several color, an orange-red color was used.
This may seem like too much work, but you do not have to do all the things I did. I wanted to show how to use different types of items in your openings. You can always increase the size of the openings or make them skinny or fat by applying the Free Transform Tool (CTRL+T) to the black rectangular layers. Using different textures and types of images really adds to the appeal of this type of image. That is what makes it so much fun to do.
I won’t go into so much detail for the image below as you probably get the idea of how to do this. Several of the elements are the same. You can see that I moved the rose box to the right (select the Move Tool, hold down SHIFT to make the move straight and drag the black rectangle over. If you have the image already added, you need to highlight all the clipped layers that are attached to the black rectangle. Notice that almost all the edges are gone – that is because layer masks were added to each of the black rectangle layers, and the edges were painted out with a low opacity black brush to remove the hard edges and make the images fit on the background smoothly. Still using the basic design of the template though.
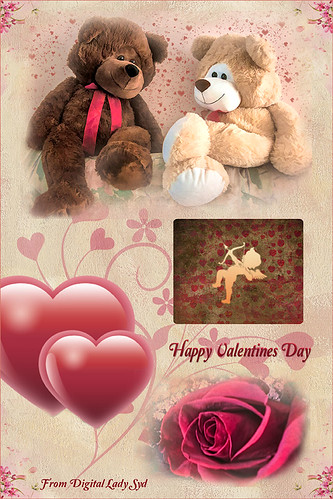 I will make a quick list of the resources I used since they may help you find some design elements you need for your own valentines. The background is French Kiss Solstice Initiation texture which really adds that sense of nostalgia to the image. On the background is a Flowers Swirls Hearts Brush – Sampled Brush 2 set to 42% opacity to just give a little design in the background. The beautiful red hearts are a PSD file from GraphicsFuel Valentine hearts card template. A Hue/Saturation Adjustment Layer was clipped (see Step 3 above on Adding Images to Template section) to the hearts and the hue set to -7, Saturation -38, and Lightness +3 to get the matching red color. The really pretty pink flowers in the corner are from Design Shub Greeting Card Valentine – just the flowers were dragged into the template and the 4 layers moved individually to the corners. The text font was rasterized in this document and brought to this file – then Free Transformed (CTRL+T) to make it fit. The Vintage Valentine Paper is by Aramisdream and the Cupid is glass prism cupid brushes CupidReq14. A Gradient Overlay Layer Style using a cream to orange gradient was used on the cupid.
I hope I have given you some ideas for creating a different type of valentine. They can be so personalized and if you just work your way from top to bottom, it is really not that hard. I had a great time creating this blog and I hope you will find it useful! …..Digital Lady Syd
Digital Lady Syd Related Blogs:
Where To Get Those Free Valentine Templates
A Few More Valentines to Make
Create a Valentine

Pingback: Where To Get Those Free Valentine Templates « Digital Lady Syd's Fun Photoshop Blog
Pingback: Using a Tych Panel to Show Off Your Images « Digital Lady Syd's Fun Photoshop Blog
Pingback: » The Polaroid Photo Look Digital Lady Syd's Tidbits Blog
Pingback: HOW TO USE A PHOTOSHOP TEMPLATE | Digital Lady Syd's Fun Photoshop Blog