
HOW TO USE THE ADAPTIVE WIDE ANGLE FILTER
 The Adaptive Wide Angle Filter is one of those darn Photoshop filters that does not seem that useful until you really need it – and then you wonder how you ever got by without it. I often just do a crop and straighten and then if my lines are still “wonky,” I go into the Puppet Warp Tool to try and fix things up. In reality, it would have been much easier to just use this handy filter that Photoshop included in its CS6 edition to adjust your image using the lens distortion – and you do not even have to remember which lens you used because Photoshop finds it and sets it up for you. Bottom line here – don’t worry about all the technical sounding things – just use the filter to straight up your lines! It works and is pretty fast. That said, check out my basic steps which will get you through the post-processing steps to get good results.
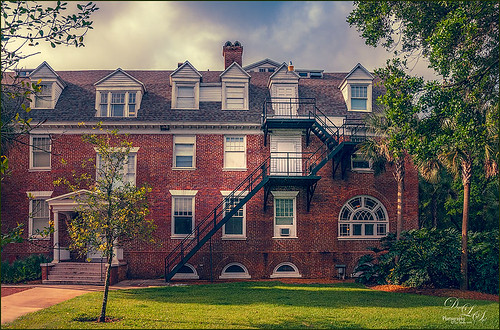
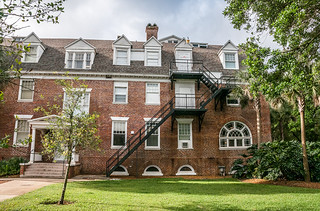
The filter was actually designed to take the distortion out of fish eye or other wide angle lenses. I think this is why I didn’t use it much – I do not use my wide angle lens much and do not own a fish eye lens, but my 18-200 mm standard zoom lens was able to use this filter effectively for the building shot at the widest angle, 18 mm. The above image is of Chaudoin Hall at Stetson University and is a great example of how an image can really get straightened out with the Adaptive Wide Angle Filter. (The beautiful vintage colors came from running the image through Topaz (see sidebar at my Tidbits Blog for website link.) ReStyle and applying the Wedgewood Blue and Tan preset.) This building was very difficult to shoot since I could not stand back from it very much, but I really wanted the image for the historic feel. It may not be perfect, but it is much better than the original image. See below for the original image and a screenshot of the filter to help see how this filter works.
Basic Workflow For Using the Adaptive Wide Angle Filter
1. Using a tip by the wonderful Russell Brown, be sure not to check the Enable Lens Profile Correction in Adobe Camera Raw or Lightroom before opening in Photoshop. But do still check Remove Chromatic Aberration since wide angle lens often have some of this.
2. Convert the image to a Smart Object so that if an adjustment is needed, the settings are still available.
3. By default the top tool, the Constraint Tool, is selected for you to show Photoshop where the issues are. Click and drag out a green line – the line will bend as you move across the object. To remove the line created, just press ALT or Delete and click on the line and it will disappear. The line can be readjusted by clicking on the end and dragging it out longer or shorter. It can be dragged all the way off the image. The circle in the middle will let you adjust the angle of the line by moving the little round handles – I found this a little difficult to use. If you want the lines to be perfectly straight, as I did in the image above, hold down SHIFT key while click and dragging to get a perfectly straight line. Vertical lines will appear as yellow and horizontal lines will be red. If you want an already straightened line to be perfectly straight, right click on it and in the drop down choose what you want – Arbitrary just removes the curve.
4. Since this filter will by default cut off your image, adjust your Scale to get exactly what you want to show up in the image. Use the Move Tool to get around the image and line up the area you want to see exactly.
5. If the Scale is adjusted, after applying the filter, the area needs to be filled in. Either crop in or use the Edit -> Content Aware Fill command. If the image is a Smart Object, it must be applied or rasterized (right click on layer and select Rasterize from menu) to be able to use the Content-Aware Fill command. Use the Magic Wand Tool to select the outside transparent areas, then go to Select -> Modify -> Expand and put in 4 pixels to help Content Aware Fill work right. (Thank you Scott Kelby for the setting.) If the area is small, just use the Clone Stamp Tool to clean up.
Here is a screenshot of all the adjustments that were made to this image to get the windows, roof and bricks to line up right. If you look closely you can see the yellow and pinkish-red vertical lines. The scale was set to 89% since I wanted the little tree to be anchored in the photo and not be cut off in the middle.

Images with no Metadata
If Photoshop has found the lens listed in its arsenal of lens, it will go immediately to the Auto button – the lens used will be listed down in the lower left corner. If there is no lens data, first flip through the Correction choices – sometimes one looks a lot better than the others. Then click on one end and then the other of something that needs to be straightened. Click in circle in the center of the line and it will bend the line so it fits. Usually this will fix the line. It can get a little tricky if not using a RAW file. When not using Auto Correction, the Focal Length slider and Crop Factor Slider (the amount sticks to the setting from the last image that used it, so reset to 1 and then adjust) are available that may help in fixing the image. To get a really good overview of how this filter works, check out Russell Brown’s A Detailed Look at Adaptive Wide Angle video that covers very thoroughly how to adjust images with no lens metadata. The shot below was taken with my phone of the glass ceiling at the Daytona Beach Airport and is an example of how to use this filter without a defined lens. Once again I used Topaz ReStyle – this time the Russet Toned Black and White preset – I think this may be the best plug-in filter for anyone doing creative work.
 Here is the screenshot of the image while using the filter. The final is quite different from where I was.

Other Good Info
A few more tidbits are discussed here about this filter that could be helpful. On the first image the windows were connected with the constraint lines going across the bricks in between. You do not always have to have perfectly vertical lines – I did for the building since that is what was needed, but there may be many cases you just need a little nudge. The Polygon Constraint Tool is used for quickly fixing something in a rectangular shape like a door or window – I have never tried this tool but it sounds like it would work.
Thinking back on it, the first image might have made a better image by shooting a couple portrait overlapping panorama shots. In fact, this is exactly what lots of people use this filter for – panoramas. There are some other creative possibilities that I have not explored that can be done with this filter. Some people have tried straightening lines that should not be straightened for a different look. Some people have used it on textures to get a special effect.
The bottom line is that next time you have a fairly complicated image to line up, check out the Adaptive Wide Angle Filter before going through a lot of steps and aggravation to get the look you want. It can be a very quick and handy tool to have in your collection of techniques……Digital Lady Syd

Pingback: » Beware of Snoozing Cat! Digital Lady Syd's Tidbits Blog
Pingback: » Where Am I? Digital Lady Syd's Tidbits Blog
Pingback: HOW TO GET A LOCALIZED BLUR IN LIGHTROOM OR ADOBE CAMERA RAW | Digital Lady Syd's Fun Photoshop Blog
Pingback: » Beautiful Clouds at Stirling Castle Digital Lady Syd's Tidbits Blog
Pingback: » Castillo de San Marcos Digital Lady Syd's Tidbits Blog
Pingback: » Mickey Shopping on Main Street USA Digital Lady Syd's Tidbits Blog