
HOW TO USE THE SUBTRACT BLEND MODE AS A SPOTLIGHT
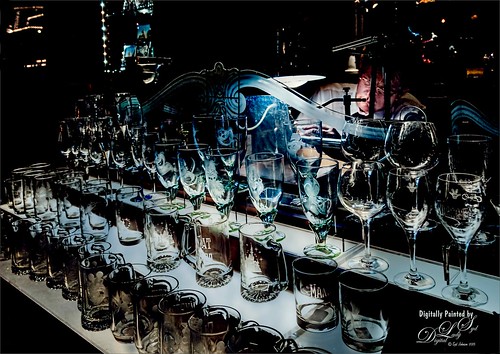 This week I thought I would post a little interesting Spotlight Effect using the Subtract blend mode that I posted in my Tidbits Blog several years ago. It is such a handy little technique learned from Calvin Hollywood, a German Photoshop guru, so I thought I would share it again. This image of the glass maker in the Magic Kingdom at Disney World is an example of how to use this technique. The spotlight effect can be directed exactly the way you want it.
The Subtract blend mode (and also the Divide blend mode) was introduced in Photoshop in CS5. Calvin has posted a very nice short video that includes this technique called “New Blend Modes – Divide and Subtract.”
The basic workflow as follows:
- Open image in Photoshop and duplicate the Background Layer (CTRL+J).
- Set top layer to Subtract blend mode.
- Go to Filter -> Bur -> Gaussian Blur and set Radius to 250. The image now has a night effect and is not that blurry.
- Add a Layer Mask and with the mask highlighted, paint with a black brush set to a low opacity to emphasize areas to be lightened.
Below is the result of using the technique from the original blog post showing how effective this spotlight technique can be. This image is of a beautiful sculpture called Cherubs Playing with a Swan that was created by Jean-Baptiste Tuby I in 1672-73 and is located in the National Gallery of Art in Washington, DC. To see original image, go to my Spotlight Effect With the New Subtract Blend Mode Tidbits Blog.
 |
 This image is of a Sandhill Crane is one of several that are “wandering” around our neighborhood for the last couple of weeks. These birds sort of look like a turkey body with these gorgeous heads of red feathers. They only visit a few weeks a year and are rather tame! The Subtract blend mode was used to create a really soft vignette effect around this painted bird. The layer opacity was only set to 29%, just enough to put a little spotlight on our posing model – very subtle. (Should mention a couple of steps used to do this. The texture is one I made in Painter, then in PS the bird was selected and placed above the texture. Using Mixer Brushes as a blender and to add color, the bird was painted over on a New Layer. The texture was duplicated and placed on top, set to Subtract blend mode at 29% layer opacity. Then on an added layer mask using a low opacity brush, the soft vignette was painted in. Final steps were the usual color and contrast adjustments.)
Well, hope you enjoyed my little Subtract tip for this week. By adjusting the layer opacity or changing the Density and Feather sliders in the layer mask’s Properties Panel, the effect can be set just as you want. Hope to get out and take more of these birds this week!…..Digital Lady Syd
Digital Lady Syd Related Blogs:
Who’s Hiding in the Cabbage Patch?

Syd, this crane is GORGEOUS!!!
You do such beautiful work with digital painting.
I really love the spotlight effect, and have used it quite a bit with really good results.
09/07/2015 at 5:51 pm
Thank you for the tip! The glasses look stunning, and I also love the statue and the beautiful crane 🙂 I wonder, why do they behave like they were tamed?
09/09/2015 at 9:45 am
Thanks for the comment Inese. Most of the animals in my neighborhood feel pretty safe and no one really bothers them. They are like the neighborhood “pets” so maybe the cranes are taking after the numerous other birds like turkeys, herons, egrets and storks that reside here full time. They do sort of honk at you when they get riled up if you pop up on them. I find the cranes have a lot of personality!
09/10/2015 at 4:54 pm
Pingback: » Sharing the Good News! Digital Lady Syd's Tidbits Blog