
WHAT IS TOPAZ’S NEW JPEG TO RAW AI?
 I am with most of you – say what?????? I knew Topaz (see my Tidbits Blog for website link) was working on some new software for JPG’s but this one is a real surprise. I have been working with the stand alone program for a couple of weeks, but it has taken a while for its wonderful capabilities to sink into my head. So this is what is going on…..it is somewhat similar to AI Gigapixel which I totally love and AI Clear which I can’t live without. (See my The Best New Software Around – Topaz A.I. Gigapixel! blog.) JPEG to Raw AI (J2r) uses similar machine learning technology to recover lost detail in jpg files and convert them to a dng or tiff extension. This will open up the Raw Converter in Photoshop or gives better slider capabilities in Lightroom.
There is not a lot of info released on this software yet so their website seems to be the best resource to find out more info and where a trial version can be downloaded. Below is a rundown of what Topaz is saying about their product.
Why Use this Program?
- Topaz states “There’s also enhanced dynamic ranges as shown by deeper shadows and enhanced highlights.” This is important and to me and is the best way to see results from applying the software. The program basically helps clean up jpg issues from smart phones, especially from some of the earlier versions, and older digital camera shots that just created jpg images.
- J2r uses the ProPhoto RGB Color Space that Lightroom uses. Most jpg files contain the sRGB color space which has very limited color choices. With the ProPhoto color space there will be better saturation and vibrance without any visible artifacting in your image.
- When an image is run through the program, it goes from 8-bit mode to 16-bit mode. This removes banding and converts the image from 72 dpi to 300 dpi, which usually results in a more normal sized file. I personally really like this. I hate opening up Image Size in PS to find out my image is at 72 bit resolution and 72 inches tall! Also, changing the resolution and downsizing in PS can be tricky.
- Artifacts in some jpgs can ruin an image and can be accentuated by post-processing, especially when sharpening. Topaz says “This program will remove these artifacts while preserving natural image features.”
The image above is one of my recent phone shots taken at a local Lowe’s Garden Shop using an older Android phone. Below is a before close-up of the original out-of-phone jpg on the left and the converted to a dng file on the right. It is a very subtle adjustment, but look carefully at the lower green leaves to see more detail in the shadow areas of the dng file and a little more definition in the bright areas of the lower right petals. Even the yellow centers seem a bit more defined. In PS Topaz Studio’s AI Clear Adjustment was applied (I use it on just about every image). The final post-processing for the image above used a clean up layer, a little fine line dodging and burning (see my The Best Dodging and Burning Technique! blog using John Paul Caponigro’s technique), a Curves Adjustment Layer, and a painted in vignette.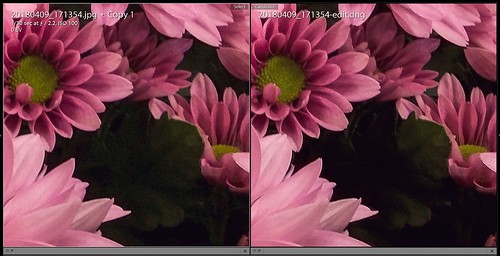
I have had a bit of a problem figuring out why some of my images improve when run through the program and some not so much. One of the engineers explained in their presentation: “While it will remove noise/blur and recover some detail, you’ll see most of the benefits when you try to edit the photo. Viewing a well-exposed high-quality JPEG before and after running it through J2r may not show a huge difference, but your editing capacity for that same image will generally go up.” After working with the program quite a bit, I believe this is very true. Since I use PS more creatively, I may not notice color shifts or tone changes as readily as many photographers who are looking to improve many of their less desirable images. Below is another example of what this software will do – this time a Casio QV-2900UX, a 2.1 Megapixel camera with a 8X zoom creating only jpg images, was selected. I was pretty impressed with the results – the image on the right is the original jpg file, the middle is the image after running through AI Gigapixel, it is still a jpg file, and on the left is the dng file. It definitely has a lot more detail – I thought it was a little crunchy for my taste but then realized it was little flowers showing up. Who knew they were there? On the sky to mountain line, there was some fringing going on after AI Gigapixel was applied.
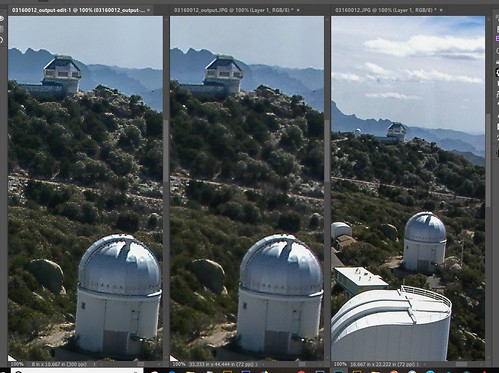 For the final image below, the fringing was removed by just painting on a new layer over with a small sized Clone Stamp. There was no fringing anywhere else on the image. A gradient map was added with blue and cream tones set to Soft Light blend mode at 71% opacity, a spotlight effect on a few of bright areas of the telescope domes, and Topaz Studio’s AI Clear at default settings. Overall the image turned out really nice and so much better than when I first post processed it back in 2004. We’ve come a long way!
What is the Difference between AI Gigapixel, AI Clear and JPEG to RAW AI?
Here is a quote from Celeste during the software release of their new product and pretty much sums up what Topaz is doing here. “While each of these products uses Artificial Intelligence to improve the quality of your photos, there are a few distinct differences. Gigapixel uses AI to enlarge your photos while preserving detail for printing. AI Clear uses AI to reduce noise and sharpen. JPEG to RAW uses AI for a variety of different purposes – it does reduce noise and sharpen, yes, but it also helps to restore details lost in a compressed JPEG, enhances shadows and highlights that are lost in a JPEG file, prevents banding, and reduces blockiness. There are distinct disadvantages to a JPEG file, and the AI for JPEG to RAW was specifically trained to restore the things that were lost when the JPEG was compressed. While they all have their advantages, JPEG to RAW is going to be the best for improving your compressed JPEG file!”
*****
Below is a screen capture image using Snip It that is from the Old Faithful web cam in Yellowstone National Park on January 31st in the early morning- I had never seen bison in the cam camera before and it looked spectacular! There appears to another geyser erupting in the background and Old Faithful was spewing pretty steadily so there was a lot of mist in the air. The screen shot was run through JPEG to RAW first to create a dng file (_edit is added to the end of the file name so you know this program was used). A Tiff file should have been selected, but I was not sure what I was doing. Then I ran it through AI Gigapixel set to 4 times creating a Tiff – Gigapixel puts the _output suffix on the file name.
 I will tell you what else I did but it is not pertinent to the new program so skip this paragraph if not interested. Next PS was used to open the image and ACR opened up where some changes were made. No sharpening was done at this point. Then it was opened as a Smart Object in PS and cropped. Lucis Pro was used to sharpen the bison – black mask and just the bison painted back. I imagine I could have added the sharpening in ACR. A Color Look Up table was applied – one I created to just create a sketch effect. Now the real magic came with using Topaz Studio – AI Clear (set to defaults and Exposure -0.08, and Clarity 0.48). Next the Edges Adjustment was used – this can really sharpen up an image and worked great on the bison (Edge Tone Dark, Edge Strength 0.15, Suppress Weak Edges 0.21, Suppress Small Edge 0.02, Edge Thickness 0.16, and Edge Resolution 1.00). Precision Detail Adjustment was added (Overall Small Detail 0.30, Overall Medium Detail 0.43, and Overall Large Detail 0.36-used a Gradient Mask set in middle of the image so sky was not affected, just the middle ground and foreground); and Impression Adjustment used the default settings (set Number of Strokes to High, Stroke Color Variation set to 0.25 and Spill 0.32). To recreate a better mist effect, on a separate layer a fog brush was used to fill in where the screen shot lacked mist and several Grut Cloud brushes (the best around by far) were used to enhance this soft effect.
Okay, here is the original so you can see what a difference this made – all three programs – J2r, AI Gigapixel, and Topaz Studio – helped create the above.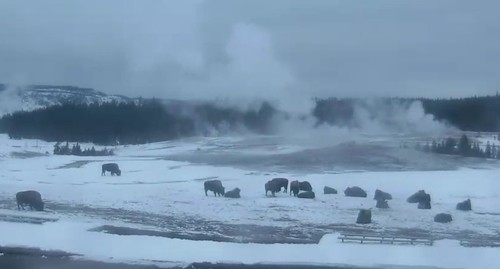
Bottom Line
This is definitely a program that you should try out. Be prepared to have a bit of a wait if processing a large jpg through the program. It is not as fast as Gigapixel. I do believe that I am seeing some changes, even though they may be subtle, and I know that Topaz will be adding capabilities to the programming so it will be even better in the future. (Don’t forget, if you buy it, all updates are free forever!) They are definitely the cutting edge leaders in AI technology for photography and they have not let us down yet. So I will be trying out more images with the program and plan to write more as I learn. In the meantime, try out the 30-day trial on some of your images and see what you think. And let the Topaz team know if there are having problems, they are always very interested in knowing about them. In the meantime hope everyone is thawing out after this horrible cold spell that came through the US. Have a good week!…..Digital Lady Syd

The advances in software are amazing! I love the image of the bison, it has a lovely timeless feel.
02/03/2019 at 6:21 am
Spectacular improvement of the old jpegs! Great software.
02/11/2019 at 10:13 am
I am planning on blogging on this program again soon as everyone seems interested in what the differences are between all of Topaz’s AI softwares.
02/11/2019 at 2:05 pm
Oh that’s wonderful. I keep all the ancient jpegs, some of them are unique, I don’t want to lose them.
02/11/2019 at 4:55 pm
Pingback: WHAT IS GOING ON WITH ALL THE “AI” IN PHOTOGRAPHY SOFTWARE? | Digital Lady Syd's Fun Photoshop Blog
Pingback: » Senior Neighborhood Pine Cone Meeting Today Digital Lady Syd's Tidbits Blog