
HOW TO USE A SPATTER BRUSH FOR A BACKGROUND EFFECT
The image above is an example of what I like to do with a spatter (or splatter) brush in Photoshop. It can really pull an image together when it is lacking some interest. Thought I would show you a couple ways to get this nice effect and where to find the brushes to do it. I got this idea from watching an “oldie-but-goodie” video by Mark J. Johnson, one of my favorite Photoshop people from years ago – I have not been able to find any of his more recent material. The video is called Photoshop Workbench 418: Paint Splatter Border Effect from 2014. He is using a brush from Lisa Carney, another one of my favorites – he does not give you the brush, which has more of a splatter look to it, but you can see what it looks like and the settings he used. These are the settings I used on some of my brushes from various resources..

So lets start with this tiny adorable Sand (Desert) Cat image taken at the Smithsonian Washington DC Zoo. It was not a great shot as it was he was inside a building with poor light and was moving a lot, but his face was well focused. By adding some interest to the background, the overall moving effect could be blended in with a spatter brush. So after doing some initial clean up, it was time to add some spatter marks.
Finding the Brushes
This image used the Splashy brush in Kyle Webster’s Spatter Brush set. To find the spatter brushes, open the Brush Panel (I usually just press F5 and it opens up along with the Brush Settings Panel) – just click on the little “hamburger” icon in the top right corner of the panel. In the pop-out menu, there is a choice called “Get More Brushes” – that is where Kyle has all his brushes for you to download. Once the website is opened, you will see a New Release Summer 2020 Brushes at the top – the Lily image uses the Spladoosh Variant brush from this set. Scroll down and find a group called Spatter brushes – download them – to add them to PS, can just double click on the spatter.abr file – they will load in as a group at the bottom of your brush panel. (Even if PS is closed, it will open up PS and add them in.) Scroll down the group list until you see the Splashy brush.
Adding a Spatter Layer
For the cat image, a New Layer was added and the Splashy was selected. Just dabbed around until an effect was created. In this case, no texture was added first. No changes were made to the Splashy brush but it should be noted that it is set to “Multiply” blend mode in the Options bar which appears to give the brush a much softer lighter stroke effect in this case. If it is switched to Normal, marks have more emphasis on the dark and light aspects of the brush tip itself. Also for this image the actual spatter brush layer was set to Linear Burn at 72% Layer Fill. A Color Lookup Table using a Cerulean Blue preset from PhotoFocus was used to get the overall image color effect.
The Tilde (~) Keyboard Shortcut
New with the November 2019 update of PS 2020, the tilde key (~) key acts as an eraser – so when you paint with a brush, pressing the Tilde key will erase using the exact same brush with the same settings, not the brush selected in the Eraser Tool. This can be quite useful for blending when the brush is set to a lower flow or opacity – it will remove just a reduced amount of the stroke. You can use this in a layer mask to create soft blended edges.
Also, press the Tilde key (~) and the right arrow (->) key to rotate the brush tip clockwise. Use the left arrow key (<-) to rotate counterclockwise. Add the SHIFT key and it will change the Angle in 15 degree amounts. I really love this key – it has made it a lot easier to paint in PS.

Using Spatter Brushes in a Layer Mask on a Texture Layer
In the Flamingo image, Spatter Brush 139 in a free set called Abstract Paint Brushes by Darrian Lynx was used – the settings in the Brush Panel were: Shape Dynamics Size Jitter 31%, Control Pen Pressure, and Angle Jitter 100%; Transfer Opacity Jitter 29%, Control Pen Pressure and Minimum 48%; and increase size to 1158 pixels. On one of my painted textures a layer mask was added and the above brush was used to paint out the center with black for a border effect. On a stamped layer (CTRL+ALT+SHIFT+E), Luminar 4 (for website link, see sidebar of my Tidbits Blog)was opened and several “looks” were applied to soften up the edges of the painted spatter border to give a sort of dreamy feel to the image.
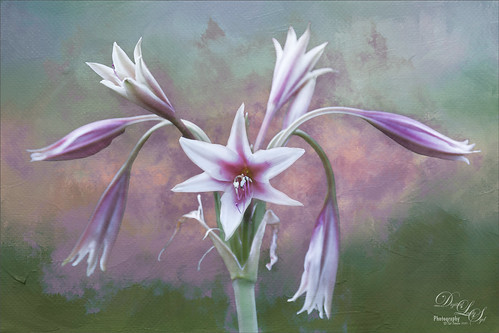
The top image of the Lily used a brush from Kyle’s new Summer 2020 Brushes set called Sladoosh Variant. This brush is set to Normal blend mode at 30% opacity for this image and no changes were made to the brush settings. The Tilde keyboard shortcut was used a lot to get the effect around the blossoms that I wanted.
Brush marks can be combined on different layers and set to different opacities to make new spatter brushes. Also several different layers set to different layer opacities or blend modes using different brushes can be stacked above the image to create some great effects. And don’t forget to try different textures with different blend modes to get some interesting results. It is really a lot of fun to do this. Have a great week and start looking at those spatter brushes!…..Digital Lady Syd

That looks like fun – and very useful too. I love the image you have created with the sand cat photograph. (And what a lovely little creature!) I’ve been toying with the idea of using Painter to make background layers for photographs – but that will have to be a project for winter…along with all the others!! 🙂
06/23/2020 at 7:41 am
Hi Ann – I love the little Sand Cat too as I am a big cat person. You might be surprised how easy it is to paint backgrounds in Painter – just find a couple brushes you like and it is amazing how they sort of fall together very quickly! I find that if I can get a good one, I can change the colors with a Hue/Sat Adjustment Layer in PS to make it match the flowers or plants. It is so much fun to do!
06/24/2020 at 11:37 am
I think that I’ll have lots of fun trying Painter out in the winter. (And Rebelle 3.) Little cats rule round here – at least, they think they do! 🙂
06/25/2020 at 8:21 pm
Pingback: » The Mighty Dragonfly Digital Lady Syd's Tidbits Blog