
HOW TO GET A GRAPHIC LOOK IN PHOTOSHOP
I have been having a lot of fun trying out a new look I learned from TikTok. A 52-second video called The Lady in Green got me thinking about how to create that smooth graphic effect that is very popular right now. My reference image was by the Impressionist painter Charles Courtney Curran called Blue Delphiniums created sometime in the early 1900’s.
A sketch was created first – mine was not near as good as the video’s. Not everything in my reference painting was going to be added, just the pretty lady that was changed a bit. Next, the video suggested using the Pen Tool to get the really smooth lines that are key to creating this popular graphic look. Several different Shape layers of the different sections (Umbrella, Hat, Face, Rt Arm, Lt Arm, and Dress) were made. It could even be used as a poster effect using just the image below.

To make Shape layers (which I find a little tricky since the paths need to be pretty close to what you are selecting), the Pen Tool Options Bar needs to be set to Shape (not Path or Pixel) with any color for the Fill ( just not No Fill) can be used to start – the color can be adjusted once the shape path is connected with the Pen Tool. Then PS pops into the Layers Panel where a layer named Shape (#) appears. May need to adjust the layer order if areas are covering over other parts. If a mistake was made with the path lines, you can’t paint directly onto a Shape layer to fix it so the layer may need to be rasterized (right click on the layer and select rasterize). From this point on, almost anything could be done to the image now that the Shape layers are done. By clipping (ALT + click between the two layers) a New Layer to the Shape layer, any changes done will be confined to just that layer. If a line needs to be smoothed out, choose a Mixer Brush with bit of a point on tip and set it to Very Wet, Very Heavy in the Options Bar – then just smooth or straighten out an edge with a very small brush (like 15 pixels or less) and paint to get the sharp line feel. TIP: If you do not have a Mixer brush with a sharp point, just select the Mixer Tool icon (using the above settings), then press CTRL+ALT+click on an a regular brush with a tip you like and the Mixer settings are applied to it. (Thank you Nicolai at GrutBrushes for that tip!)
Below is an overview of the different resources used and how they were changed to give unique effects:
- French Kiss Tableaux Mirage texture brush was applied at full size clicking just once. This gave the interesting painterly effect to the background. This brush was created using the French Kiss Texture (for info on how to do this, see my How to Create a Texture Brush to Match a Texture blog – this is a really handy way to match texture to your image.)
- On a clipped layer above the dress Shape layer, the Grut NM (natural media) Swing Swish brush (watch this site for a weekly new free brush and lots of great regular brushes) set to 1000 pixels was used to paint in the dress texture. The brush was changed in the Brush Settings Panel by adding a Color Dynamics section (settings are set to Apply Per Tip checked, Foreground/Background Jitter 2% with Control set to Pen Pressure, Hue Jitter 7%, Saturation 7%, and Brightness 8%), and in the Texture section, the texture was changed to Grut’s Rigeribs texture (a much more smooth and solid colored texture will do) with the same settings. This gave the nice overall textured effect on the dress.
- The lacy effect around the lady was created from watching another TicTok short video by Carol Tayler – a Photoshop Trick called Silk Texture, and yes it uses the Pen Tool also. This brush was easy to create and looks pretty cool. Brushed this effect on a New Layer on top of the Shape layers and a layer mask was used to remove areas that should not have the netting on it. (Tips to make this look like mine: I created the brush like they showed in the video, then to get the pretty effect, the Size was set to 250, the Spacing 11% instead of the video 44%, and the Angle Control Fade amount to 200. Also try to use a loose looking figure eight effect when creating the shape and a small , like 4 px small hard round brush, to Stroke the brush with in the Path Panel-set this up ahead of time in the Brush Panel.)
- Background grass and floral items on several New Layers: Kyle’s Smitty brush from his Spring 2022 set was used to create the painterly effect in the sun, which was just a circle selection created using the Elliptical Marquee Tool. The green foliage (brush SB 46 3) and flower (SB 46 3) brushes all came from Aaron Blaise Photoshop Foliage Brush Set (check out some of the best inexpensive brush and drawing tutorials at his site, and watch for his sales).
- Edging around the Umbrella was made by adding a Neon Layer Style on the edges and using just the Color Overlay and Outer Glow effects to create it. For instructions on how to do this, check out Spoon Graphics video called Neon Light Effect Photoshop Tutorial. This effect looks slightly different in each of the image iterations.

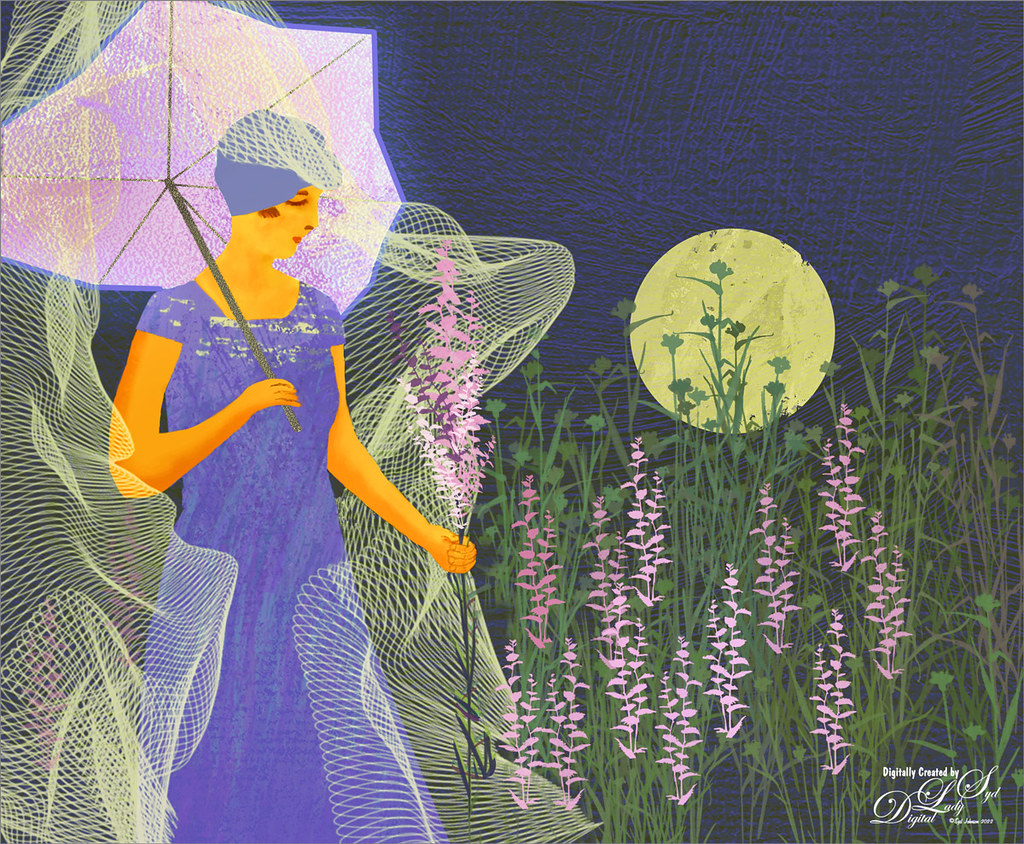
A couple things needed to be done to each of these images. It was hard to get the hands and fingers looking just right. A very small hard round brush was used and the small Mixer brush were used to smooth the fingers on each image. Also the arms have different shading effects that were also smoothed with the Mixer brush. The other thing that differentiated each of the images was the Color Lookup Adjustment Layers used. For the top image, a LUT called On1-Summertime1 was applied (if you have On1 software, their LUTs will work in PS – just have to add them in). On1 has some of the best LUTs available. To create the color above, on top of the Summertime1 LUT, PS’s Candlelight Color Adjustment Layer was added and set to Color Burn blend mode. Next the Layer Style was opened and in the Blend If This Layer, the black tab was split (ALT+click on tab) and set to 0/99. Then in the Layer Mask, the green grass in the background was lightly painted back and finally, the mask density was set to 35%. It created what I consider a very different look from the first image.

This image is yet a different iteration and the only change is that a different Color Lookup Adjustment Layer was added on top of the Summertime1 LUT (try PS’s Soft_Warming LUT for a similar look). It is a free one from Sparkle Stock’s Winter Mood set called Polar01. A Curves Adjustment layer was added on top for more contrast. This image seems so much more formal. (Switched the LUT to PS’s LateSunset and it gave even a different beautiful look.) The Color Adjustment Layers is a great way to change up any image!
It was hard not to add too many things to the images and keep them simple. I hope everyone got a few new ideas for creating images – not a lot of painting but just creative uses of resources. It was fun to try some new things and it was not that hard – just had to get the hang of using the Pen Tool and Shape Layers. You really don’t have to use either one – use any selection tool you like and just use layer masks to clean up problem areas if that is easier. I did a little of this on clean up layers and it worked out fine. Hope you are having a great summer! Enjoy!…..Digital Lady Syd
DIGITAL LADY SYD RELATED BLOGS:

A very interesting tutorial! I particularly liked the way you could get very different end results. This could be a great way of producing designs for some of the POD companies that do t-shirts, housewares etc.
07/17/2022 at 8:26 am
Thanks Ann – I wonder if I would have gone into Graphic Design in college – at that time graphic art on a computer was very simplistic. The young folks today have a great opportunity to do some very creative things!
07/17/2022 at 12:33 pm
Ah, I often wish I had studied something else – but at least I got the chance to go back to studying later to get an HND in photography. (It was very satisfying and confidence-building. I’m very glad I did it.)
07/17/2022 at 12:36 pm
That is really great Ann! I almost took a job doing graphics for marketing, but instead continued doing engineering work. It does make me wonder what I could have ended up doing.
07/20/2022 at 8:32 am
Excellent looking ! Well shared ! Graphic look in Photoshop! Thanks for sharing ☺️☺️
08/15/2022 at 6:40 am
Thank you so much for the kind comment!
08/15/2022 at 5:00 pm
My pleasure stay blessed 😘
08/15/2022 at 7:26 pm
Pingback: HOW TO CREATE A GUSTAV KLIMT LOOK | Digital Lady Syd's Fun Photoshop Blog