
PHOTOSHOP BETA AI WITH FENCED ZOO IMAGES

This colorful Wreathed Hornbill image was taken at the Jacksonville Zoo several years ago. I wanted to see if I could really get rid of the fencing like the new technology was supposed to do. Normally this photo would not have been post-processed, but after using the AI features, it is one I am happy to see in my bird image collection. The bad news is that it was not created nearly as fast or easily as all the videos which show using a one or two-click process would make it seem. It still required the same workflow that I normally use on my images after applying the Generative Fill effect. Below is what the raw image photo.

For this bird image, it is pretty obvious what was done. There is a new Contextual Task Bar for both the Beta and PS 2023 which everyone seems to love. To move it out of the way, I pinned it above in the Option Bar area, but it has to be repinned there every time PS is opened. The reason this Contextual Task Bar is important in the Beta version is that once any selection is made, it creates a Generative Fill field (prompt) and Generate button which is the easiest way to apply the major AI magic.
What did not work! The bird was selected using the Contextual Task Bar Select Subject button (Note: at this time the Remove Landscape button does not work as well) – then clicked the Invert Selection icon (2nd over) in the Contextual Task Bar – and finally clicked the Modify Selection (1st icon over) and in drop-down select Expand Selection – Expand by 20 pixels (this number seems to be the one most people use when expanding anything in AI which needs to see what it is selecting around). Then, in this case, the prompt was set to “remove fence and add plant covered background.” (Some people say the Generative Fill prompt will not react to the word remove – I suggesting trying it with and without remove in the prompt as different results can happen.) After two Generate buttons were pressed, all results showed the fence and it was distorted – only one, as shown below, had a background and none had plants.

What did work! So, instead of using the Generative Fill to remove the chain links (which obviously did not work), on a New Layer above the image the Remove Tool (which also uses AI) was chosen with the “Remove after each stroke” unchecked in the Options bar. Then painted with a small brush a little larger than the fence width over just the bird area since the background was going to be AI generated – you can see what is being removed as the Tool creates a red transparent line. Once painted over, press Enter or click the check mark in the Options Bar. (I tried using the Magic Wand with contiguous turned off in the Options Bar, and it did a rather poor job of selecting all the fencing – thought Edit -> Content Aware Fill might work. It is worth a try if you think it will select the fence in your image.)
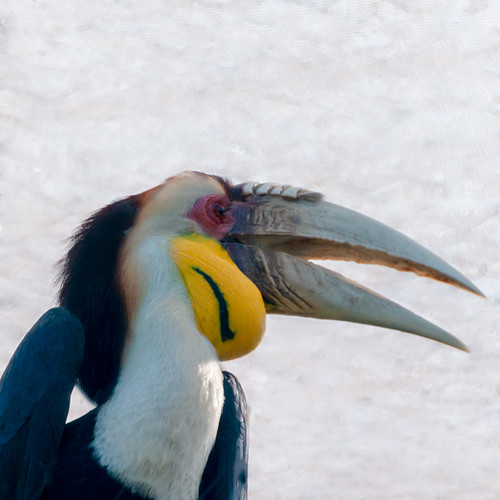
As shown above, the image looked pretty good with the fencing removed. Still had to select, invert and modify before using Generative Fill to continue adding the background. With the prompt empty and after three Generate button attempts, the top final look was the one that looked best to me (8th look out of 9). I do like the background result – Generative Fill did a good job eventually on this. Don’t be nervous about using the Generate button several time – but do remove the ones you don’t like if the file is getting really large – just click the little icon in the upper right corner to remove the ones that look bad individually. Next my basic regular workflow had to be followed to get the best effect.
*****

This is another image from the Jacksonville Zoo that never would have made the cut without the PS Generative Fill panel. Below is the original just so you can see what was done.
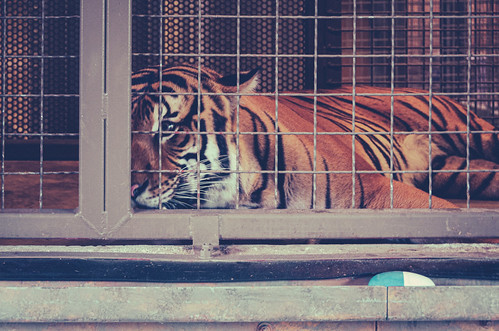
Nice image but the face is half gone. This time the fencing was removed first. So going along with the trick above, used a very small sized Remove Tool brush (45 pixels) and this time painted very carefully. The SHIFT + click can be used with the tool, but I did not run it the whole way, just a few sections at a time and got a better result. I was unable to get rid of the post, so decided to let Generative Fill do the work and basically that is what is in the final image. It put in the paws, face and background with the first Generate and no prompt. The legs were all cut off so first extended the bottom for front paws by using the Crop Tool with a 20 pixel partial edge at bottom of the actual photo. Once the Generative Fill was run, the front paw showed up. Did again on the right side to get some more back paws. One is still cut off but it looked funny when it was added in. Several Generate button iterations had to be done to get a good result. Again, a lot of clean up had to be done, but overall it is a really nice image.
*****
Tips about the Remove Tool
Firstly, I love the Remove Tool! It works great on just overall photo adjustments. Some things I have learned from listening to lots of videos is as follows: 1) Try not to use it in large areas at one time – it can create unnatural patterns, especially on faces. 2) Don’t go over too many time – it can look a little pixelated. 3) Most people keep “Remove after each stroke” unchecked in the Options bar – otherwise it will drive you crazy if lots of marks need to be created. Check out Remove People or Objects from Photos Using Photoshop’s Remove Tool for some good info on using this Tool. Also, Colin Smith at PhotoshopCafe’s video called NEW Photoshop TOOL! better than Generative Fill? that compares it to Generative Fill. I would suggest just playing around with the Tool – lots of people are getting some great results with it.
When to Use the Spot Healing Brush
I find it tricky to tell which tool to use now but I am tending towards the Remove Tool as it seems to give a little better result in most cases. I did have problems with the bear images below – the Remove Tool made a mess of their faces. When used, the hair on the faces looked funny where the fencing covered them. First I decided to try the Spot Healing brush set to Content-Aware but it did not look any better. Finally, I did use the Spot Healing Brush, but it was set to Proximity Match with a Diffusion of 3 – it worked! Proximity Match looks at the pixels just outside of the area you are healing to find matching pixels to use to replace in the selected area – works good when healing smaller parts that look similar to the areas around it. (This is exactly what was needed on the bear faces.) The Diffusion slider determines how large the spread of pixels around your brush is – a low value has little spread which was also what was needed. As an aside, another important thing to consider on the Spot Healing Brush is the Spacing option. Set to 25% is good for most images. Set to 0% and the brush will be really smooth and at 1,000%, very spotty! (Something to think about if getting weird results with one of your Spot Healing Brushes.) Using 50% Hardness and a 100% Round brush are also good settings. (Ever wonder how to get to these settings to change them? I did! Well, you cannot get them through the Brush Settings panel, but you can if you go up on the Options Bar and click the 3rd icon over called “click to open the brush options” – there the settings can be adjusted. Also right click inside the image with the mouse to get the same panel. I created a Tool preset (cannot be saved as a brush preset) to use just for removing fencing with these settings. And you can always click over to Content-Aware while using it if an area is not looking right with Proximity Match.
*****
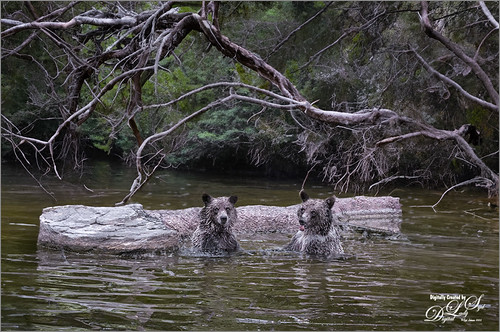
Here are Lewis and Clark from the Palm Beach Zoo with a new background. These bears actually love to swim and fight around in the water in the afternoons at the Zoo just for fun. (Check out my photo link of the guys really rough-housing in the water!) This image looks different from the one below as it was downsized to a 1024 pixels wide to match the pixel size that the current AI info is using to generate the backgrounds. It looks a little sharp to me but I liked the background branch over the bears’ heads that Generative Fill created. The prompt used was “very wooded background.” This image was completely behind fencing. The water in the foreground is from the actual photo so the fencing had to be removed off it as well as the bears, and just behind the bears was AI generated.

This image looks a little different because it was not downsized before doing all the fence clean up and the Generative Fill for the background. This works because the background does not have to be so in focus since it is so far from the bears and the foreground which are the original parts of the photo. I used “dark forest background” in the prompt area to get this result. It looks very natural to me for the bears. Again, the original image as shown below would never have been selected to post process before Generative Fill.

Therefore, just be aware that if the area you are adding is further away from your focal point, the image does not have to be downsized before running the Generative Fill. Otherwise, watch out for problems. Also I might note, the bottom image had some very bad artifacts in the trees that had to be removed using the Remove Tool so do look carefully at the AI areas being added.
*****
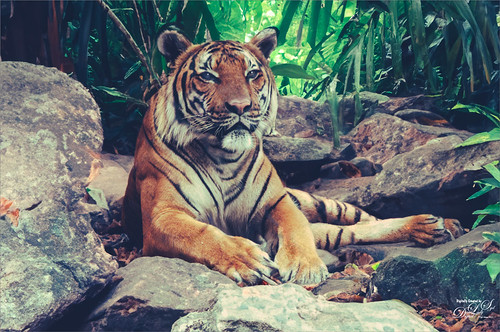
And just because I have been having so much fun with this, here is another of a Sumatran Tiger at the Palm Beach Zoo. Just added a prompt saying “jungle background and rocks” and it turned out pretty nice! This image did not need much work done to it so it was probably the fastest to post-process of all the images.
Therefore, the fencing can be removed very nicely, but it was not as easy as I thought it would be. Well that is about it for this blog. I will be posting my impression of the AI digital painting possibilities next week. See ya soon!…..Digital Lady Syd

It’s extraordinary to think how far Photoshop has come since the early days! Excellent results! 🙂
07/03/2023 at 12:47 pm
It is amazing. Still “on the fence” about the Generative Fill AI tool and what it means to creatives. Thanks for the comment Ann.
07/05/2023 at 12:26 pm
Pingback: HOW TO GET RID OF THOSE DARN FENCES IN ZOO SHOTS | Digital Lady Syd's Fun Photoshop Blog
Pingback: » Another AI Oil Painted Image of the Natural Bridge Digital Lady Syd's Tidbits Blog