
DIGITAL LADY SYD REVIEWS ALIEN SKIN SNAP ART 4
 Happy New Year to everyone! Hope you have a wonderful year ahead and create some really spectacular images from your photos! Recently I have gotten interested in adding a painterly feel to my photos. Alien Skin’s Snap Art 3 has definitely been one of my favorite Photoshop plug-ins for doing this – not only for its ease of use, but also because it gives some great results quickly. (See my Digital Lady Syd Reviews Alien Skin Snap Art 3 blog). I was excited to hear the plug-in was being updated to version 4. Since I reviewed Snap Art 3 not that long ago and since it is the holidays, I am just going to do a fairly quick update for this version. Needless to say I love Snap Art 4. It is definitely worth a second look if you love the painterly effects like I do. To be honest, I do not see a whole lot of difference between the two versions except for the new interface, which looks more like Lightroom’s interface. The biggest change is that thumbnails are note created of your image showing all painting style variations in each artistic group – this makes it easy to choose a particular filter or effect for the image. Also the Background and Detail Masking Panels can be seen at the same time which is very helpful. F5 still resets the Background to some default settings, but I am not quite sure how this is determined. CTRL+R resets the Detail Mask so you can create new ones. The sliders and artistic effects are all the same as version 3.
The image above is of a beautiful golden retriever dog (similar to one I used to own) that was enjoying a nice sunny morning in Savannah, Georgia, in October. This is a great example of how subtly the plug-in can be applied, yet still get a nice painterly feel. In Lightroom, Trey Radcliff’s Dramatically Clean Chipmunk preset was applied before opening the image into Photoshop and the Snap Art 4 plug-in. I applied a preset I created from Snap Art 3’s Factory Default preset settings – still one of my favorites that is based upon an Oil Paint effect. To sharpen the details when using this filter, increase the Photorealism slider and decrease the Stroke Length slider. In this case, two Detail Masks were created to add back the detail to the dog’s fur and face. Pretty simply!
********
 I am finding that I like to use this plug-in with other Photoshop plug-ins to achieve the look I like. In this Bird of Paradise bloom pix from my yard, a 5-image HDR was processed using HDR Soft’s Merge to 32 Bit HDR and returned as a 32 bit TIFF file in Lightroom. Some localized sharpening and Trey Radcliff’s Gradient Folding Colors preset was applied before taking the it into Photoshop. The layer was duplicated and made into a Smart Object before opening in Snap Art 4 (it is very helpful to use a smart object so you can go back and adjust the detail masks if needed), which achieved this beautiful painterly result using the Abstract Pastel preset – two detail masks used on the bloom where a little more Color Variation and smaller Stroke Length were used. Next Nik’s Analog Efex Pro plug-in was applied using only three of its filters that just popped the color: Basic Adjustments with Saturation set to 85%, Lens Vignette with amount set to -29%, and Levels and Curves with just a little RGB and Luminosity tweaking and an amount set to 67%. By combining these different applications, a very beautiful image was achieved.
********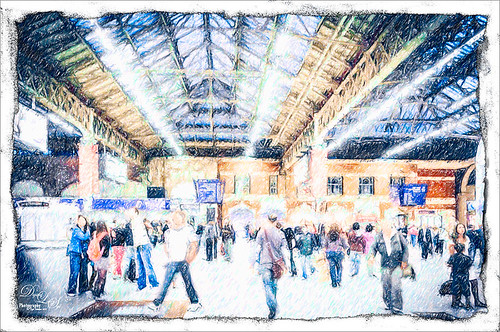 This image of Victoria Station in London uses Snap Art 4 Colored Pencil filter. First Topaz (see sidebar for website link at my Tidbits Blog) ReStyle’s Cambridge Battleship preset was set to Soft Light blend mode. Then one of Snap Art’s colored pencil presets was applied. In the Detail Masking panel, the Photorealism slider was set to 100 and the people were painted over to bring out detail in them. Created the frame back in Photoshop by painting around the image edge on a New Layer with a Sponge brush, then opening up a Drop Shadow layer style where Distance was set to 0, Spread to 34% and Size to 5 pixels. This gave the cool dark edge effect in the border.
Check out Alien Skin’s website page for several useful tutorials, especially one called Chris Wieck’s Snap Art Tips. Well, that’s it for this post – just wanted to get this review done since I believe Alien Skin’s Snap Art 4 is a fantastic way to add some painterly effects to an image, or to totally change the image. This is in my top five plug-ins for Photoshop so that means it is pretty darn good! Lots of fun – and that, my friends, is the “name of the game!”
Digital Lady Syd Related Blogs:
Get Great Results with Alien Skin Snap Art 3 and Topaz ReStyle Together!!
A Day in the Sun!

Pingback: » Bamboo Forest Abstract Digital Lady Syd's Tidbits Blog
Pingback: » The Candy Store Staircase Digital Lady Syd's Tidbits Blog
Pingback: PAINTERLY PLUG-INS – SO MANY CHOICES, SO MANY CHOICES! | Digital Lady Syd's Fun Photoshop Blog