
DIGITAL LADY SYD’S PLUG-IN WORKFLOW
 This week I just did what I call some “fun” Photoshop and just played. Know I have touched on these things before, but liked the results so thought I would share again and go through my plug-in workflow. This time I have added small images showing the results of each plug-in layer. Also wanted to say thanks to the Photography Club of Flagler County, the club to which I am a proud member, for letting me “bend their ears” for an hour on my passion of painting using Photoshop. So many of its members are totally excellent photographers so check them out!
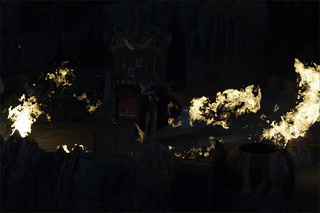
As I said before, for some reason I really loved Universal Studios Orlando and got some different shots when visiting. This image was from The Eighth Voyage of Sindbad Stunt Show. I liked the flames and graininess that were due to the high ISO (1250) needed to take this shot. The original RAW file was extremely dark (see below). Probably not the best image for drawing your eye to the focus point, which to me was the girl, but I still liked the image so here it is. In the original image as it came from Lightroom, Seim’s Super Gentle X preset was applied as a starting point. Have not talked much about Gavin Seim’s Power Workflow 4.1 Lightroom presets (see sidebar at my Tidbits Blog for website link) – I really like them and find I almost always use them over playing with the sliders in Lightroom now. They are different from others I have bought – uses a lot of curves and HSL changes to get some very natural effects. You can download a free sampler, which is how I got started with them, and if interested, watch for the good sales he offers every now and then. He also has a really interesting You Tube video called Gavin Seim’s History of Photography. The Noise Luminance was set to 26, Detail 59, and Contrast 30 to handle some of the noise issue. Below is the RAW file and the file as it looked when brought into Lightroom. If that does not sell you on using Lightroom or Camera Raw, I am not sure what will!
Next Topaz (see sidebar at my Tidbits Blog for website link) Clarity was used – I did not want to sharpen the noise, but definitely wanted a more natural sharp look to the image so Clarity was used instead of Topaz Detail. The Micro Color Boost II preset was used with a few adjustments (Dynamics White Level -0.55; Hue/Sat/Lum settings: Hue Orange -0.06 and Magenta -0.61; Sat Orange 0.42, Yellow 0.03, Green 0.47, Blue 0.77, and Overall 0.33; and Lum Red 0.17, Orange -0.14, Green 0.38, Aqua 0.33, Blue 0.19, Purple 0.16, and Magenta 0.36). Back in Photoshop a black layer mask was added so the effect was removed, and then it was painted back in where I wanted the nice saturated colors showing up, mainly the foreground and flames. The image below has just Clarity applied. Very subtle difference from the Lightroom preset image – mainly shows up in the colors in the foreground.
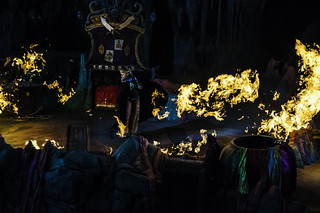
 On a duplicated layer (CTRL+J) Topaz Black & White Effects was opened and the Toned Collection Sepia II preset was chosen. This time a lot of the settings were changed, or else it would look like sepia, right? Here are the settings used (Selected the 4th over teardrop which set the settings for Section 4 Finishing Touches Silver and Paper Tone. Left Basic Exposure with preset settings. Adaptive Exposure was set to 0.24 and other setting left as set. Creative Effects Diffusion set to Softness 0.71, Diffusion 0.67, and Diffusion Transition 0.56. Finishing Touches used the Quad Tone settings provided by the preset. Vignette was set and centered on the girl. Vignette Strength set to -0.28, Vignette Size 0.61, Vignette Transition 0.83, and Vignette Curvature 0.82. Transparency set to 0.40 to just bring a little color back into the image). What is really neat about Black & White Effects is that the Local Adjustments section has so much variety that you can sort of sculpt the image. Therefore all the brushes were used to enhance most of the special effects above. First the Detail brush was used to paint over the girls face and body to emphasize it a little more. Used these settings for all brushes: brush opacity of 0.14, Hardness 0.00 and Edge Aware of 0.50. This is just enough opacity to see a change. Painted over the area again where more detail was needed. Second, painted with the Color brush over the flames once, her face several times, and her body once. Also the foreground color was lightly painted over. Third, painted with a Smooth brush over the flames – I usually do not see much of a change here with this brush but I wanted the overall feel soft, so it was used. Fourth, painted with the Burn brush on the areas that shows up too bright around the edges. This included part of the flames on the right edge. Fifth, painted with Dodge brush just around the large pot in the foreground and her pant legs to brighten these areas up just a little. In Photoshop a white layer mask was added and some of the detail was painted back in the foreground and flames – that is because the Diffusion settings were pretty strong in this plug-in. I wanted to use it for a more ethereal feel, but there are places that needed more detail. The Local Adjustment brushes did add some of this detail back, but there is a little more painting control back in Photoshop. Once again the difference was very subtle, but there is some definite darkening going on by adding this plug-in. Also, this plug-in’s layer was only set to 59% layer opacity which also lessens the effect. Below is how the image was starting to appear with Black & White Effects applied.

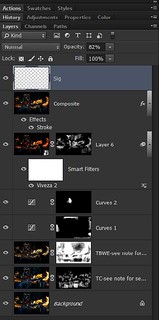
Two Curves Adjustment Layers were added to darken the edges down and brighten the girl just a little. Below you can see the Adjustment Layer mask’s were turned black (CTRL+I inside the mask to turn it black) and a white brush was used to paint back the localized sections to reveal. Since I am never one to leave things alone, Nik’s Viveza 2 was used to add the red tones to the flames (actually used the little eyedropper under the Hue slider and sampled the red in the flame to add more) and pop her face a little (mainly used just a little Contrast of 28% and Structure of 44% to make the face show up just a little more). You can see the flame settings in the screenshot below. (Click on image to see settings larger in Flickr.)
 Since the effect was still a little strong, a black layer mask was added and just the areas I wanted more were painted back in white, of course using my Chalk Brush 60 with 19% Angle Jitter. How cool to use so many of my favorite plug-ins in one image. The final image is shown at top of blog and below is an image of the Layers Panel from the finished file. (Click on the Layer Panel to see close-up in Flickr.)
 Well I hope this gave you some insight into how to do use plug-ins effectively in Photoshop. You do not have to overdo the effect – can just add a black layer mask in Photoshop and paint back with white where you want the effect to show up. Or try changing the Layer Opacity or Blend Mode to get a different look. And don’t forget to try some different types of brushes other than the Round brush when painting in that layer mask. Lots of choices here! Until later…..Digital Lady Syd
Digital Lady Syd Related Blogs:
How Topaz Black & White Effects Can Create Some Surprising Results!
More Clarity on Topaz Clarity
Digital Lady Syd Reviews Topaz Clarity
Nik’s Viveza 2 Plug-In – A Hidden Gem!

Great blog, Syd. You are amazing. I’m now following your Tidbits blog also. I just love that your share your process. It is so helpful to me. So many people act like their process is some kind of big state secret. I figure, the more I share, the more I get back. I’m glad the presentation to the club went well.
08/23/2014 at 5:15 pm
Thanks Kerry – I feel the same way. That is why I am blogging – now that I have time to spend on it, why not share what you are learning? Syd
08/23/2014 at 6:58 pm
Pingback: MORE COMBINING PLUG-INS FOR GREAT EFFECTS! | Digital Lady Syd's Fun Photoshop Blog
I just read the comment and I want to add my thoughts. Why some people are afraid to share their knowledge? Even if I learn from you it doesn’t mean that I will copy your art. Not even close 🙂 Thank you so much for sharing so generously!
09/06/2014 at 5:39 pm
I have learned so much from people that are so generous with their techniques. There is so much going on with Photoshop that it is hard for everyone to keep up with all the different things the program can do. Just glad I have the time to do this. Thanks for the support!
09/06/2014 at 10:09 pm
Thank you! 🙂
09/07/2014 at 6:32 am
Pingback: » There’s a Leopard on the Floor! Digital Lady Syd's Tidbits Blog