HOW TO CREATE A PHOTOSHOP ARTISTIC TREE
 Sounds simple enough! It is but it is not. Had a lot of fun trying out a few techniques and going back and forth between Photoshop and Painter. Unfortunately, I believe this will be my workflow since both programs have things I like.
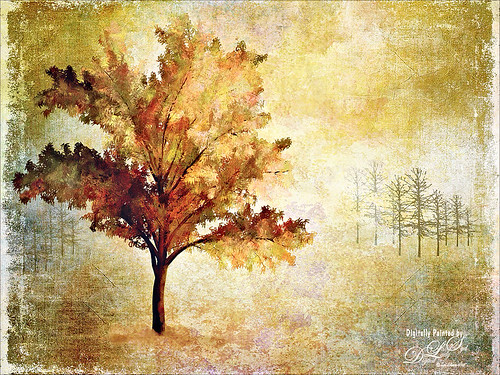
So let’s start with this top image. This actually is a tree that was created in Photoshop with their relatively new Tree Filter – it is in both Photoshop CC (go to Edit->Fill->Pattern Fill and open Scripts-has a few of the sliders missing from CC2014) and CC2014 (go to Filters->Render->Tree). It took some experimenting to get what I consider an artistic feel to the tree, but it can be done. Two files were created to do this. First I found a texture that I liked – it was Anna Lenabem’s Texture 208. (If you have not seen her textures, check them out – they are absolutely beautiful!) Next the tree was created on a New Layer above. (Here are the settings in case you want to see how it was done: Base Tree Type: Robinia; Light Direction 180, Camera Tilt 3, Leaves Amount 100, Leaves Size 98, Branches Height 100, Branches Thickness 112, Check Default Leaves, Check Custom Color for Leaves – color used R255/G255/Blue147, Check Custom Color for Branches R238/G128/B99, and Arrangement 94.9.) I think I am turning into a Blake Rudis “groupie” – he definitely has the best tutorial on how to create trees in Photoshop – see his recent video tutorial called How to Make a Tree in Photoshop CC. He also gave me the idea to try and make a fine art image out if it. Now here is where it gets a little sticky – the layer was duplicated and just the tree was taken into Topaz (see sidebar at my Tidbits Blog for website link) Impression. (Here is my preset and the settings applied: SJ WC like Effect preset-Stroke: Brush Type 04, Brush Size 0.91, Paint Volume 0.42, Paint Opacity 0.87, Stroke Rotation 0, Stroke Color Variation 0, Stroke Width 0.33, Stroke Length 0.89, Spill 0.23, Smudge 0.26, and Coverage 1.00; Color: Overall Hue 0.15, St -0.20, and Lightness 0.06; Red Sat 0.47 and Lightness 0.14; Orange Sat 0.60 and Lightness -0.42; Yellow Sat -0.33 and Lightness 0.13; Green Sat 0.20 and Lightness -0.32; and Blue Sat 0.36; Lighting: Brightness -0.04, Contrast 0.39, and Light Direction x0.33 and y0.06; and Texture: Strength 0.78, Size 0.30, Canvas IV, Background Type Solid, and Background #d38967 (soft melon color). Changes I made to it: Stroke Color Variation 0.52, and Green Sat -1.00 and Lightness 0.) The layer was set to 63% layer opacity. A Hue/Saturation Adjustment Layer was placed and clipped to tree layer on top with Master Hue set to -43, Sat +36, and Lightness 0 – this added some pink tones into the leaves. A stamped layer was created (CTRL+ALT+SHIFT+E) and Alien Skin’s Snap Art 4 was applied. (Here are the settings used: SJ Abstract Large Color Variation – Artistic Style Oil Paint; Background: Brush Size 27, Photorealism 4, Paint Thickness 100, Stroke Length 49, Color Variation 73, Brush Style Bristle Brush, and Random Seed 418; Detail Masking none; Colors Brightness 59, Contrast -14, Saturation 54, and Temperature 33; Lighting: Highlight Brightness 45, Highlight Size 26, Direction 120, Angle 65, Color White; Vignette none; and Canvas Rough Paper, Thickness 26, Zoom 16, Texture Paper, rough, Color white.) Since it puts the layer on white background, the layer was set to Multiply back in Photoshop and the layer opacity set to just 21%. The last step in this file added a Gaussian Blur filter with the Radius set to 1.1 – added a black layer mask and painted back just the sharp edges of some of the leaves that looked unnatural. Saved this image and then saved another version that was flattened to take into Corel Painter. Here is what the image looked like at this point.

All that was done in Corel Painter is a New Layer was added and Karen Bonaker’s Bare Trees brush from her Holiday 2014 Brush-a-Day Set (this is brush 1) was used to add the trees in the background. The file was saved as a PSD file and taken back into Photoshop where the Painter layer was set to 49% layer opacity. A little clean up was done on a New Layer. Next Painted Textures Desert Sky Canvas texture was applied twice, first set to Divide blend mode at Fill of 26%, and the second one set to Linear Burn at 68%. Another stamped layer was created and the image was taken into Nik Viveza 2 where the focal point was clarified just a little – I love what this filter does to a photo! Created a stamped layer and this time another of my all-time favorite plug-ins, Topaz ReStyle, was added. (These settings were used: Silver and Ivory Cloak preset – Set ReStyle to Screen at 53% opacity and Texture 1.00; Basic Tone Temperature -0.34; Black Level 0.66, Midtones -0.27, and White Level 0.05; and Detail Structure 0.39.) On a New Layer above back in Photoshop, the Blur Tool was used to further blur the edges of just the dark leaves on the tree that appeared too sharp. The last step was adding a Curves Adjustment Layer to give a little more contrast. That was it – a really involved workflow, but it was not that hard – just a lot of experimenting. It was really fun to create something that looks so artistic with just filters!
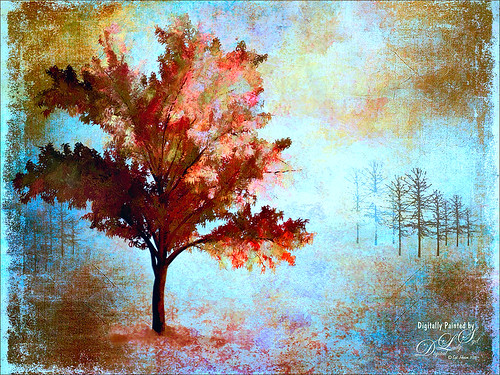
 This is the same tree – the only difference in the whole workflow is that I used a different preset for Topaz ReStyle – the Guite Chrysanthemum preset. The settings were lost but is was slightly lightened in the plug-in. I liked the results so I thought I would show you what a different color palette can do for the image. I really like the way the oranges and blues play off each other.
Hope this blog gave you some ideas on how to use your filters with the Tree Filter in Photoshop. It really can give some beautiful results. And what the heck is a Robinia Tree? Have a great week and grow a Photoshop tree!…..Digital Lady Syd

Thanks for posting this….good info!
01/18/2015 at 9:53 am
Hi Syd. Good blog and so much information. I love how you’ve added Painter into your work. I learn so much when I read your blog.
01/23/2015 at 1:26 am
Thanks for the kind comments – I really enjoy creating the painterly aspect in my images.
01/23/2015 at 11:41 am
Pingback: GET INSPIRED USING YOUR FAVORITE TEXTURES | Digital Lady Syd's Fun Photoshop Blog
Pingback: » Happy Valentines Day Digital Lady Syd's Tidbits Blog
Pingback: REBLOG – GET INSPIRED USING YOUR FAVORITE TEXTURES | Digital Lady Syd's Fun Photoshop Blog