
HOW TO GET THE SOFT GLOW IN TOPAZ GLOW
 Well, now that the holidays are over, I have had a chance to get reacquainted with Topaz (see sidebar at my Tidbits Blog for website link) Glow and start to understand this little gem of a plug-in a little bit more. I watched a Topaz Webinar by Blake Rudis’s (Integrating Topaz Glow into Your Workflow) and then another shorter video (Topaz Glow A Closer Look with Blending Options), and the program actually makes a lot more sense to me. I thought I would show you a few more examples of how Blake is using Glow to get some absolutely beautiful soft glow effects. Click on the Webinar link above for a download button that links to a Glow PDF file showing how to make his presets and several of his actions – I refer to the PDF file all the time now.
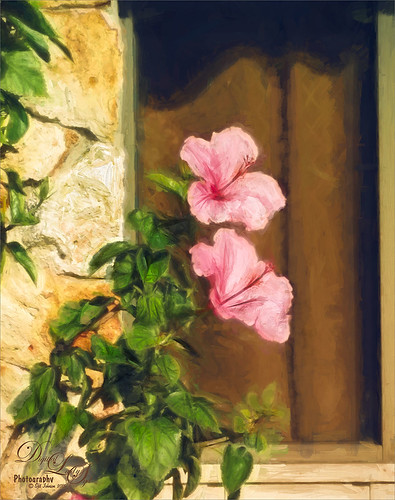
For me it seems Topaz Impression works great as the second step once Glow has been applied. The image of the two pink hibiscus has both filters applied. If you would like the detailed steps and plug-in settings used, check Image 1 info below. Two things were done differently from the usual application of this filter: 1. A black layer mask was added to the Glow layer and just the parts where I wanted the Glow to show up were painted back in the layer mask. Since the original image was pretty nice for starters, Glow was used to just add detail and highlights to just the flower centers and leaves – the rest of the image looked way over-the-top with the settings used. 2. Then the layer opacity of the Impression layer was reduced so you can still see some of those preserved Glow strokes. This image resulted in a pretty natural final look, which is what I wanted.
***************
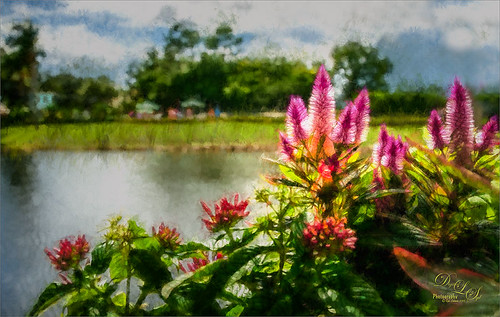 These flowers were taken at Disney World Epcot Center last year. I could not get this image to post-process correctly so I had skipped it. Then Glow came out and it has actually turned it into a rather unique feeling image. Glow added the light to the foreground colors but by using Topaz ReMask, it did not affect the reflection and sky in the background. Then Topaz Impression was applied using one of my presets at 82% Strength. All the steps and settings are below under Image 2.
*****************
 In this image of a leafless tree taken from above on my phone, a different workflow was used. First some texture and Topaz ReStyle was applied before Topaz Glow was used. That is because I felt the image needed that beautiful light effect that Blake discusses in his videos. His Room Glow preset was applied at 66% Strength and set to Hard Light blend mode before going back into Photoshop – it basically popped the picture! See Image 3 info for settings.
******************
 This image is from my favorite eating place in the Daytona Beach area, Takeya Steak House – just the best! I could not resist taking this image while waiting of a table recently. It seemed to be begging for a Glow application, so here it is, but it definitely also shows the fractal side of the plug-in. Not much was done this image other than adding Glow and clean up. See Image 4 for the complete workflow and plug-in settings. I like this sort of illustrative feel that Glow can give to an image.
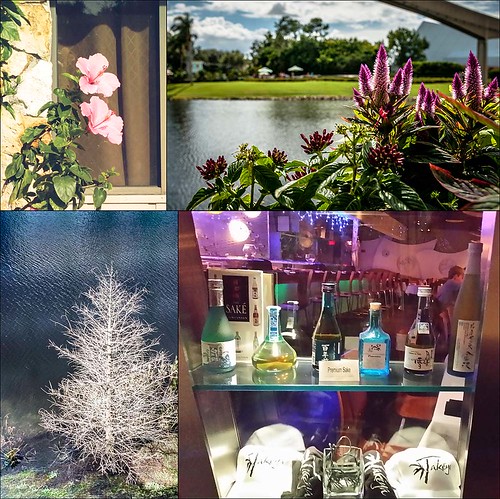
I decided to give you a small look at the original images as it is really hard to tell what effect this plug-in had on the images without them. So below are the images as they appeared after Lightroom but before Photoshop.
**************
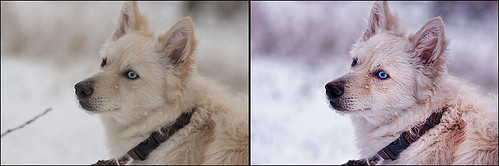
This last example is for all of us animal lovers – wanted to show how this plug-in does a great job with lighting on animal images. The image is from MorgueFile Free Photos – this site is loaded with fabulous pictures. The beautiful dog image was taken by GaborfromHungary, and I wish I had taken it. I wanted to try out Blake’s Animal Glow preset. It did not work well with this image, but my Graphic III Beach preset looked real great on the image. You need to try different settings for different types of images. The presets Blake gave us and the ones I am providing are just nice starting places. Once you find one you like, make a few changes for the specific image – you will get a real feel for what the sliders do and what effects you like. For all the settings on the dog image, check out Image 5 below.
 I hope this blog has shown you how to get some gorgeous lighting effects with this plug-in. One of Blake’s workflow steps when using Glow is t0 set the Overall Saturation to -1.00 so you can see what is going on with the luminance and not the color. Then adjust your saturation back. I find this very helpful to do when adjusting the sliders for each image – you are just looking at the black and white tones and not the vivid colors, which can sometimes get in the way. You really need to at least look at his PDF and try his settings to see how the light effect changes in your images. It really is an incredible result and I am so happy I tried out the presets. Maybe this info will make you look at what can be done with this plug-in from a little different point-of-view – I know it changed how I am using it. Blake has really found a new way to use Topaz Glow that makes this plug-in much more useful and interesting. Hope you give it a try at least! Until next week, stay warm and have a good one!…..Digital Lady Syd.
Digital Lady Syd Related Blogs:
Digital Lady Syd Reviews Topaz Glow
Simply Glowing!
On the Beach
Using Topaz Glow to Add Color
HDR Tree
Workflow Steps and Plug-in Settings:
Image 1: This is a very basic image taken with my Android phone camera, then in Lightroom 2 Lil’ Owl (see sidebar at my Tidbits Blog for website link) Hazy Days 22 preset was applied to get a bit of a Tuscany feel to the image. Once opened in Photoshop, some clean up was done on a New Layer, a stamped layers created (CTRL+ALT+SHIFT+E), and Topaz Glow opened. If you watch Blake’s videos, you will find he uses the plug-in to add a beautiful soft light effect to almost all his images. That is is exactly what I did with this image. A preset I created was used to get some very nice lines in the leaves and flowers and some nice lighting. Then once back in Photoshop, a black layer mask was added (CTRL while clicking on layer mask icon at bottom of Layers Panel) was added – just the flowers and leaves were painted back into the mask. Next Topaz Impression was opened and a preset following the instructions in Blake’s free download PDF (see first paragraph above) was used to create a preset I call Abstract Settings-Blake Rudis. (Here are the settings if you would like them: Primary Glow Type Dark, Glow Strength 1.00, Effect Sharpness 0.12, Electrify 1.00, Simplify Details 0.06, Edge Color 0, Detail Strength 1.00, Detail Size 0.42, Brightness 0.16, Contrast 0.18, Saturation 0.08, Line Rotation 0, and Glow Spread 0; Secondary Glow Glow Type Light, Glow Strength 0, Effect Sharpness 0.54, Electrify 0.11, Simplify Details 0, Brightness 0, and Contrast 0; Color Overall Saturation to 0.62, Red Sat to 0.44, Yellow Sat to 1.00 Yellow Lightness -0.36, Green Sat 1.00 and Lightness -0.51, Aqua Lightness -0.36, Purple Sat 1.00, and Magenta Sat 1.00 and Lightness 0.50. Set to Screen blend mode at 66% Strength; and no Finishing Touches. In this image I set the Primary Glow Saturation to -0.41.) Since I did not want too much applied, the layer was set to 55% opacity. A New Layer was created above and I just painted using my Chalk 60 Brush (just the Shape Dynamics Angle Jitter is set to 19%) to clean up some of the painted areas that need to be smoothed out – here your own touch can be added. Last step was to add a Curves Adjustment Layer to add a little contrast back into the image.
Image 2: Just basic changes were made to this image in Lightroom, no preset. This time Topaz Clarity was applied using the settings Blake suggested in his Webinar (here are his basic settings and they usually are a pretty good starting point for the image: Micro Contrast 0.13, Low Contrast 0.33, and Medium Contrast 0.52 – than can look at histogram and black tone – I did not adjust that here). Next Topaz Remask was used to separate the foreground from the background so Topaz Glow would only be applied to the foreground. In Glow, Blake’s Abstract setting was applied as shown with no changes and no blend mode changed in the plug-in. Back in Photoshop, the blend mode was changed to Pin Light at 100% layer opacity. On a stamped layer (CTRL+SHIFT+ALT+E) above, Topaz Impression was applied using my Abstraction preset set to 82% Strength (Stroke Type 12, Brush Size 1.00, Paint Opacity 0.38, Stroke Rotation 0, Stroke Color Variation 0, Stroke Width 0.85, Stroke Length -0.50, Spill 0.72, Smudge 0, and Coverage 1.00; Color Overall Hue 0.14, Sat 0.23, and Lightness 0.06; Red Lightness 0.14, Yellow Sat -0.11, and Green Lightness -0.36; Lighting Brightness 0.13, Contrast -0.23, and Vignette 0, Light direction X 0.34 and Y 0.05; and Texture Strength 0.19, Size -0.43, and Canvas I, Background type white solid and Background White). Now the painterly effect was added to the whole image, not just the foreground. A little clean up was done and that was it.
Image 3: In Lightroom used 2 Little Owls’ Fresh Color 1 preset. In Photoshop Topaz Clarity was used, but this time John Barclay’s settings were used (check out his Topaz Webinar called Creating Your Images with Topaz Plugins (not posted yet but is from 12/23/14) for another good video and some good Clarity info here.) The settings used for this image are: Micro Contrast 0.36, Low Contrast 0.20, Medium Contrast -0.11, and High Contrast -0.23 (see the stair stepping effect of the sliders) – then he looks at the histogram to adjust the Tone Levels – I usually do this in Photoshop but Clarity does a great job with the tones and colors. I am finding I like these basic settings a lot for this plug-in. Next Painted Textures Thanksgiving Winter Marsh was added twice – once set to Multiply at 64% layer opacity and Blend If This Layer white tab split (ALT+drag) was set to 96/130 and the top texture set to Linear Light at 22% layer opacity. Then Kim Klassen’s Deep Sigh texture was added and set to Hard Light at 74% layer opacity and the layer style Blend If sliders were set to: This layer white tab split and set to 149/196, and Underlying Layer black tab split and set to 14/42. This lightened up the background some. Next on a New Layer I used a brush I created using a portion of French Kiss’s Atelier Georgia texture set to 1600 px and just painted some green texture over the tree and everything – set layer to Soft Light blend mode. Created stamped layer and applied Topaz ReStyle Regal Blue Shades (settings changed here: Restyle Opacity 50% and Color blend mode; Basic Opacity 22% and Multiply blend mode; Detail Structure 0.50 and Sharpness 1.00. Mask for Basic painted to bring back some of the white in the tree – Brush Strength 0.77, Brush Size 0.05, and Hardness 0.30 using Edge Aware and Color Aware sampling tree branch). On a New Layer above, the Sharpen Tool was used to sharpen up the tree branches – it did a pretty good job on this image. Next Topaz Glow was applied using the setting in Blake’s PDF for his Room Glow preset – the Strength was set to 66% and blend mode was Hard Light before returning back to Photoshop. This one really took a while to complete and ended up very different from the start. Totally fun to do!
Image 4: In Lightroom 2 Lil’ Owls’ At the Vineyard 7 preset was applied. In Photoshop John Barclay’s Topaz Clarity preset was applied with same settings as Image 3. In Topaz Glow I used these settings for my Inter Web Variation preset (Here are the settings: Primary Glow Type Dark, Glow Strength 1.00, Effect Sharpness 0.12, Electify 1.00, Simplify Details 0.06, Edge Color 0, Detail Strength 1.00, Detail Size 0.42, Brightness 0.16, Contrast 0.18, Saturation 0.08, Line Rotation 0, and Glow Spread 0; Secondary Glow Glow Type Light, Glow Strength 0, Effect Sharpness 0.54, Electrify 0.11, Simplify Details 0, Brightness 0, and Contrast 0; Color Overall Saturation to 0.62, Red Sat to 0.44, Yellow Sat to 1.00 Yellow Lightness -0.36, Green Sat 1.00 and Lightness -0.51, Aqua Lightness -0.36, Purple Sat 1.00, and Magenta Sat 1.00 and Lightness 0.50. Set to Screen blend mode at 66% Strength; and no Finishing Touches.) On a New Layer above, the Sharpen Tool was used on the lettering in the bottles and hats. A little vignetting on the sides was applied with a Brown Solid Color Fill Layer with the mask filled with black (CTRL+I in white layer mask) and the edges painted back.
Image 5: First the image was duplicated and taken into Topaz Clarity (John Barclay Basic Settings from Image 3 was used, then Tone Level Black Level 0.13, Midtones -0.16, and White Level 0.30; HSL Filter Sat Red 0.45, Aqua 0.69, and Blue 0.33 were added). The Spot Healing Brush Tool was used to get rid of areas. Then in Topaz Glow my Graphic III Beach preset was applied ( (Here are the adjusted settings I used: Secondary Glow: Glow Type Light, Glow Strength 0.23, Effect Sharpness 0.47, Electrify 0.17, Simplify Details 0, Brightness 0.36, Contrast 0.62, and the other two 0; Color: Red Sat 1.00, Orange Sat 0.27, Yellow Sat 0.20 and Lightness 0.09, Aqua Sat 0.78 and Lightness -0.26, and Blue Sat 0.49). The Blend Mode and Strength is the same as the blend mode and layer opacity in Photoshop, so usually I do not apply them until I go out of the plug-in so they can be readjusted easily. This time the Overlay blend mode was used and set to 67% layer opacity. A black layer mask was added, and the dog was painted back in. In the Properties Panel, the Density was set to 85% and the Feather 31.6. The last step was a Curves Adjustment Layer that was used to add back just a little contrast and the Blue/Yellow curve was used to move the image to a more cool look. That was it.

Pingback: » Doors, Doors, Doors! Digital Lady Syd's Tidbits Blog
Pingback: JUST HAVING FUN! | Digital Lady Syd's Fun Photoshop Blog
Pingback: » Keeping an Eye on Things Digital Lady Syd's Tidbits Blog
Pingback: » Wetlands Getting Ready for Spring Digital Lady Syd's Tidbits Blog
Pingback: HOW TO CREATE A MAGICAL FEEL IN PHOTOSHOP | Digital Lady Syd's Fun Photoshop Blog
Pingback: » Courting Herons Digital Lady Syd's Tidbits Blog
Pingback: TOPAZ FILTERS AND LANDSCAPES | Digital Lady Syd's Fun Photoshop Blog
Pingback: HOW TO ADD A SIMPLE GLOW EFFECT TO YOUR IMAGE | Digital Lady Syd's Fun Photoshop Blog