
SOME CHRISTMAS CHEER AND RESOURCES
 Having a great time creating some vintage cards since the season is near. I have linked some holiday resources containing, several with free downloads, to help you make some of your own creations along with a few tips and Glitter Brush to make. Lots of info here so off we go!
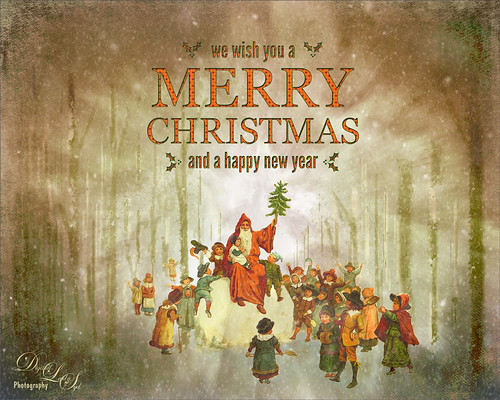
For the top image I actually started painting some aspen trees, like the ones Karen Bonaker is giving away for her Holiday Brush Giveaway for Corel Painter 2016, except this time a Photoshop brush by GrutBrushes.com called New Media Dim Detritus was used to create the trees. Nicholai has some of the best, all media Photoshop brushes – check out his Free Brush of the Week every Monday. This is how I started using his brushes and now I use them on almost every image. Used different colors to add variations on the trees and different brush sizes – held the SHIFT key as you drag to get a totally straight vertical tree. And added some smaller branches. This beautiful vintage scene is from a book published in 1894 called “The Coming of Father Christmas” has pdf link to download the original book from the The British Library Flickr group – another great free resource of vintage items. To get the God-Beam effect, Jai Johnson’s free Soft Pink Glaze texture was applied and set to Linear Burn Blend Mode. The Layer Style was opened by double clicking on the layer, and the Blend If This Layer white tab was set to 157/193 (split by ALT+clicking on the tab and pulled apart). On a New Layer a watercolor brush by Grutbrush called Bran Chatter was used to add a slight shadow effect in the foreground and was set to 36% layer opacity. A clean up layer was created and my SJ Pastel 3-painting texture brush was used to smooth some of the sharp edges by sampling colors and painting over edges to slightly blur them. (To create brush, see my How To Use Photoshop’s Brush Texture Section for Painting Clean-Up Blog.) Next my free SJ Snow2-Overlay-slight blur was placed in image and set to 53% layer opacity to add some soft snow. Next Something Like Life Photography & Design snow2 overlay was applied – here is a link to the Snow Overlays that contains this overlay. It was set to Screen blend mode at 92% layer opacity. The text is in an overlay set that Shadowhouse Creations, one of my very favorite texture people, is giving for the holidays. A Stroke, Inner Shadow and Pattern Overlay was added to this overlay to get the match up text to the vintage feel. Next from 2 Lil’ Owls (see sidebar at my Tidbits Blog for website link) this pretty vintage overlay effect was added and called Color Bokeh-Grunge Set 4. The last step was adding a Curves Adjustment Layer to add back a little contrast.
******
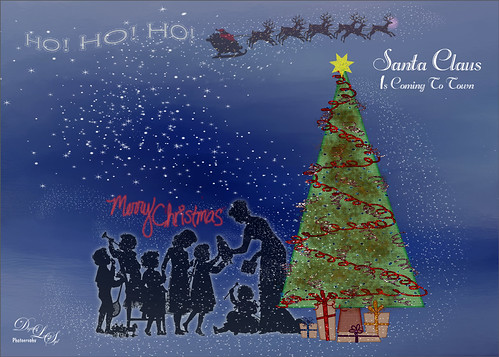 Here is another card I created just for fun. This time I have to give major kudos to the Scrapbook Community and all the wonderfully creative people that make their kits. The tree and packages in this image are from a set by Pixelscrapper‘s Brooke Gazarek called Touch of Sparkle Christmas Tree Gifts Kit (appears to be a free download with a sign up to this site). On the tree, besides adding a star using Stars & Sparklers brush 12 from PhotoshopBrushes.com and setting it to Dissolve Blend Mode at 83% layer opacity, the tree was brushed in with orange and then yellow on two separate layers to create a little texture using a brush made from listening to Aaron Nace, who is a Photoshop brush guru. This brush I use to add subtle color in shrubbery and backgrounds and in this case, the Christmas tree. (See end of blog for instructions on making this brush – very easy.) Even the white falling snow can be added with this brush although an overlay in the scrapbook kit above was used here. The Silhouette of Children Receiving Gifts from 1900 is free from the Old Design Shop, a very favorite vintage blog that I follow – always lots of really cool old items to download. Topaz (see sidebar at my Tidbits Blog for website link) ReMask 5 was used to get a very clean selection but Color Range or any other method could be used. When a good sharp edge is needed, ReMask works the best for me. A default Outer Glow Layer Style was used on the layer mask. The actual silhouette was set to only 66% layer opacity. One of my Corel Painter textures was placed underneath the silhouette and tree layers and a Color Balance Adjustment Layer was used to get the background color effect. The Santa Claus and reindeer are in a set of Christmas brushes by Flina on Deviantart, some of the best around. What can make an image special is the attention to detail. In this case, the brush was used on two different layers – once in black and directly on top in red. On the red layer, a black layer mask was applied (CTRL+I in a white layer mask to invert), and just the area for his jacket and hat were painted back in white. A separate layer was used for Rudolf’s red nose and an Outer Glow Layer Style in light red was used to get a slight nose glow. I also tried to line up the snow so it looks like Santa took a turn around the tree before heading off. The last areas applied were all the text layers. Santa Clause Is Coming to Town is also from Shadowhouse Creations using link in first image description. Ho! Ho! Ho! is a free font called Hana set to 21 pts. and the Warp Style Flag was used to get wavy appearance. An Outer Glow Layer Style was set to Blend Mode Dissolve, Opacity 75, Noise 44, Color White, Technique Softer, Spread 65, and Size 7. A Contour was changed and I cannot find the download link so try different ones and set the Range set to 100% and Anti-Aliased off. Try using different Contours in several of the Layer Style sections for different effects. This is another example of the detail that can be applied that will make the image look more professional. The Merry Christmas lettering is an overlay from the scrapbook file with the default Overlay Glow Layer Style added. The last step was to add a Black and White Adjustment Layer and adjust the green tone – then set adjustment layer to Luminosity at 37% layer opacity.
My Glitter Brush Settings: For a little Holiday Gift, here are my brush settings so you can make your own perfect Glitter Brush. First use a very small 3 pixel soft black round brush and make about 8 or 9 dots in a small circular area. With the Rectangular Marquee, pull out a square by holding down the SHIFT key and dragging out around the dots. Go to Edit -> Define Brush Preset, name, and it will appear at the bottom of your Brush Preset panel list. I named mine SJ Glitter Brush-original. Next in the Brush Panel go to the Brush Tip Shape section and set 17 px, Angle 0, Roundness 100% and Spacing 11%; Shape Dynamics section – just these settings – Angle Jitter 17%, Roundness Jitter 57% and Minimum Roundness 25%; Scattering section – 593% and no Both Axes checked, Count 1, and Count Jitter 0; and Smoothing section checked on. Save as a brush preset (click on the folder icon at bottom of either the Brush Preset Panel or the Brush Panel) – mine is named SJ Glitter Brush-1. This brush can now be used to add some texture in or add some sparkles by changing the size to a small 3 pixels and adding an Outer Glow layer style (double click on layer to open). For the color brush, the size was changed to 7 pixels and the Color Dynamics section was opened in the Brush Panel where the Foreground/Background slider was set to 51%, Hue 66%, Brightness 100% and Saturation 10% – get rainbow sparkles. This was saved as SJ Glitter Brush-color. Sometimes I set the Hue and Saturation to 0 to add just one basic flower color into an image. Try using this brush on its own layer for adding texture into a background or an object. It really works wonders!
Well I hope you found some fun things to download and use in your holiday creative work. This time of year is so much fun as I feel I can just play away and nothing has to be too authentic looking – lots of fun. The previous posted blogs below also have lots of resources if you need more. Hope everyone is enjoying this wonderful time of year so until next week…..Digital Lady Syd
Digital Lady Syd Related Blogs:
Merry Christmas and Happy Holidays from Digital Lady Syd!
Some Free Christmas Overlays to Spice Up Your Christmas Cards
How To Use Those Holiday Resources
Merry Christmas from Digital Lady Syd
Christmas Card from Digital Lady Syd!

I love you how used that texture and linear burn layer mode to add so much warmth and magic to your moody forest. Great image. And thanks so much for the kind words about my brushes too!
12/12/2015 at 11:48 am
Thanks for the info Syd!
12/12/2015 at 1:06 pm
Thank you for the great tips!
12/12/2015 at 2:55 pm
Pingback: » Santa Believing! Digital Lady Syd's Tidbits Blog
Pingback: GETTING THAT PAINTERLY EFFECT WITH PLUG-INS | Digital Lady Syd's Fun Photoshop Blog