
HOW TO USE PHOTOSHOP’S BRUSH TEXTURE SECTION FOR PAINTING CLEAN-UP
 I have been painting in Corel Painter more but finding I just have to use Photoshop to finish up most of my work. This can be frustrating because as we all know, Painter excels with their hundreds of brushes and usually the strokes and dabs look much better when created in Painter. Therein lies my dilemma. How do I clean up some mis-strokes when I am in PS so that you can’t tell the clean up was done.
I have been working on a brush all week and a lot of the best results came from the PS Brush Panel’s Texture section settings. If you understand this section, you can create some really nice brushes for smoothing out hard edges or blending texture into a big splotches of paint.
Some Important Brush Panel Notes:
- The Brush Panel in Photoshop is often called the Brush Engine as it is in Painter.
- Also when creating a new brush, be sure to actually click on each brush section name to open it up. By clicking on the check box, the existing settings from the last brush used will be applied to it. This can wreak havoc on a brush!
- Texture and Pattern can mean the same thing, depending on what you are doing in Photoshop (and Painter). A texture is really a texture that you are adding in as a layer to an image and usually have .jpg or .png file extensions. A texture can be a pattern when using the Paint Panel’s Texture Section, the swatches as shown below are actually patterns and will have a .pat extension. To convert a texture to a pattern, open the Texture in PS, and to a Pattern, go to Edit -> Define Pattern – a Rectangular Marquee Selection can be made of just part of the texture to use as a pattern also. It will now appear at the end of your Patterns list.
Brush Panel Texture Section Basics
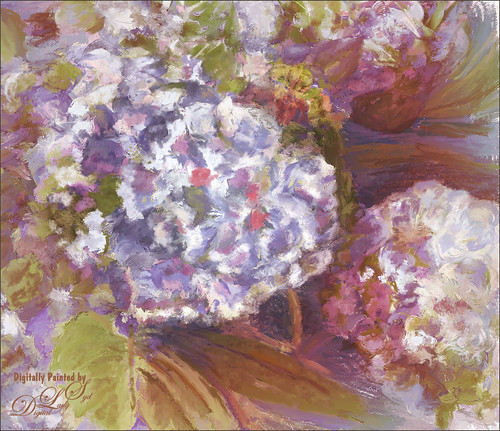
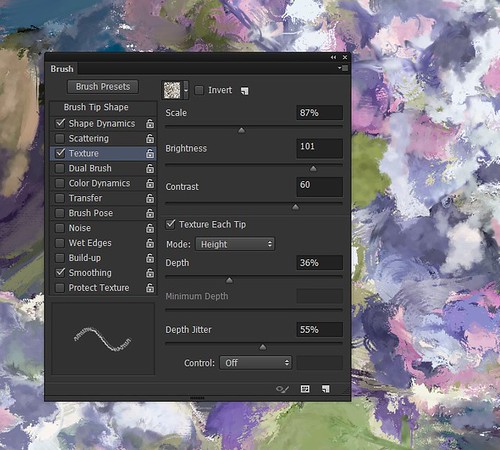
Below is what the Texture section looks like when the brush created was used to clean up the above hydrangea image. See My Pastel Brush Settings section below for all the original brush settings – it is a favorite of mine to just paint with, without these Texture settings. The new settings are also listed again if you would like to create the brush.
 As you can see in the image, the Painter strokes created a lot of differing and textured swirls within this image. When the image was opened in Photoshop for final processing, I looked at the strokes more closely. Several looked too sharp – too much bristle or sketch-looking lines – and did not blend well with the other parts of the image.
The brush created was for adding texture into painted areas to either soften edges or add some interest. This is done in PS by adding one of the same patterns already listed in the drop-down (click on down arrow to left of pattern swatch to open up). This is the same pattern list used with the Pattern Fill Adjustment Layer, Layer Style Pattern Overlay Section, Bevel & Emboss Texture Section, and Stroke Section. Here are a few of my Obsidian Dawn patterns shown in my drop-down list below.
 A colored pattern can work in the brush if it has lots of contrast, which is determined not by the color saturation but the light and dark tones. The black and white patterns seem to be the best choices. The texture used in this brush was called 12 and the link is in brush settings section below. The pattern had a nice contrast to it and created an interesting texture in the stroke. The pattern may not be visible in the stroke preview at all until the following section sliders are adjusted.
The Scale can be adjusted to get a bigger or smaller pattern size. If you make it too small, a repeat pattern line in larger brush strokes may be seen, so watch out for this. When the pattern is added and no change is visible, try adjusting the Brightness slider first and watch the Preview for a change. The Contrast can help but it is not usually as noticeable. The Mode can make a big difference. Try all the different modes as they sometimes give drastically different results. The Preview will show these differences. The Depth, Minimum Depth (must set a Control to use this slider), and Depth Jitter (randomness) sliders can also add some major texture contrast, especially on the edge of the stroke. Overall adding texture to a brush requires a lot of tweaking, but when you get a good result, it is so rewarding and helpful to have.
How to Paint with This Brush
Now that you have a brush you like, here are a couple little tips for using it. Since you are using a texture (pattern) in your brush, it can make your computer use a lot of ram to keep up with your stroking since most of the time the Texture Each Tip box is on. This means it is applying the texture to each stroke laid down. Try increasing the spacing just a bit – usually this will not make a very noticeable change and speeds up the stroking. Since I have an older computer, CS6 runs much smoother when painting with a textured brush. It can also help to change your image to 8-bit mode if having problems.
Next point, if you want to just smooth some of the strokes with this brush, sample the color you are painting on (ALT+click on spot). If you want to add a little texture to the stroke, just sample a similar color nearby or go a lighter or darker using the color swatch. This is how I mainly added the soft color in some of the larger areas of this image. This brush can be used without the Texture Section checked to make a much more smooth stroke for color clean up or sharp edges.
Sometimes a funny color results if you are painting on a layer that is underneath an adjustment layer. That’s because you are technically sampling All Layers even though it is not shown in the Options Bar. Either need to turn off the adjustment layers above and sample the colors before the adjustments layers were added, or create a stamped version (CTRL+ALT+SHIFT+E) on top and then add the New Layer for painting on. Now the sampled colors will be as you adjusted them. The stamped layer can then be deleted but the colors will stay correct.
Why Not Use the Smudge Brush or the Mixer Brush?
The Smudge brush does some wonderful things, but there is no access to the Texture Section in the Brush Panel for Smudge brushes (only Basic Tip Shape and Shape Dynamics can be adjusted with a Smudge Brush and no color can be laid down, only get blending). The Mixer brushes work very well but I find it takes a lot of experimenting to get the exact stroke needed. Since what I needed was a quick little clean up brush, this seemed a bit like over-kill unless it is needed for some fine art.
My Pastel Brush Settings
I really like the shape of this brush – as a starter it is very textured and makes a nice subtle rough edge with the dab. The new brush used in my image and in this blog was called SJ Pastel 3-painting texture adder2 (I do not remember why I named it Pastel 3 since it used their Pastel 11???). Both the new brush and my original brush (called SJ Pastel 3 Use) used this wonderful dab (tip shape of brush – similar to a captured dab type in Painter) can be found in SDW Pastel Brushes set as Pastel 11 brush. I listed my settings. I also created brushes using their Pastel 5 brush – try this one out for a good experiment – slightly different dab shape. I am not exactly sure this qualifies as a true pastel brush since the Erodible Tips are often used for pastel effects.
Brush Tip Shape:
Size: It opens up at a huge 2130 px brush! Here are the settings for the other sections so you can create the same brush or use this one to try and create some better results. The original SJ Pastel 3 brush was set to 35 pixels in size. For this painting brush, the size is set to 8 pixels. I like to use a small size for clean up and this can be adjusted easily.
Angle – 137 degrees – change by moving the little circle with the arrow around
Roundness – 100% – change by moving the little dots on circle inward
Spacing – 35%
Shape Dynamics:
Size Jitter – 17% but Control on Fade
Minimum Diameter 23%
Angle Jitter – 42% and Control Off
All other settings at 0.
Texture: For SJ Pastel 3 Use (original brush)
Pattern in drop-down: Rough, located in PS Erodible Textures
Scale – 87%
Brightness – (-45)
Contrast – 0
Check Texture Each Tip
Mode – Multiply
Depth – 50%
Depth Jitter – 1%
Texture: For SJ Pastel 3-painting texture adder2 (new painting brush)
Used was Pattern 21 from Obsidian Dawn’s SS-grungy-dirty-patterns set. Check out her website – one of my favorites for brushes and everything Photoshop and some good tutorials are also available.
Scale – 87%
Brightness – 101
Contrast – 60
Check Texture Each Tip
Mode – Height
Depth – 36%
Depth Jitter – 55%
Smoothing: Always leave toggled on
Options Bar Settings
For beginning setting, the brush Options Bar shows a Mode of Normal, Opacity 67% and Flow 100% for both brushes. Need to be careful. If your brush does not act correctly, take a peek up at these settings to make sure they are set correctly.
I usually save these brushes as both Brush Tool Presets and Brush Presets. Also go into the Preset Manager and save them on your hard drive so if you lose them accidentally, they can be restored easily.
 These pretty little wildflowers were growing on my deck a while back. They were painted in PS using the original My Pastel Brush, and then clean up using the new SJ Pastel 3 brush from above. The background was painted in Painter and added over the image. There was a lot of clean up in this image, but overall it came out pretty much how I wanted it to look.
I hope you get a chance to try out the brush and experiment making your own. It can really help to clean up those over-looked Painter mistakes without having to go back and forth into the different programs. Also it works great when painting in PS as in the wildflower image, with and without the Texture Section turned on, to clean up the layers below. Hope this gets a few people to try making their own brushes – it is so much fun!…..Digital Lady Syd
Digital Lady Syd Related Blogs:
How to Easily Create a Photoshop Brush for Painting

Always great tips on this site!
05/17/2015 at 3:50 am
Thanks for the comment Pat
05/17/2015 at 2:02 pm
Pingback: » Waiting For Spring Digital Lady Syd's Tidbits Blog
Pingback: MORE PAINTING – WITH PAINTER AND PHOTOSHOP | Digital Lady Syd's Fun Photoshop Blog
Pingback: SOME CHRISTMAS CHEER AND RESOURCES | Digital Lady Syd's Fun Photoshop Blog
Pingback: GETTING THAT PAINTERLY EFFECT WITH PLUG-INS | Digital Lady Syd's Fun Photoshop Blog
Pingback: » Painting the Town Digital Lady Syd's Tidbits Blog
Pingback: GETTING THAT POSTER EFFECT | Digital Lady Syd's Fun Photoshop Blog
Pingback: HOW TO CREATE MY FAVORITE BRUSH | Digital Lady Syd's Fun Photoshop Blog
Pingback: PATTERNS, PATTERNS, PATTERNS | Digital Lady Syd's Fun Photoshop Blog
Pingback: TOPAZ STUDIO 2 IMPRESSION AND PHOTOSHOP BRUSHES | Digital Lady Syd's Fun Photoshop Blog