
HOW TO USE THE SPOT HEALING BRUSH – REALLY IMPROVED NOW!
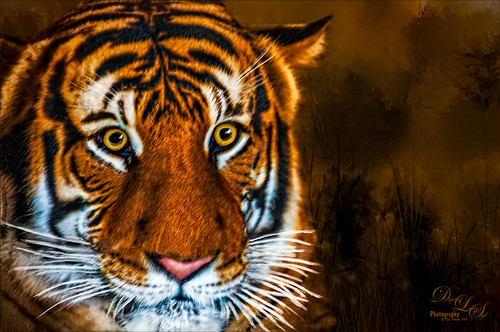 Once again, had to share something I think is rather cool. I usually do most of my post-processing in Photoshop CS6 because I do most of my painting with it. (I have my favorite brushes saved in the Tool Presets, I can use my own Flash panels, and the Mixer brushes paint faster.) But that does not mean I do not like Photoshop CC 2015. Adobe has greatly improved the Spot Healing Tool from earlier versions of CC and it seems CS6 and I just wanted to show how good it now is. The above image of a Malayan Tiger (I think) was taken at the Jacksonville Zoo inside a room with large bars in front of his beautiful face – they were doing a little tiger demonstration for the visitors so so you could see them up close. I really loved the expression on his face, so I decided to experiment in PS and see if I could get a good image from the original – the left image below.
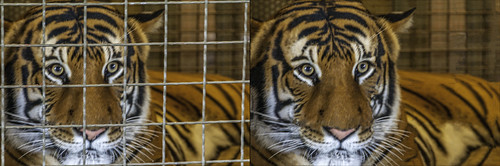
By selecting the Spot Healing Brush and setting the Options Bar settings to Mode Replace (This mode works best for me – per Adobe it preserves noise, film grain, and texture at the edges of the brush stroke when using a soft‑edge brush), Type Content-Aware and Sample All Layers, I was able to remove the bars completely – no other tools or cloning needed! I found that using short strokes was most useful and going over it a couple of times was sometimes needed. Apparently the Tool will learn how you want the area filled. I used a brush that was slightly larger than the chicken wire bar to be removed to help with the fill in information. I also used a layer above to make my corrections on so if something was really messed up, it could be erased and redone in just that area. See the right image above for spot-healing results. Obviously it was not totally perfect, but not bad at all!
Finalized the image by creating a stamped layer, and applying Topaz (see sidebar at my Tidbits Blog for website link) Detail 2 to sharpen the face. One of my textures created in Painter was added underneath the tiger. A Black and White Adjustment Layer was added to the texture – sliders were adjusted and set to Tint using a beige color. This darkened the texture quite a bit. A layer mask was added to the stamped layer so the texture could be used for the background. Another stamped layer was created and Topaz Impression’s Photo Painting III preset was applied as is and set to Saturation blend mode. A layer mask was added to bring back some of the whiskers and facial detail. A little painting was done on a layer for clean up of the face. The eyes were sharpened using an Exposure Adjustment Level. Nik Viveza 2 was used to add focus to the face – everyone can do this now that the plug-in is free! The last step was to add two Curves Adjustment Layers set to Luminosity blend mode – used to darken the image and one to lighten. Fill layer masks with black and paint back to dodge and burn. That was it.
Such for not blogging, but I was so surprised how good the Spot Healing Brush is working over the one in Photoshop CS6 and wanted to share – anyway, have a great week!…..Digital Lady Syd
Digital Lady Syd Related Blogs:
How To Do a Quick Eye Sharpening in Photoshop
How to Use Curves Adjustment Layers to Dodge and Burn an Image

My goodness, Syd, you did a beautiful job on this. It is amazing that you were able to remove all those bars. So nicely done, and what a gorgeous creature.
Have a great weekend!
04/02/2016 at 10:04 am
Thanks Lisa – PS always has a way to amaze me! It just keeps getting better!
04/02/2016 at 7:03 pm
Excellent, Syd. I love the Spot Healing Brush! By the way, one of the options I miss hugely is Variations. Do you know of any third party plug-ins that do the same? Hope you’re having a lovely weekend!
04/03/2016 at 4:43 am
Hi Sarah – sorry it took so long for me to get back to you on this. I don’t use Variations a lot, but not sure why. I had realized they took it out of CC, but it still in is in CS6. I can’t seem to find a 3rd party plugin that contains this type of filter but I will keep looking and let you know if I find one.
04/06/2016 at 10:39 am
Thank you, Syd. I always found it much easier to make colour adjustments with. I have searched before to no avail so don’t bust a gut!
04/06/2016 at 10:59 am
What a perfect job with the Spot healing brush! Thank you for sharing!
04/03/2016 at 10:55 am
Thanks Inese – it is a pretty amazing tool!
04/06/2016 at 10:40 am
Pingback: » Taking a Break! Digital Lady Syd's Tidbits Blog