
HOW TO DO A QUICK EYE SHARPENING IN PHOTOSHOP
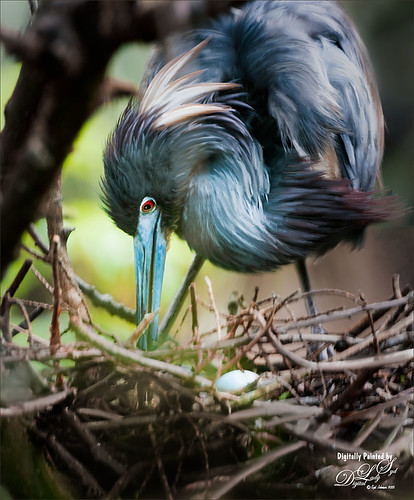 Thought I would just do a quick post while taking some blogging time off. Don’t forget to check in on my short Tidbits Blog though. This beautiful Heron was very busy organizing her nest at the St. Augustine Alligator Farm Rookery.This is another image I painted in Photoshop using a couple Blender Mixer Brushes, meaning no color was added – just blending and smoothing the color that was already there.
This Calvin Hollywood eye technique is one I use all the time. The bird’s eye was sharpened by selecting the eye in Quick Mode (press Q – be sure Color Indicated is set to Selected Areas and press Q again to exit Quick Mode) although any selection tool works fine, and then opening up the Exposure Adjustment Layer. Now just the eye is showing as white in a black layer – if this is backwards, just CTRL+I in mask to invert. Set the Exposure to the right a little (which lightens the exposure of the eye) and then adjust the Offset (sliding to left darkens shadow areas) and sometimes the Gamma Correction (affects the midtones of area) – watch for any milky or color shifts with the Offset slider which means you have gone too far. Go back to the Exposure slider for final adjustment. For example, my settings were Exposure +2.06, Offset -0.0100, and Gamma Correction +1.04, which means the eye was brightened by 2 exposure stops and midtones evened out a little. To further enhance the brightness of the eye, add a Hue/Saturation Adjustment Layer. Copy the Layer Mask from the Exposure Adjustment Layer by ALT+clicking on mask and dragging up – it will ask if you want to replace the mask – say yes. Adjust the Saturation slider and change the whole Hue/Sat Adjustment Layer to Luminosity blend mode so only brightness is changed in the eye.
Very little else was done to this image. Used a Curves Adjustment Layers to make a slight Vignette around the bird and to adjust the blue color in the image, and a Levels Adjustment Layer to open up the midtones a little. This is too much fun!…..Digital Lady Syd
Save

Pingback: HOW TO SEE IF YOU CAPTURED THE FOCAL POINT | Digital Lady Syd's Fun Photoshop Blog
Pingback: » Digital Lady Syd’s Rule No. 13: Paint Something Everyday Digital Lady Syd's Tidbits Blog
The image is so beautiful – busy mama heron is showing her plumage and posing like a professional model 🙂
06/11/2015 at 3:47 pm
Thank Inese. I am so into painting these birds – they have so much personality!
06/13/2015 at 9:43 am
Your photographs are so beautiful – they truly show the bird’s personality.
06/13/2015 at 6:58 pm
Pingback: » A Tricolored Heron That Fell in a Painting! Digital Lady Syd's Tidbits Blog
Pingback: HOW TO GET A PAINTERLY EFFECT FOR WILDLIFE AND BIRDS | Digital Lady Syd's Fun Photoshop Blog
Pingback: HOW TO CONVERT AN IMAGE TO B&W WITH HUE/SATURATION ADJUSTMENT LAYERS | Digital Lady Syd's Fun Photoshop Blog
Pingback: CREATING WINTER WONDERLAND EFFECT! | Digital Lady Syd's Fun Photoshop Blog
Pingback: HOW TO USE THE SPOT HEALING BRUSH – REALLY IMPROVED NOW! | Digital Lady Syd's Fun Photoshop Blog
Pingback: » Looking Innocent! Digital Lady Syd's Tidbits Blog
Pingback: WHAT’S NEW IN TOPAZ IMPRESSION 2? | Digital Lady Syd's Fun Photoshop Blog
Pingback: HOW TO USE MOTION BLUR FOR ARTISTIC EFFECT | Digital Lady Syd's Fun Photoshop Blog
Pingback: HAPPY MOTHER’S DAY! | Digital Lady Syd's Fun Photoshop Blog
Pingback: THE EYES HAVE IT – HOW TO MAKE THEM POP IN AN IMAGE | Digital Lady Syd's Fun Photoshop Blog
Pingback: RECYCLE-HOW TO GET A PAINTERLY EFFECT FOR WILDLIFE AND BIRDS | Digital Lady Syd's Fun Photoshop Blog