
HOW TO CREATE 2017 CALENDARS IN BOTH LIGHTROOM AND PHOTOSHOP
 This week I thought I would give you a quick tutorial on how to create basic calendars using your own photos. A calendar can be so personal and might be the perfect last-minute gift. Recently I blogged about how to use templates in both Lightroom and Photoshop, and these techniques use very similar steps to create calendars. (See my How to Use Lightroom’s Print Templates to Display Your Images blog and How to Use a Photoshop Template blog.)
The first thing that needs to be done is to download the free calendars. First Ed Weaver at Red Photographic site distributes the calendars every year along with the wonderful Lightroom Print templates. Also Calendar Labs.com has different formats that can be downloaded as Word documents – see the Photoshop Calendars section below on how to convert these to JPEG files. Either site’s calendars can be used in both programs.
LIGHTROOM CALENDARS
Matt Kloskowski (a former Photoshop Guy) created a recent blog that basically covers how to get the templates into your program – check out his Free Lightroom Calendar Preset and Templates blog. It is important to understand that the JPG calendars are just that – JPGs and need to be Imported into Lightroom just like any other image. Therefore, they need to be placed in a folder probably with your images so you know where to find them. The templates also need to be imported into Lightroom – the files have an extension of .Irtemplate. In the Lightroom Print module’s Template Browser, create a new category called 2017 Calendar Templates – then right click on the folder and import these templates. There are 11 being imported.
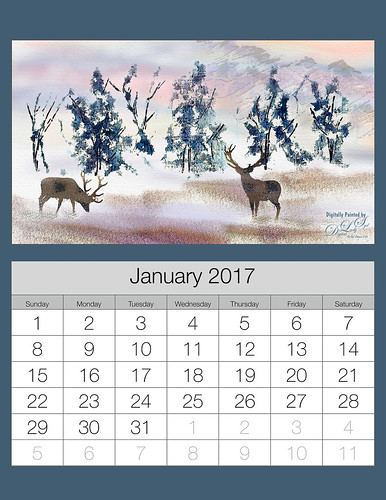
The image above used the Calendar 8 1:2 X 11 1 month template. Matt suggests creating a New Collection called 2017 Calendar Templates. From the Develop module, select all the 2017 Calendar JPGs and drag them into this collection. Now go through your images and choose ones you would like to include in your calendar. The collection makes is very easy to add the images and the calendars into the templates once back in the Print module. Highlight the new Calendar collection and the Film Strip at the bottom will show all the items in the collection. Click on a template in the Template Browser to chose one. Just drag images into the openings of the template you have selected. To adjust the images inside the openings, must CTRL+drag image to fit – this is because the template is a Custom Package. My 12-month calendar did not look right when selected. If this happens, click on the Page Setup button and go into your printer’s Properties. You probably need to set the paper size to the size in shown in the template description – my printer does not have all the sizes shown so the standard 8 1/2 inches X 11 inches was used for the these examples and set to Borderless Printing to get the template openings to look correct. A background color or Inner Stroke can be added. Instead of printing right from Lightroom, I like to go to the Print Job section and choose Print to: JPEG file. Press the Print to File and save the file as a JPEG. Now more adjustments can be made in Photoshop if needed.
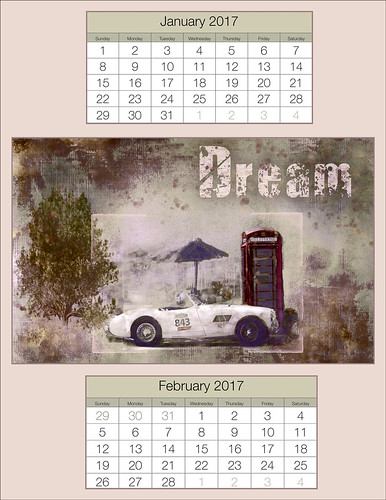
 Below is a different example of how to use the templates in Lightroom. This calendar used the Custom Center template in Lightroom Templates folder. Note that the heading colors are different from the gray tones in the original calendar JPEGs – this can be done by first selecting the calendar needed, then enter the Develop module, create a Virtual Copy (by right clicking on the image) and changing the color – this time the Split Toning panel was used to do this. The Virtual Copy can be dragged onto the template just like the original image. I just kept going back to the Print module and seeing if the resulting color matched nicely. Also, on the Calendars, I removed the bottom lines by just adjusting the cells – then used the CTRL+drag inside to further adjust calendar in the cell.
PHOTOSHOP CALENDAR
It is actually easier and there is more creative license to do calendars in Photoshop. First create a document that is the size you want the calendar to be – I used 8.5 inches X 11 inches again. Now bring in the calendar. The calendars from Ed Weaver are fine or download from Calendar Labs.com for some different formats. If using the Word document calendar, just open it up in Word, right click on the calendar itself, and choose Copy. Go into the Photoshop file and right click or CTRL+V to Paste the calendar into the document. Now Free Transform (CTRL+T) to adjust size and to position. If Copy is not one of the options in Word (as in the 12-month calendar which is in a table format), need to right click and choose Select -> Table – then right click once calendar is highlighted and click on Copy. It will now Paste into Photoshop. Next place an image for the top of the calendar – or just paint in a New Layer above the calendar. New Layers can be placed above the Background layer and fancy brushes can be used to paint behind it. There are now all kinds of possibilities for creating beautiful calendars for each month or for yearly ones.
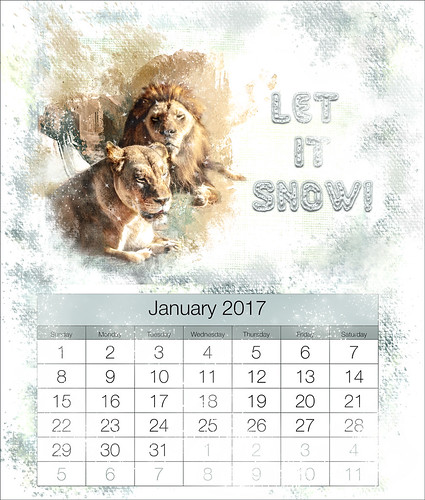 Above the background was painted behind and above the image to give the whole month a snowy feeling – this might be a little hard to read, but it was fun to create. These are just my lion buddies that look so good wherever I put them. Used the Pretty Action”s Magic Dust brush again, some of Aaron Blaise Canvas Texture brushes, and a couple of Grut’s FX Cloud brushes (they don’t have to be used for clouds!). The image below is another example of creating the Calendar in PS and just dragging in the calendars and images. A layer mask was placed on the calendar and using one of the canvas texture brushes again, parts were lightly painted out in the calendar. Then the calendar was duplicated and taken into Color Range where the white was removed – press CTRL+J and just the numbers were shown on the layer – a Layer Styles stroke was placed around it. Then the layer was set to Color Burn at 64% so it shows up, but is slightly transparent. The flower image was taken in the Bahamas – Corel Particleshop was applied using the Cluster Brush to add some bright lights. Also the Magic Dust brush was used to add more of a magical feel. Really fun!
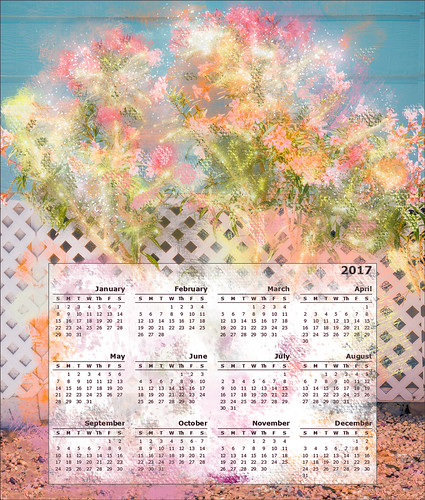 Hope this was easy to understand. It is a lot of fun to create your own calendars – I like to do this every year. Just experiment around and you should be able to get the hang of it. Enjoy the holidays!…..Digital Lady Syd

This is something that I’ve not tried, Syd, and would really love to.
Thank you so much for sharing here.
Have a very Merry Christmas, and a bright and beautiful New Year!
12/19/2016 at 7:06 am
Thank you so much for sharing! Love your lions 🙂
Wishing you a Merry Christmas, and a wonderful New Year!
12/21/2016 at 5:40 pm
Pingback: HOW TO CREATE A 2018 CALENDAR | Digital Lady Syd's Fun Photoshop Blog
Pingback: HOW TO CREATE A 2020 CALENDAR | Digital Lady Syd's Fun Photoshop Blog