
HOW TO CREATE LIGHT LEAKS TO USE OVER AGAIN
 Many people are selling some beautiful light leaks to add as overlays to your images. It occurred to me that is this is just not that difficult a thing to accomplish so this blog is about making your own light leaks quickly. Besides being great for vintage looks, many digital artists use light leaks to add more light into an image. By making the final light leak layer a PNG file, it can then be easily adjusted and placed over your other images to get a quick and perfect light leak effect. The above image of the waterfall at the entrance to the Ormond Memorial Art Museum and Gardens used two light leaks – an orange one on the left side of the image and a pink color sampled from the bright colored flowers for the upper right side.
The workflow to create a light leak is pretty easy – just follow the steps below. Once a few have been tried, it is not that hard to make several colored light leaks in the same image (as above) or add subtle pattern effects to the light leak. Even some of the regular gradients that are supplied by Photoshop or downloaded from others can be turned into light leaks with a little more manipulation. In Photoshop I started with a very basic image where the different light leak effects could be seen clearly and then added and deleted after saving.
1. First click on the foreground color swatch to open the Color Picker. Choose a foreground color that would make a nice color light leak. Reds, Yellows and Oranges look very good. Also Blues and Purples can look great too with the right image.
2. Next a Gradient Fill Adjustment Layer is opened. To find it, click on the half-moon icon (4th over) at the bottom of the Layer Panel. (Alternatively go to Layers -> New Fill Layer -> Gradient Fill.) In most cases the Linear Style gradient is used. Click on the Gradient strip in the Gradient Fill Panel to open the Gradient Editor panel – select the 2nd Gradient over, the color to transparent gradient, and click OK. Don’t worry that the color may look way overdone at this point.
- The Angle determines how the gradient lines up on the image.
- Change the Scale to make the leak appear larger or thinner. For example, set Scale to 385% and it looks very soft and stretched out – no defined edge; set to 25% and there is a very sharp gradient edge. There is definitely an opacity change associated with the Scale setting. The default is 100%.
- Use the Move Tool (V) to move the gradient around in the image so it can just fill up the very low edges or cover most of the image.
By adjusting the Angle and the moving the gradient in the image, it can be placed exactly where you want it. This workflow only creates light leaks with one edge in the image instead of being a strip effect.
3. If the light leak effect is too strong, set the Gradient Fill Adjustment Layer to Screen Blend Mode in the Layers Panel.
4. To save the light leak as a PNG file, turn off the all other layers and select the Gradient Fill Adjustment Layer. There are two ways to do this. I prefer the first way as the color is more brilliant and can be adjusted easier, but it does save the light leak as a much larger file.
- Go to Save -> Export -> Export As and set Format: PNG. Be sure Transparency box is checked. Click Export All and save file in a light leaks folder on your computer. Now the PNG file can be applied to any of your other images! I usually name mine something like SJ Orange Lower Left Light Leak.png. This choice is not available for Photoshop CS6 users.
- Go to Save -> Export -> Layers to Files. In the dialog set the Destination to the light leaks folder, File Name Prefix should be the light leak name, check Visible Layers Only box (this is important or all the image layers will be converted to files), File Type PNG-24, and check the Transparency and Trim Layers boxes. It would be easy to combine two light leak Gradient Fill layers or one with a Pattern Fill Layer clipped by turning both layers in the Layers Panel. Fort CS6 users, go to File -> Scripts -> Export Layers to Files and the same dialog box appears as discussed in this paragraph.
- Can always double click on the gradient strip in the Gradient Fill Panel and when the Gradient Editor Panel opens, Name the gradient and click the New button – then the gradient will appear at the end of the Presets for use on another image as a gradient but it is not a PNG file.
*****
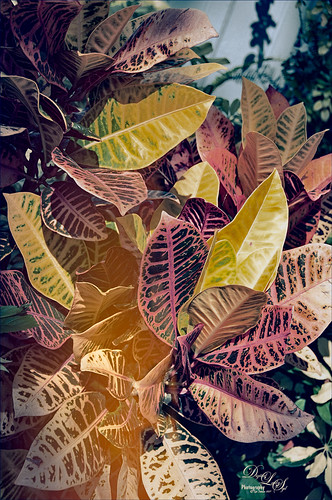 As noted above in Step 2 of the Basic Workflow, the light leak only has one side to it. There is a more complicated process and it is shown above on the Coleus Plant image also taken at the Gardens. To get a strip effect, it is fully explained in James Abbot’s How to Create Realistic Light Leaks in Photoshop short Tipsquirrel video. The major trick is to adjust the actual gradient strip tabs in the Gradient Editor panel. By moving the little tabs on both the upper and lower sides of the strip, clear spaces in the gradient can be created so a strip effect can be created. Then a second Gradient Fill Adjustment Layer is clipped to the original Gradient Fill Layer to set the color. I suggest you watch the video for a good explanation on how to create this effect. To me it seems like it would be easier to adjust the Light Leak in the Gradient Fill Adjustment Layer’s mask to paint with a black soft edged brush and remove parts of the leak or use the Gradient Tool on the mask to create a straight soft line.
*****
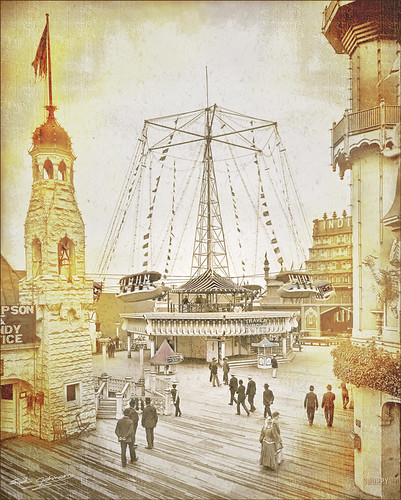 To create very simple light leaks, a Fog Brush (download the one used above at Plearn) can be used to paint a color on a New Layer where the light leak would look good. Then try different blend modes and adjust the layer opacity, or add a layer mask and paint out areas that are too strong. Very easy. Then the color layer can be saved down as a light leak layer by using Step 4 in the workflow. The Traver Circle Swing at Coney Island in 1905 (the price was 10 cents for adults and 5 cents for children) historic image from Shorpy.com used a layer where an orange color was painted around the sides and top of the image and set to Vivid Light blend mode. Again this layer could have been saved as a PNG document as in Step 4 above. A border I had created a while back was added to give a little texture in the light leak areas.
I hope this info will give you an opportunity to create some of your own light leaks. These saved light leaks can be loaded into Topaz (for website link see sidebar at my Tidbits Blog) Texture Effects’s Light Leaks section to use in this plug-in. Give it a try and see if you like the results. Until next week…..Digital Lady Syd

Very useful, Syd. Thank you.
03/20/2017 at 6:14 am
Thank you! Great tips.
03/20/2017 at 6:19 pm
Thanks – fantastic tips! I love the look of light leaks, I’ll definitely be using this xo
https://seafoaming.com/
03/20/2017 at 9:44 pm
Glad you liked the blog – light leaks are actually pretty easy to just create.
03/22/2017 at 10:24 am
Pingback: PAINTING FUN IN PHOTOSHOP | Digital Lady Syd's Fun Photoshop Blog
Pingback: NOW AVAILABLE – FREE BETA VERSION OF MACPHUN’S LUMINAR FOR WINDOWS | Digital Lady Syd's Fun Photoshop Blog
Pingback: SOME FLOWER POWER | Digital Lady Syd's Fun Photoshop Blog
Pingback: » Beautiful Scottish Sky Digital Lady Syd's Tidbits Blog
Pingback: HAPPY VALENTINES DAY (WITH A FEW TIPS)! | Digital Lady Syd's Fun Photoshop Blog