
HAPPY VALENTINES DAY (WITH A FEW TIPS)!
 Just my annual Valentine Blog with a few tips. I really like to create images for this holiday. The little tiny dahlia flower above is growing in my otherwise very dead-looking garden. Unfortunately in Florida we had a couple cold days below freezing at night and many of my beautiful plants and flowers were lost.
The image was taken into Photoshop where the Shake Reduction filter was applied since the shot was taken hand-held while on my hands and knees – definitely some shakiness there! Then the layer was duplicated and the flower was selected – used the Select and Mask dialog to refine the selection. Applied the mask so the background could be painted out. I had to use Tip 1 to find out which brush I had used to paint the background – it was a Fay Sirkis’s Precious Oil Diamond Blender brush (her brushes are pretty hard to find now but worth it for painting in PS – they are still available from KelbyOne along with several very good earlier PS painting videos if you are a member – just search for her name and download course assets) with a few Brush Setting Panel changes that made a nice smooth pinkish background. Her Portrait Face Sfumato Detail Blender was used to paint the flower petals. The Valentine Brushes created in Tip 2 were used to add the holiday feel. A Bevel and Emboss default layer style was used on the valentine objects. A yellow-orange light leak was applied to the lower left corner (see Tip 3 for this). Finished off with my regular workflow. The text font is Birch Standard.
******
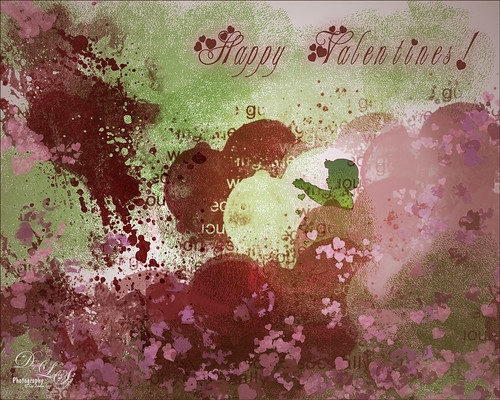 This image started out as a texture I was creating with the hearts from Julie Mead’s Valentine Gift 2 set (See Step 2 below for link). The cupid is also from this set. Used my SJ 3 Pastel-Van Gogh TI brush was used to add the green background color on the bottom layer. (Also Tip 2 below.) Different layers were used to add each valentine brush and the cupid brush to the image. To make the cupid green, the cupid layer style was opened up by double clicking on the layer words in the Layers Panel – a 2 px Stroke was used in a dark red color, a Gradient Overlay was selected using the Forest Walk green to white linear gradient from Random Gradients – Graphix 1, and an Outer Glow set to 65% opacity using a pink color. A small 17 pixel valentine brush by Digital Touch was used to paint little valentines all over a New Layer and a Pattern Overlay layer style was added using a pink valentine pattern set to Multiply. (Tip 2 shows you how to create this brush easily.) The font used was MC Sweetie Hearts. Last step was to add a New Layer and use a spotlight effect on the cupid – set to Overlay blend mode at 55% layer opacity. (See my How to Add a Spot of Light blog.) The last step used a Gradient Fill Adjustment Layer to create a vignette using a dark red color. (See my Yet Another Great Way to Create a Vignette blog.)
******
 More crazy Valentine Fun above – this time started with the free Big Heart brush – the rest of the valentine was built up around this main feature. A darkish red and pink texture was used and could be made using Dave Belliveau’s Mixer brush from Tip 2 for a bottom background. On top of this a Heart Bokeh Stock element by sweethooligan (no current link could be found but appeared to be an old DeviantArt location) was applied and set to Screen blend mode at 57% layer opacity. The Be My Valentine text blurb was from by Ulia Choo. The music playing cupid was from Glass Prism Cupid Brushes at DeviantArt set to Multiply and then a dark Inner Gray Layer Style was added that shows the original square edge around the element. Upper left element is Heart Corner Large from Valentine Brush Set by Cheshire Angel that was set to Multiply blend mode to remove the white background. Some small valentines using the same Digital Touch brush as in image above was used – this is a handy valentine brush! Then three Light Leaks were used to add some variance to the color tones in the image.
Tip 1: Use the File Info Dialog to Find Brushes and Filters Settings Used
This is a tip I have mentioned before, but it is worth repeating. Have you ever forgotten what brush you used to create a certain effect and want to use it again? Or what settings were used on an Adjustment or filter that were not noted? This info can be found if you go to File -> Info (ALT+CTRL+SHIFT+I) to open the dialog. But to be able to recover this information, your Preferences (Edit -> Preferences -> History Log) in the History Log tab must have the Metadata radial turned on when the image is created. I just keep this turned on even though I do not use this function often, there are times it has been helpful to have.
Tip 2: Find or Create Brushes – then Get Comfortable Using Them
Mixers: When painting in Photoshop, it is really important to have a couple Mixer brushes ready to use – at least one good blending brush and one for adding color. It is important to have confidence these brushes and learn to change the settings on the fly to get good results – that is what I did using Fay Sirkis’s Precious Oil Diamond Blender brush. I have large and small sized ones and a couple that add color using the same basic dab. To find out what the dab of any brush looks like, just turn off the Spacing setting in the Tip Shape section of the Brush Panel. One of my favorite Mixer blender brushes for smooth background colors is free from David Belliveau with his How to Blend Colors in Photoshop: 4 Essential Technique blog download (included with regular soft and hard edged brushes and a Smudge brush).
Regular Painting Brushes: Check out my How to Create my Favorite Brush blog and make a nice regular brush (my SJ 3 Pastel Brush) – great for painting or just touching up an image when used at a small size. In the second image, my SJ 3 Pastel-Van Gogh TI brush was used. It can be created by following my Painting Fun in Photoshop blog’s third paragraph – gives an explanation on how to make the base brush more painterly. My favorite paint brush site is Grut Brushes.com who gives away a brush of the week to try out – also his sampler has some really nice paint brushes. I use Grut brushes all the time.
Regular Stamp Type Brushes: Converting a PNG to a regular stamp brush: Both these images used some brushes created from nice free valentine hearts by Julie Mead at E-scape & Scrap. There are 9 wonderful valentine PNG files that instantly made me think of Photoshop Brushes. So that is exactly what I did – created several valentine brushes. See Tip 2 below.. All the PNG but the first heart were converted to brushes adding the PNG file to a New Document, then converting to Black and White – I used the Black and White Adjustment Layer to do this – and then creating a stamped layer on top. Now go to Edit -> Define Brush Preset and create the brush. I did not make many changes – mainly just size. I also created a couple of brushes that were created by stamping down the new brushes together on another layer and saving that as a brush. This can be seen in the second Valentine Greetings image. This image started out as a texture that was created by using New Layers for each color and just stamping down the Julie brushes for the effect.
Creating a stamp brush from a Photoshop Shape: The little Valentine Brush used in the last two images can be created by selecting the Custom Shape Tool in Photoshop and set to Shape in the Options Bar. On a New Document, go to the Options Bar Shape: drop-down menu, select the valentine and drag out holding the SHIFT key to hold the shape and press enter. Go to the Layers Panel and use the Marquee Tool to draw a selection around the shape – go to Edit -> Define Brush Preset and press Enter. A Valentine Brush has been created and added to the bottom of the Brushes Panel. Now any settings you would like to add can be done in the Brush Settings Panel.
Tip 3: Make Other Resources
Sometimes it is easier just to use resources you have collected, but sometimes this is not possible. That is when I try to reproduce what I like – it may turn out better than the original. This does take time so I do not make all my resources. Make your own texture when you can. In the last valentine, the red heart background could easily be created by using a black background and painting red hearts using the valentine brush (shape brush in Tip 2) and Brush Settings Panel’s Scatter and Color Dynamic settings. Tip 2 shows how to make the Valentine texture in the second image. The text block could easily have been reproduced using Text Layers and fonts in PS. Create some Light Leaks to add nice color variations to your images. (See my How to Create Light Leaks to Use Over Again blog.) I keep them in my PS Library so it can be tried out on images quickly.
Hope these tips were useful and has some fun making Valentines in Photoshop. It is my favorite Photoshop holiday – Happy Valentines Day! …..Digital Lady Syd

Syd, each of these is just wonderful, but the dahlia? Oh my goodness, it is absolutely gorgeous. I am always so in awe of all of the information you so generously share here and I truly appreciate it so much. I have a question for you if you don’t mind…
How long have you been doing this? I am guessing a very, very long time!!
02/12/2018 at 1:33 pm
Ugh, got carried away, and I wanted to wish you a very Happy Valentine’s Day!!!
02/12/2018 at 1:33 pm
Pingback: » Happy Valentines Day Digital Lady Syd's Tidbits Blog