
10 NOT SO WELL KNOWN PHOTOSHOP TIPS
 Recently I have been watching many Photoshop videos. This week I thought I would share some quick tips that I am finding to be very handy. These may be obvious things to many of you, but all of the tips below were new to me. For info on the Blankets image taken at the Native American Festival, see bottom of blog.
Add Noise to Bring an Image Together
This really works and looks nice, especially if a texture was added for a background or creating a composite. Just go to Filter -> Blur -> Lens Blur and set all sliders to 0 except the Noise slider which is set to 4 and Distribution Uniform. Very subtle but nice effect.
Overscrolling
Okay – this is something that I never knew was in Photoshop, but what a major time-saver it is (unfortunately it is not in CS6)! We all know pressing the SPACEBAR turns any tool into the Hand Tool, but did you know it can be used to also move the image around the workspace? Go to Edit ->Preferences -> Tools and check the Overscroll box. That is is! What a time saver. Now the image still stays attached as a tab, but it can be moved around to avoid panels opening in the workspace or for close up painting.
Rotate View Tool
Here is a tool I have never used much but will be. It is indispensable when trying to paint in a certain direction or draw black lines around objects. The Rotate View Tool (R) icon is hidden behind the Hand Tool in the Toolbar. Need to select it and then click on your document. A large star-shaped pointer icon appears that indicates the direction of the image – adjust by spinning the document to the angle needed. The cool thing to know is this tool has a “springboard” R key – this means that while painting, just hold down the R key and the pointer icon will appear in the image to readjust the angle, let go, and continue painting! To return image to upright, just double click on the icon or press the ESC key. It is very quick and handy to use. Try it and I bet you will like it also!
Printing Out the Steps to an Action
The individual action steps cannot be printed out, but all the actions in a set can be printed out. To do this, highlight the set that contains the action you want to see. Next hold down the ALT+CTRL keys and Open the pop-out menu in the upper right corner of the Actions panel. Do not lift up on mouse, but just scroll down the menu to Save Actions. When the explorer opens up, the file will show a .txt extension instead of the regular action .atn extension. Now the action steps will be listed when file is opened. This is really handy if you are trying to figure out exactly what settings are being used or to trouble-shoot a action that is not working properly. Who knew!!!
Preparing Image for Web
A famous portrait photographer suggested this tip to use after saving your image for print. Add a Levels Adjustment Layer to image and set Black tab to 0, Midtones to 0.95, and White tab to 255, then set Output Levels sliders to 5 and 250. Will look better on the web. To create a more matte appearance, set the Black tab to 14 to flatten out the shadows.
When Scanning Old Photos – What Resolution is Needed?
If you want to make an old image into a larger size, before scanning image create a New Document to the size of 8 X 10inches at 240 pixels/inch for example. Once created, go to Image -> Image Size and in the dialog box uncheck Resample Image box and enter one of the dimension sizes of the original old photo being scanned, say 2 ½ inches into the Width field. Photoshop will show in the Resolution field the number needed for scanning (960 pixels in this case) to make this image 8 X 10 at 240 ppi. Set scanner to 960 pixels to get the image to look right for printing. This is ingenious!
Adjusting Skin Tones That Do Not Look Quite Right
I tried this tip a couple times and it works really well. Add a new layer above a person with bad skin tone and set the blend mode to Hue. Hue shifts just the tones when used on a New Layer. Sample new skin color and paint with 100% brush opacity and a low flow of no more than 2% on skin – it warms up the skin just a little. To adjust lips, use Hue blend mode on painted lip layer. Try using the Color blend mode if Hue is too subtle. By adding a little blue tone to this layer on skin that is too yellow, the skin can look much better.
Select and Mask Command
This command (to be used once a selection has been made) seems pretty much self-explanatory, but there a few things to consider when using this dialog. Did you know that if you hold the ALT key down while pressing the Refine Edge Brush, Brush Tool or the Quick Selection Tool, it will switch between the Add (+) and Remove (-) setting. I have been trying to use the X-key and it does not work. Apparently I forgot this was used in the Refine Mask dialog box. This is a very handy tip for me.
Also, when using Output Settings, check out your image with both the Decontaminate Colors on and off – it does not always create a good result. Note that in CS6, the Refine Mask dialog box actually has a slider where the amount of decontamination can be set – I really liked this slider but they have removed it in the Select and Mask Command dialog box. If you really want to use this feature in CC 2017 just click on the layer mask or create a selection, go to Select -> SHIFT + Select and Mask and the old Refine Mask dialog opens up. Now the Decontaminate slider is available. There is a slight controversy among some Photoshop gurus as to which dialog is best. I personally like the new Select and Mask as it has many more features, just not a slider for decontamination.
Once back in Photoshop if you missed some areas while in the dialog, just duplicate both the layer and layer mask several times to build up the selection.
Merging Layers and Blend Mode Issues
Have you ever noticed that after merging layers, the blend mode goes back to Normal? If a color shift occurs after merging, this is what has happened and the blend mode probably needs to be reset.
Sometimes when creating a stamped or composite layer (CTRL+ALT+SHIFT+E) on top of the Layer stack, a slight color change occurs. This has driven me crazy on several occasions! By setting the stamped layer to Color blend mode, the image colors will go back to the original underlying layer color before the layer was created. This shift seems to occur after using several blend modes and layer styles on different layers with varying the opacities. There probably are other ways to fix this, but I find this tip works pretty well.
History Log Metadata
This is one tip I have used for a long time and it has saved me when I forgot what settings I applied. Create a text History Log of every step that done on an image by going to Edit -> Preferences -> General and check the History Log and the Metadata radial button. Now when you a apply for example a Levels (not as an Adjustment Layer), the settings used can be found by going to File – > File Info and selecting the Photoshop section (History tab in CS6 at top) – a list of everything done to that image will appear. In CS6 can be exported as a .txt file, but in CC need to select all the text (CTRL+A) and paste (CTRL+V) into a text editor like Notepad. Right now some of the settings from external plug-ins will show up in the settings , but this is not working on the newer ones. For example, it currently lists Topaz Adjust actual settings, but only lists that Topaz Texture Effects 2 was used but no settings. Google Nik plugins and On1 2017 products have the preset used listed but no setting info. Also, the actual brush and settings being used will not show up, but if a Tool Preset brush is used, it is listed without its settings. That can be very helpful too. This log stays with the PSD file so you can always go back to it, unlike the actual History Panel states and snap shots.
I hope some of these tips were helpful – not real hard things to do, but just handy to know! Have a nice weekend!…..Digital Lady Syd
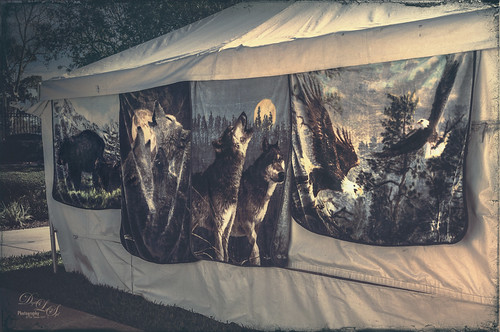
Notes on Blanket Image: I wish I knew who was selling these beautiful blankets, but I am sure most of the Native American Festivals will have them for sale. In Lightroom used Kim Klassen’s Melancholy preset to give more of a wilderness feel right from the start. Did a little adjustment brush work on the blankets. In Photoshop on a duplicate layer, Topaz (see sidebar at my Tidbits Blog for website link) Restyle was opened and a Cold Frosty Day preset was applied with a few corrections. This layer was duplicated and Topaz Texture Effects 2’s Crisp Morning Run preset was applied next, set to Color blend mode and a layer mask was opened to remove some of the effect off the birds in particular. The Blend If sliders This Layer tabs were adjusted. A clean up layer was added to remove the price tags. Two Curves Adjustment Layers were opened, set to Luminosity blend mode, and one was set for darkening the image and one to lighten – then both layer masks were inverted to black and just areas that needed more emphasis were painted back. A Spotlight Layer was created, set to Overlay blend mode at 37% layer opacity. Next Nik Viveza 2 was added to add a little focal direction to the image. A Color Balance and Levels Adjustment Layers were added. A Red Luminosity Curves Adjustment Layer was applied. French Kiss’s (see sidebar at my Tidbits Blog for website link) Glorious Grunge Edging was used as a border with a dark blue Solid Color Adjustment Layer clipped (ALT+click between layers) to add color to it. It was a pretty long workflow but I liked the final result. These blankets were really nice!

These are extremely useful. Some I know and some I don’t. I didn’t know about pressing the Spacebar to turn any tool into the Hand Tool! Thanks, Syd.
06/03/2017 at 12:50 pm
Glad you like them Sarah! Most are not your normal tips but can save a lot of time. I personally love the Overscroll feature – it was a new one since CS6 that slipped through the cracks for me!
06/03/2017 at 3:54 pm
Some very good info here Syd! Thanks for sharing it!!!
06/04/2017 at 2:59 am
Pingback: » Summertime! Digital Lady Syd's Tidbits Blog
Pingback: » Hiding Out at the Rookery Digital Lady Syd's Tidbits Blog
Pingback: PATTERNS, PATTERNS, PATTERNS | Digital Lady Syd's Fun Photoshop Blog