
PATTERNS, PATTERNS, PATTERNS
 I started to add this info into my How to Create My Favorite Brush post which used a Pattern in the Brush Panel and played a big role in the brush creation. There was so much to discuss about this topic, I decided to turn it into two blogs. Glad I did as I have recently learned a few new tricks on using Patterns that are discussed below.
Patterns..and How Crazy This Gets
When downloading Photoshop patterns from the Internet, the files must have a PAT extension (not JPG which most texture file extension use) to load them into your Pattern list. With Photoshop open, just double-click on the downloaded .PAT file and they load right into PS. Where are these patterns used? In the Pattern Fill Adjustment and Adjustment Layer where the Dialog obviously contains a Pattern drop-down menu. Click the little cog in upper right of the Pattern drop-down to add in other Patterns (another way to add them in – see below for more on this). The Content Aware Fill (Edit -> Fill) has a choice for Contents Pattern. Also are used in Layer Styles – Pattern Overlay section, Bevel and Emboss Texture section, and Stroke section (Fill Type) all contain the use of Patterns. When creating a brush using the Texture section of the Brush Panel, you are really adding a Pattern that carries a .PAT file extension, not a JPG. The following Brush Tools allow the use of a Texture section which uses Patterns: the Mixer Brush Tool, Pencil Tool, Eraser Tool, History Brush Tool, Art History Brush Tool, Clone Stamp Tool, Dodge Tool, Burn Tool, and Sponge Tool . The Pattern Stamp Tool uses Patterns in both the brush settings and Options Bar. Several Tools have Patterns as a choice in the Options Bar: Bucket Tool (check out the Foreground drop-down. You can actually pour a Pattern onto a layer – who knew?), the Healing Brush (this is strange too!), all the Shape Tools set to Shape and clicking on Fill swatch and then clicking on the Pattern swatch, there is the pattern list. I may have missed a couple uses, but overall, I was amazed that Patterns are in all these places in Photoshop. And unfortunately, sometimes the Patterns are in Texture areas and sometimes not labeled at all – it can be a little confusing!
Loading and Creating a Pattern
If you want to convert one of your favorite textures or images into a Pattern, open the texture (which can be a JPG or PSD file) and go to Edit -> Define as a Pattern, name it and the pattern now appears at the bottom of your Pattern list. To see all your Patterns and to add more, go to Edit -> Presets -> Preset Manager and open Preset Type drop-down and select Patterns. The Patterns can be dragged around in the Preset Manager to put them in a better order. Click Load to add new ones or click the the little cog at top and see all the Photoshop canned presets available. (In case you wondered, the sets are: Artist Surfaces, Artists Brushes Canvas, Color Paper, Erodible Textures, Grayscale Paper, Legacy Patterns, Nature Patterns, Patterns 2, Patterns, Rock Patterns, Texture Fill 2, Texture Fill, Watercolour Patterns and Web Patterns – I had no idea all these were here!) Go to next section to see how to create a new pattern. It is useful to have colored and grayscale Patterns loaded. Even though the brush panel only uses the Patterns as grayscale color, the other Tools and commands will use the color. It is fun to try out watercolor blobs and brightly colored textures that you liked. And remember if you download Patterns, by double-clicking on the .PAT file will add them to the bottom of your Pattern List.
Creating a Noise Pattern for Your Library Panel
For some reason, it had not occurred to me that an Adjustment Layer could be saved and reused in the Library Panel. I do not use this panel much, but after watching Lisa Carney’s Color Techniques for Retouching classes on Creative Live this week, I am reconsidering. This noise tip came from her class on Portrait Retouching and involves creating a Pattern Adjustment Layer to add the final grain effect at the end of your workflow. She feels that adding a slight noise will pull an image together, especially when compositing. The image above of the Dive Boat going out to sea used this Noise Adjustment Layer – it looks really good with the vintage feel. (This results in a very similar look as the first tip in my 10 Not So Well Known Photoshop Tips blog where the Lens Blur Filter was used.)
Here is the workflow for this useful Adjustment Layer:
- Create a New Layer by clicking SHIFT + CTRL +N. In the Dialog name the layer Noise at this point, set it to Overlay blend mode, and check the Fill with overlay-neutral color (50% Gray). Note the blend mode must be set to Overlay before check box shows up.
- Go to Filter -> Noise -> Add Noise and set to 3, 5 or 8. Turn on Gaussian radio button and uncheck Monochromatic (do not want black and white grain on faces and skin especially).
- Go to Filter -> Blur -> Gaussian Blur and set to a Radius of .3 or .5 to lightly smooth.
- Desaturate the layer by going to Image -> Adjustments -> Hue/Saturation and set Saturation to -50.
- Go to Edit -> Define Pattern and name the pattern Add Noise 5-Gaus .3 Desat -50 so you know the settings used to create this Noise layer.
- In the Adjustment Layer icon at the bottom of the Layers Panel, select the Pattern Adjustment Layer – go to the bottom of the Patterns list and click on the new Pattern created in Step 5. The Scale can be adjusted if needed. Now would be a good time to rename the layer the same as the Pattern name if saving to the Library Panel in next step.
- Open Library Panel and drag the Pattern Adjustment Layer into panel. Anytime you want to add some noise at the end of your workflow, just right click on the Noise Pattern icon and select “Place Layers” – it appears in your image as a Pattern Adjustment Layer. Note: if you just select it, it will appear to be a rasterized version of the adjustment layer – this may be okay if that is what you want.
- Set the adjustment layer to Overlay blend mode and tweak the layer opacity if it needs it.

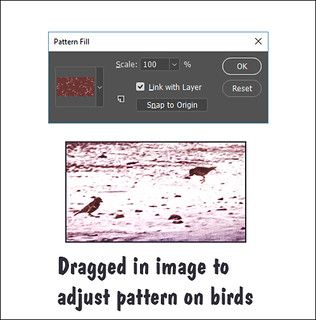
Using a Pattern Fill Adjustment Layer to Add Texture to an Object
This image of New Plymouth on Green Turtle Cay in the Bahamas used a little trick I use all the time to give the little birds on the sand some texture. Birds are from a 7 bird brushes for You set by justadistrict12 girl on DeviantArt (could not find a link). They were added using black color at 100% Brush Opacity and Flow. Then a Pattern Fill Adjustment Layer was added on top. It was then clipped to the bird layer (ALT+click between the layers) so that the Pattern is only applied to the birds and not the whole image. The Pattern used was a brown colored texture with beige lines going through it from a set redheadstock at DeviantArt called Lace Photoshop Patterns. It gives some detail to the birds making them look like they have a little definition where the wing would go. See Screenshot below. When dialog is open, the Scale can be changed and the Pattern moved by dragging it around in the image. This way the Pattern can be adjusted to give a nice effect. Now in this image, it may not look necessary to do this, but it makes the difference between making an image look finished or not. This is really nice on images where flying birds are added. Solid color birds will look like they are pasted into the image.
What is really nice about using the Pattern Adjustment Layer is that different noise patterns can be made using different settings in the Noise Filter, Gaussian Blur Filter, and the Saturation slider in the Hue/Saturation Adjustment Layer. Each one can be saved in the Library Panel so different effects can be tried out quickly to decide which one looks best. Just be sure they are named so the difference between them is obvious. The one used above I named SJ Add Noise 5-Gaus .3-Desat -50 (same as pattern name) to remind me what is applied. And favorite Patterns can also saved as adjustment layers in the Library for using just on bird brushes or anything that needs this type of effect applied.
Hope you enjoyed the Pattern post – it can get a little confusing! Try out the Noise Adjustment Layer – I think I will be using mine a lot….Digital Lady Syd
Digital Lady Syd Related Blogs
How To How To Use a Pattern Fill Adjustment Layer
I Didn’t Know That! Use A Pattern Fill Layer to Add a Painted Texture
A Little Layer Style Fun
Christmas Card from Digital Lady Syd!
How to Use Photoshop’s Brush Texture Section for Painting Clean-Up

More useful tips! Keep on going, Syd.
06/24/2017 at 1:18 pm
Thanks Sarah – There has been so much going on in the Photoshop world recently – hard to keep up! LOL!
06/24/2017 at 3:25 pm
Pingback: » A Very Unusual Place! Digital Lady Syd's Tidbits Blog