
HOW TO CREATE VINTAGE TEXT FOR IMAGES
This week I have been playing around with some very old images from historical volumes that are readily available on line. I was surprised how many interesting items can be found in these old volumes and they are copyright free due to the old dates. I found that using these illustrations and text can create some very nice vintage effects. Thought I would share a couple tricks on how to get this info out of a downloaded PDF book file opened with the Acrobat Reader software and into your Photoshop files. Please do not copy from books that are currently copyrighted or remove photos from their files. This process should only be used on really old volumes where no copyright infringement is being violated. Read the copyright information on the book’s download site before using it in your own work.
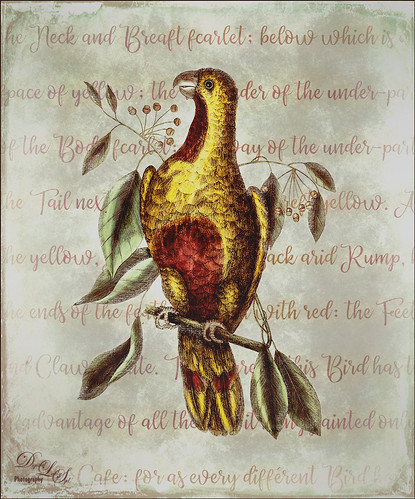
The Parrot of Paradise from Cuba (could not figure out which bird this really is) was taken from an old volume printed in 1754 called The Natural History of Carolina, Florida and Bahama Islands – the downloadable PDF (on right side in web link) contains just the Bird portion of the volume. I have to thank one of my favorite bloggers, Sarah Vernon and her First Night Design Blog, for sharing this particular info with her readers (and check out her blog to see some beautiful vintage type items for sale). Now what is particularly cool about this book is that the text is in both Old English as shown in the image or French. And the text about both birds were copied from the book. For you ephemeral fans, this is a bonanza!
Capturing Text
So how do you capture the text? There are two ways to do this depending on what you want to do with the text. Do you want the text to appear as is does in the PDF file, or do you want to just copy the text letter-by-letter and select a different font for your image. Both of these images used the second method.
Method 1 – Copying Text as It Appears in the PDF file
- Find a page in the PDF document with text that would look good in your composition. Many times there are lead fancy letters that would be nice to have in a vintage piece.
- In Acrobat Reader, click on the little upward Arrow icon (Selection tool for text and images) in the Options Bar at top. Click inside Page and a little cross-hair icon appears – just line up the text wanted, then click and drag out a box around it. A blue overlay will appear over the selected text. Right click inside overlay and and choose Copy Image (even though it is not really an image).
- Open Photoshop and go to File -> New Document -> Clipboard and Create.
- Go to Edit -> Place and a new layer will appear on top of the Background layer with the text showing up as a light brown color and a black background. Therefore, the layer needs to be inverted (CTRL+I) so it appears as a light blue on a white background.
- Add a Curves Adjustment Layer on top and pull the bottom black tab on the left all the way across to the right side by the white tab. The text appears as a very readable black and white text.
- Create a stamped layer on top (CTRL+ALT+SHIFT+E) on top.
- Go to Select -> Color Range and set the layer to Highlights in the drop-down (Fuzziness 0 and Range 216) and check the Invert Button so White lettering will be selected and the black is removed. Click OK – an active selection of the the letters will be shown.
- Add a New Layer and with the Foreground color set to black (if that is the color you want), press ALT+Backspace – the lettering is now on its own layer.
- If you want to keep this text for use again, highlight the text layer, and go to Layers -> Duplicate, and in the Document field drop-down, instead of using the current file name, select New. Now a new document with just that layer of text is selected. Save the text as a PNG file if you want the transparency to stay with the layer or as a JPG if want a layer with the white background color to be added (if white was the Background Contents color when original file was created).
Method 2 – Copy the Text Letter-by-Letter to Use with a Different Font
- Find a page in the PDF document with text that would look good in your composition.
- With the Selection Tool chosen (upward arrow), drag out a selection – by clicking inside the PDF just before the text to be copied and highlight by dragging your cursor to end of the text.
- Go to Edit -> Copy. (CTRL+C)
- Open Photoshop and create a New Document – any size will do like 8 1/2 inches X 11 inches at 300 ppi.
- Select the Horizontal Text Tool and drag out a box in the document to add the text copied from the Acrobat Reader volume. Click the checkmark (or double click inside layer) to set the text, even if letter size and font is incorrect. Press CTRL+V to paste or go to Edit -> Paste. Note that the text will not copy into Photoshop without a text box being drawn out first.
- Triple click inside text box to select all the individual letters. Open the Properties Panel, click ALT+H to hide the black highlighting, and open the drop-down menu that contains all the different fonts – use your mouse scroll wheel to run through them to find one you like.
- Now adjust size and text evenly so it fits in the text box created in Step 5.
- To be able to save this text as a PNG file or JPG file, go to Step 9 above. Note that when a text layer is duplicated, it will be rasterized in the new file and is not longer editable.
The text can be transformed, layer styles applied, different colors or patterns added, duplicated and flipped, anything that is needed. In the image above, a color was sampled from the bird for the text and placed over the bird. Then a layer mask was applied and the lettering removed from the bird. Topaz (see sidebar at my Tidbits Blog for website link) Studio was used on the bird layer where the Radiance filter was applied to give it more line strength in the bird itself and the Color Theme filter was opened. A soft blue color was added as the last color that filled in the background with the pretty gray-blue vintage look.
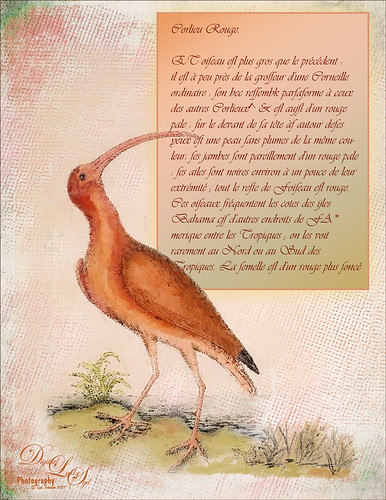 The bird image (which was taken directly from the book in this case) layer above is of a Red Curlew bird (once again not sure what type of bird it is now called) and was actually taken into Topaz Impression and the Cartoon Your Critter preset was applied. A few different textures were used for the background and a box was used to add in the text about the bird in French from the book. What an interesting looking bird!
Capturing Image
I cannot leave you hanging – the best way to copy the image from a PDF document is as follows.
- With page open to image to copy out of the PDF in Acrobat Reader, select the icon next to the View Size field so book is viewed in single-mode view.
- Go to Edit -> Copy File to Clipboard (do not use Snapshot or CTRL+C). A slider showing Copying to Clipboard will appear at bottom of page when it is processing this info.
- Open Photoshop and go to File -> New Document -> Clipboard and Create, or if a file is already open go to Edit -> Paste Special -> Paste in Place. If placing in a document, the image may need to adjusted to fit using the Free Transform command (CTRL+T). See below for more on this.
Check the size and resolution of the bird image if brought in on the clipboard – there can be a lot of pixelation on the image if changed to 300 ppi. For example, the parrot image was set to 150 ppi, which is the lowest amount to use on a for a 8 1/2 by 11 inch image to be printed. (First go the Image -> Image Size and uncheck Resample; set resolution to 150 in this case or 300 if you can; check Resample box; change the height and width to size needed; and when upsizing as in this case, adjust the Noise slider if needed. If just using the image on the Internet or computer, just leave the resolution at 72 ppi – no problems. For images placed in PS, there will probably be some pixelation which is what happened with the Red Curlew bird – that is one reason why Topaz Impression was used on the layer. The pixelation also gave an interesting ink look so it is not always a bad thing. Now the layer can be altered however you want. The bird images for this volume actually has a link to just the pictures that can be downloaded as a JPG directly to your hard drive – still not a very large image. The Parrot image was copied this way, but the Red Curlew was taken from my downloaded copy of the PDF file. This time the French text from the book was selected for the bird text. The text is not affect as much as the images where pixelation is concerned. Text layers are actually vector layers so they upsize very nicely. May need to watch once the layer is rasterized and no longer editable since that converts the layer into pixels.
Well I hope you will have some fun taking the Old English and French text and using it in all kinds of images. It is a lot of fun to use text that is directly related to the image being used, even if you cannot read the actual language. I have a couple more nice book references that I will link either in this blog or my Tidbits blog, so stay tuned. This vintage effect is very popular right now. Have a great weekend and 4th of July here in the US!…..Digital Lady Syd

Bless you for the shout-out, Syd. There’s nothing like the effect of the right font over an image. Love it!
07/01/2017 at 2:19 pm
Pingback: » Just a Pretty Flower Digital Lady Syd's Tidbits Blog
Reblogged this on From 1 Blogger 2 Another.
07/13/2017 at 11:35 pm
Thank you for the reblog! Have a wonderful weekend!
07/15/2017 at 10:49 am
You’re welcome !
07/16/2017 at 6:21 pm
Pingback: » Danger – Gang of Ferocious Fish Digital Lady Syd's Tidbits Blog
Pingback: HOW TO CREATE SCANNED PHOTOSHOP BRUSHES | Digital Lady Syd's Fun Photoshop Blog
Pingback: HOW TO CREATE A PRETTY SIMPLE BACKGROUND AND TEXT EFFECT | Digital Lady Syd's Fun Photoshop Blog