
WHAT IS TOPAZ AI REMIX????
 Short break here as Topaz released a new plugin. One thing you have to appreciate about Topaz (for website link, check out the sidebar at my Tidbits Blog) is that so many of their plugins are totally unique in the filter world. Topaz Studio’s AI (Artistic Intelligence – not artificial) ReMix Adjustment is one I did not see coming – totally different although it is sort of a blend of many of their filters. I am still trying to figure it out. At this point, there is not much info on it – they promise to supply more soon. So what is this plugin? Topaz says “AI ReMix harnesses the power of custom neural networks to create specialized artistic models based off of real art styles.” Basically they looked at hundreds of artistic images, chose some to train the Artistic Intelligence, and turned the results into what they call image styles. The filter appears to currently have 50 artistic styles from which to choose.
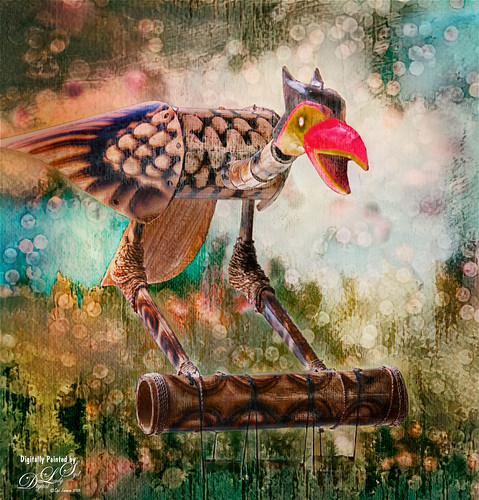
The top image of the wooden roadrunner wind chime was photographed outside a store on St. George Street (one of my previous images) in St. Augustine, Florida. It used the AI ReMix adjustment twice with different styles and blend modes, an HSL Color Tuning adjustment, and a Texture adjustment. Since the texture used was one of my own, I did not upload it to the Community. I was basically doing a little trial-and-error to figure out how to use the program. The bokeh background in the image before taking it into Studio was created by following a great tutorial called How to Create a Lens Dust Photoshop Action Effect by Marko Kozokar at Envato tuts+. The bokeh looks really good with this new adjustment. Below is the interface so you can see what the dialog looks like and some of the slider choices. (Click image for larger view in Flickr.)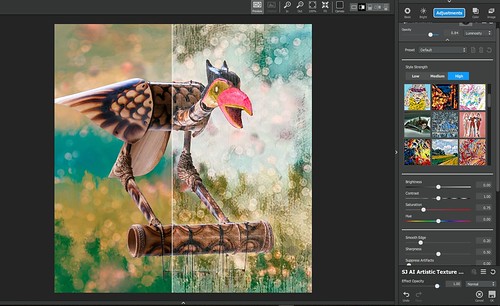 ******
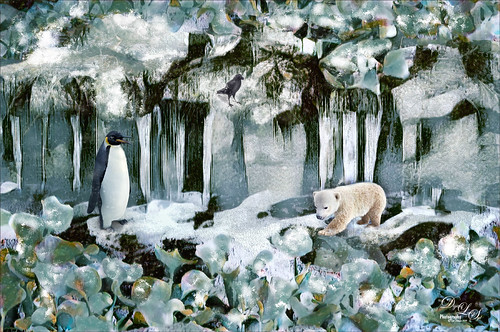
The Polar Bear and Penguin image below used a Studio preset on my original image (see below) that I created called SJ AI Cold Winter Effect and can be downloaded from the Community site. It contains three AI ReMix adjustments, a Color Theme adjustment and the Basic adjustment. The Penquin, Crow, and Baby Polar Bear are all from PixelSquid. To get the colors correct in this image, Topaz ReStyle was opened once back in PS and the Desaturated-Cool 1 preset was applied to get the cooler tones. Snow was brushed on by using Grut’s Inky Leaky brush set (these work great for this) and falling snow overlay provided by Shadowhouse Creations.
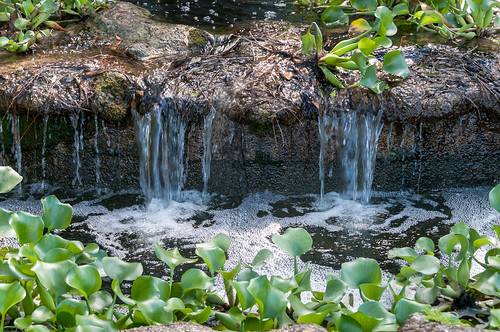
 Below is the original image taken of a portion of the waterfall at the entrance to the Ormond Memorial Art Museum and Gardens that was brought into AI ReMix. One ReMix adjustment was used on just the leaves in the foreground using a layer mask, another on the background only, and the last on the whole image at a lower opacity.
 I am not sure how they are really doing this, but it does give some interesting results. It does have a bit of a phone app feel to it, which I do not use often. They plan on releasing more image styles soon which should give a few more effects to use. To see what basically is happening in this adjustment, just be sure to update to Studio to 1.8.4 version and the adjustment will appear in your Adjustment list (icon will not be colored in). You do not have to get the trial to see what some of the results will look like. Click on the AI ReMix name and in the Preset drop-down field, click on one of the 5 choices included and also try changing the Opacity and blend mode for the adjustment – now you can see what it does to your image. Very unique results. To try out the adjustment for 30 days, click on the AI ReMix Adjustment and then click Try Pro at bottom of dialog panel – access to all the sliders will open up. Once activated there is a little indicator at the bottom of the adjustment panel that tells you how many days are left in your trial period.
******
This big bird uses the same AI ReMix adjustment style duplicated twice and set to different blend modes inside Studio (click the settings icon to left of the trash can to find the duplicate command). The bird is from a set of photos I purchased from Deal Jumbo in a set called Amazing Wild Animals 2 from images taken at South Africa, Namibia and Botswana. This guy sort of stood out to me. A Precision Contrast adjustment was first used in Studio where it was only applied to the bird by using a Studio layer mask. Then two identical AI Adjustments were stacked (located at Column 3/Row 4) – one set to Normal and one to Linear Dodge at 0.49 opacity. The bird was painted partially out using a 50% brush transparency. A Texture adjustment was also added and my Cat Painting Texture was applied. (The texture had been already loaded into the Texture Adjustment – if you would like to download it, here is the link at DeviantArt. It is just a close up of neutral color oil paint strokes from a beautiful cat image.) Back in PS, just used some of my regular workflow to improve color and contrast. Pretty simple.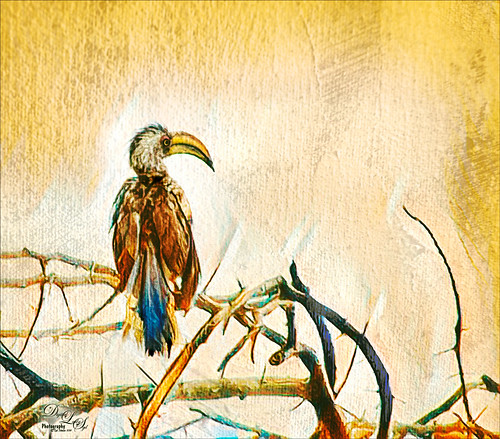 The task is to try and figure out what to do with the results so it does look artistic and not canned. And not all images work well with it. The other negative is that is makes my computer run pretty hard when several stacked adjustments. It looks better to me to stack a couple AI ReMix adjustments using different styles and settings. Topaz recommends trying out the Overlay blend mode for exaggerated saturation in the original image, Color blend mode to blend the photo and style colors together, and Luminosity blend mode for the highlights and shadows and makes the result less overdone in some cases. I am also finding that if I do not like the colors that the image becomes (even when starting with a black and white image it turns it into color), so a color converter needs to be used. My favorite is the Color Theme Adjustment where 5 individual colors can be changed. Also the HSL Color Tuning Adjustment will do some of this. Topaz has very nice mask tools that can remove parts in the image to give even greater control, especially by using a Mask Transparency brush setting around 0.50 and removing some of the effect from skin. I am looking forward to the update that is promised to come very soon.
It took me a while to actually get good results since it changes the original photo so much, but it is a lot of fun once you get the hang of it. Definitely worth clicking on the Adjustment and checking out the presets. I am sure this will become a very popular add-on once everyone learns how to use it correctly. I will be blogging on this more once the update is provided and try to do a quick video. Until then, I will just keep experimenting – it does seem to have some interesting possibilities! So glad Topaz is still coming up with new ideas for plugins – that is why they are right up there on my list of best filters!…..Digital Lady Syd

Pingback: » The Mighty Zebra Digital Lady Syd's Tidbits Blog
This sound interesting, Syd, and I love the results you got with it (especially the polar bear).
I got an email from Topaz about it, but have not checked it out yet.
03/09/2018 at 1:32 pm
Pingback: USING TOPAZ PLUG INS CREATIVELY | Digital Lady Syd's Fun Photoshop Blog
Pingback: TOPAZ REMIX – UPDATE AND BETTER THAN EVER! | Digital Lady Syd's Fun Photoshop Blog
Thanks Otto – means a lot from one of my favorite bloggers!
11/18/2018 at 10:44 am
Pingback: UPDATES, UPDATES, UPDATES! WHAT TO DO???? | Digital Lady Syd's Fun Photoshop Blog
Pingback: WHAT IS GOING ON WITH ALL THE “AI” IN PHOTOGRAPHY SOFTWARE? | Digital Lady Syd's Fun Photoshop Blog