
TOPAZ SHARPEN AI – GOOD OR BAD? AND YES, FREE UPGRADE FOR TOPAZ INFOCUS OWNERS

Recently Topaz (see sidebar at my Tidbits Blog for website link) released yet another new AI (Artificial Intelligence) filter called Sharpen AI – this comes as a real surprise since just a a while back JPEG to Raw AI was released. What is interesting about this new release is that it was actually based upon the older Topaz Infocus filter. And if you already own Infocus, you get the new Sharpen AI automatically. I love Topaz for this – they do honor their company commitment that if a filter is upgraded and you own it, you get the upgrade free! See section below for info on how to do this as there appears to be a lot of confusion with this. Let’s start by showing what Sharpen AI’s interface looks like and does. I have added several sections so if you are not interested in all the details, you can skip through some of them. Above is the lovely Siberian Tigress named Dorcas at the Jacksonville Zoo – what a lovely creature she is!
Sharpen AI Interface
Sharpen AI And AI Clear both improves an image’s sharpness and reduces its noise. There is a difference with how they each deal with noise reduction. In AI Clear the noise is adjusted by clicking on Auto or the Low, Med and High buttons. So one of these settings must be chosen. Click on the image below to see the settings more clearly in Flickr.

In Sharpen AI, there is an actual Suppress Noise slider and it can be applied at any amount and with any of the three modes that can be selected. Therefore there is a lot more versatility. Click on the image below to see a larger view of the interface for the Sharpen AI plugin in Flickr and the settings used on the Tigress. The left side is the original image with no sharpening at all and the right side has Sharpen AI applied. If you look closely, the eyes are definitely sharper in the Sharpen filter and some of the hairs around the face are subtly sharper. (The image above was enhanced with Sharpen AI. In Topaz Studio’s Precision Detail was applied to whole image and Impression applied to just the background, and in PS Lighten and Darken Curve Adjustments Layers to add contrast.)

There are three modes that can be tried on the image before applying it. I like this since one may not work as well as another. I am finding that the mode I thought I should use is not always the best one.
Sharpen Mode – this setting is supposed to only sharpen the things you want and brings out the detail in your image – Topaz says it “only sharpens the good stuff” and I guess this is where the AI comes in. It figures out what needs to be sharp in your image.
Stabilize Mode – it is supposed to be best when used with moving objects or low light situations. It “stabilizes” the motion blur that results.
Focus Mode – Topaz says it “rescues a blur within ten pixels” so that a slightly out-of-focus shot becomes much sharper. If part of an image is in focus, like the eyes, but the nose is not, this mode will fix that and bring the nose in focus also.
The Remove Blur slider is the main slider to adjust any of the three modes. They advise against setting it to 1.00 but I use 0.70 quite a bit. It can make the image look too crunchy but that may be okay if you are just using this filter for just the eyes. (See next section for more on this.) As noted above the Suppress Noise slider will reduce the noise in the image and is set to 0.50 as a default. I am also finding that this can be reduced to give some better results if you do not need the noise adjusted. Add Grain slider is only needed if the Mode over corrects your image resulting in an unnatural surface smoothness or loss of too much detail – some texture can be added back this way. It is probably not something that needs to be used often.
How to Use the Sharpen Filter
I usually use this filter from Photoshop since I like to tweak the results once applied. It also is much easier when using the masking as I am describing in this section. I am also finding that the Focus mode fits my problem areas in photography – many people also like the Stabilize mode. One of the best uses for Sharpen AI is to apply it so the eyes so look really sharp, then go back into PS and add a black layer mask to everything but the eyes. Paint them back with white at any brush opacity to make it look good. I have not tried this on a person pix yet but saw this demonstrated with great success.
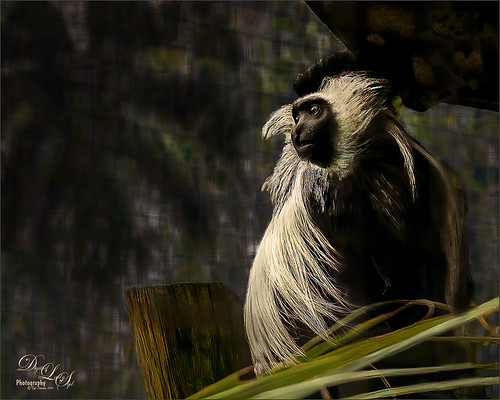 The Guereza Colobus Monkey above used the Focus mode with Remove Blur at 0.70, Suppress Noise at 0.30 and Add Grain at 0 (therefore more sharpening and less noise reduction smoothing) on a layer in PS. In PS a black layer mask was added and just the monkey and foreground was painted back for sharpening. Click on screenshot to see large in Flickr.

Other work was done in Photoshop like using a Lighten Curve to lighten him up a little and the palm shadow was added to take the distracting background away (see 15 Shadow Mockup Overlays by andshesbrave). I am often sharpening the whole image and then masking out completely the other parts of the image in the PS with a 100% white brush or using a lower amount set to reduce part of the effect in the mask. Also Blend If sliders could be handy here.
Below is an example of a landscape hand-held from of all things a bus! Sharpen AI really pulled out all the rigging lines that I have never been able to get clear – this filter saved my image – it may not be the best I have ever taken, but it sure is one of my favorites from Scotland. The filter made the image usable and that is probably the key to what makes a filter a good one. All your images are not going to be that great but some definitely have more meaning and need to be saved of those precious memories.
 Above, this whole Scottish image was sharpened, probably a bit too much – used settings of Processing Mode Focus, Remove Blur 0.70, Suppress Noise 0.80 and Add Grain 0. Then back in PS a black mask was added again and just the sailboat and its lines were painted back which made them very sharp. Using the Focus mode sharpened these lines up beautifully – never have been able to do this with any other product. AI Clear could not help this image. Then I took the image into Topaz Studio where Precision Detail was applied just to the boat. Several other clean up and color toning steps were done but the sharpening on the boat makes this image.
I am finding it is best not to use both AI Clear and Sharpen AI on the same image. It will usually over sharpen the image and add artifacting. You can add other forms of sharpening like using the PS High Pass to sharpen or the Sharpen Tool on special areas with either filter. Just be sure to localize your sharpening when doing this. The Monkey above also had a High Pass added at the end of my workflow but it was only added selectively where the foreground elements needed just a bit more sharpness. In other words, this filter does not do it all, but it is a great place to start, especially if an image needs a little extra help.
What is the Difference between AI Clear and Sharpen AI?
The big question is “Why do I need this filter?” To be honest, I rarely used Infocus so I was as perplexed at this as everyone else. And now that AI Clear is such a fabulous product, is it needed? Let’s address AI Clear first. Since Topaz fixed AI Clear back in October of last year, I use it on almost every image I post-process. I think a lot of people feel that way – I have yet to find another filter that does what this one does in just a couple clicks. It is fast and easy to apply from either Lightroom, Photoshop, or Topaz Studio. It almost always improves an image’s sharpness and reduces its noise.
It seems to me that Topaz Sharpen AI should be used for images that have what I consider bigger issues. Topaz claims it is a great asset for shots taken when hand-holding the camera. “The machine learning training process allows it to understand the difference between detail vs. noise. This means that it can selectively apply sharpening to just the image features it perceives as detail.” On landscapes it brings back detail in all parts of an image while removing noise. Sharpen AI is both a stand-alone (which will only accept Tiff, Jpeg and Png files but plans to add Raw file capability are in the works) and a plug-in that can be accessed by Lightroom, PS and Topaz Studio. NOTE: A big tip is to be sure the Automatically Update Preview is set to No or else you and your computer will be going crazy as it keeps updating the filter! The Stabilize and Focus modes in Sharpen AI are not contained in AI Clear – they originated from the original Infocus techniques. It is not fast at processing and can be down-right slow when saving the final settings to the image – this depends on the size of the file you are using. The Tigress image took 2 minutes to save on my computer which has a pretty fast processor. I did run the Shake Reduction filter in Photoshop (remember when we thought this was the greatest filter ever????) for comparison and it is not even close to either Sharpen AI or AI Clear – we have come a long way with this technology.
Topaz describes the subtle differences between the two programs by saying: “AI Clear’s main detection is noise whereas Sharpen AI’s main detection is to recognize blur. This makes Clear optimal for noisy images and Sharpen more effective for a bit more blurry images.” I believe this is true with my experience using both programs. Sharpen AI does not have batch capability – it is too computer intensive at this point while AI Clear does have the capability.
If you already own Topaz Infocus, Here is how to Upgrade to Topaz Sharpen AI:
Not sure if you own Topaz Infocus? Check out your Topaz Labs Account for purchased products – should be able to tell if you had this plugin originally.
1. Download a trial version of the program and load it on. It should say you have a 30-Day Trial at the top of the program.
2. Now click on the Help Menu and select Update Ownership which should be the second item in the drop-down list. Just click on it and it will remove the Trial information.
If having problems with the above (and hopefully you do not have to do the following steps), here is the info direct from the website forum:
Log into your Topaz Account. Click on Coupon either on the left side of your account page or under Account > coupon then click on the coupon tag. Next go to the Stand alone > Sharpen AI menu at the top of the page and select Sharpen AI. Once on the page, scroll to the bottom and find Buy Now. Once you have the cart it should show the price minus the coupon. Then check out normally to purchase. Finally, download or if you are using a trial go to the Help menu > Update ownership (in the program) and it will change from trial to normal version.
Bottom Line
I am starting to like the Sharpen AI better the more I use it but no way am I getting rid of my AI Clear! Sharpen AI is very slow and I can get fairly similar results with AI Clear and a little Precision Detail or Precision Contrast in Topaz Studio – that is when using an image that is in pretty good shape. If your image does not have that really tack sharp image result (and many of mine do not as seen in the sailboat image), Sharpen AI may really be the answer for you. I believe that as time goes on, Topaz will be updating this plug-in, like they did with AI Clear, and it will be a much faster and better product. In the meantime, I am going to continue using it to see when it is best for my own images. I know this is not a definite answer, but I trust Topaz and believe they will improve this filter to where it will be a no-brainer to use it (like AI Clear is for me right now). I do believe Topaz is going in the right direction with all the AI plug-ins and are working very hard at staying on top of this new technology. Kudos to them for that! I will continue to keep you updated on all their new products – I love the Topaz products. They fit into my workflow very well.
Hope you download the trial to try Sharpen AI out at least and if you own Infocus, definitely download it and check it out. Have a good week! …..Digital Lady Syd

Stunning images! The tiger is gorgeous, and I also love the monkey’s pose.
03/10/2019 at 11:21 am
Thanks Inese – It is pretty easy to get a good image of the big cats with their beautiful coats, but the monkeys can be a challenge, especially if they are black or brown in color.
03/10/2019 at 2:03 pm
Yes, exactly!
03/10/2019 at 5:47 pm
Excellent article – and Dorcas the tigress is seriously impressive. (And sharp!)
03/10/2019 at 1:22 pm
Thanks Ann! She looks so tame – such a lady!
03/10/2019 at 1:59 pm
Pingback: » Hiding in the Shadows of a Tree? Digital Lady Syd's Tidbits Blog
Pingback: » Trying to Eat Your Roommate for Lunch! Digital Lady Syd's Tidbits Blog
Pingback: WHAT FILTERS I USE AND WHAT IS NEW FOR ME | Digital Lady Syd's Fun Photoshop Blog