
HOW TO COLORIZE USING IMAGE COLORIZER
This week I am trying out a different method of colorization – this was really simple and I have to thank that wonderful guru Unmesh Dinka at PixImperfect for introducing me to this technique. I have always been a big fan of old vintage images, especially those that Shorpy posts and very old family shots. (See below for some other blog links on how to colorize using other methods.) The pictures are only black and white or sepia images.
Recently Unmesh had a short video called Free Tool to Auto Colorize Black & White Photos where a free program called Image Colorizer was used to create color images. If you watch the video, it shows the program taking a long time to process – it appears they have updated the program and it works much faster. To get this started, here are a couple things you need to know:
- The file must be less than 4 MB, less than 3000 px X 3000 px, and be in jpg, jpeg, or png format. So you may have to go in and reduce the size of your image before using this program. I found my images needed to be less than 3 MB to get it to work correctly – it still produced a pretty low res image no matter what the original size was.
- This does not create a perfect colorized image – but it does a really good job for a starting point so do not be disappointed if your image has color splotches on it – this can be fixed in Photoshop.
- The final image will be created by stacking the colorized image set to Color blend mode on top of the black and white image in PS.
Once you have the image set up to us in the software, go to the website – click on this link here. You just drag and drop your image into the square and watch the progress icon – it takes a few moments depending on the original size you put into the program. Then just download the image and open it up in Photoshop or Lightroom to post-process it. (There is also an app available for Apple and Android phones.)

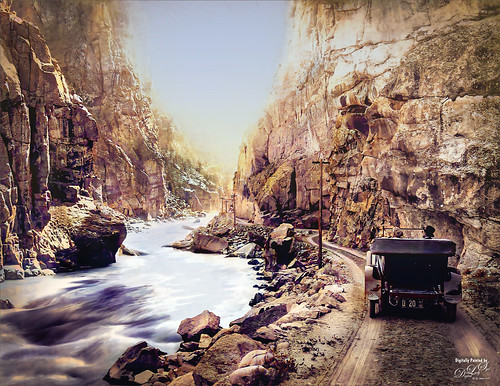
The above photo was from a list of old 1800’s vintage images at a site I cannot now find. The image was 1200 px by 927 px so it fit the criteria just fine. I want to go over a couple of tricks that I found especially handy when using this program. Once the Image Colorizer has been run, place the image over the original black and white background image and set it to Color blend mode. Below is what the image looked like out of the Image Colorizer – it was not too bad but there are some color distortions along the sides of the road and in the water. It does not look that bad overall – just if you zoom in you can see the issues. I found it amazing that just adding this amount of color can create such a colorful final image after PS editing.

Basic Workflow:
1. Run Image Colorizer and download the image.
2. In PS open the original black and white image.
3. Need to check the Image Size (Image -> Image Size) turn off the Resample button and set it to 300 dpi, then recheck the Resample box, and change the size amounts for the final image.
4. Place the Colorizer image on top and set to Color blend mode. Since the colorizer often introduces some color that is not too flattering in places, need to remove it where you do not want it. Two ways to remove color here:
The color in the above was removed by adding a New Layer on top and setting it to Saturation Blend Mode. Then used the Spotlight Brush (here is what I use – select a soft round brush set to 100 pixels and a Flow of 9% and turn on the “Enable airbrush-style buildup effects” icon). Select black (or any neutral color or else it will really saturate the color) and paint on layer where you want the color removed – build up the effect to remove more. This tip was from the great PS guru John Paul Caponigro – still has a DVD that includes this along with many other great tips.
A Hue/Sat Adjustment Layer could have been used also by setting the Sat to -100, inverting the mask to black and painting with white in the mask where color should be removed.
5. One way to remove the lines that do not look good is to go to Filter -> Blur -> Surface Blur and set the Radius to around 30 and the Threshold at 60, or less, – just experiment to see which looks the best. This was not used on this image. Also a good Smudge Brush can be used to even out color striations – there were lot of really funny lines in just the water area of this image. So a Smudge Brush was created from watching some YouTube videos by RArdell for painting watercolor in PS. Used a Smudge Brush set to soft round brush at 16 pixels and in the Options Bar set a Strength of 81% and Sample All Layers checked. Really simple but it creates some nice smooth lines for the water area to remove the subtle color lines. Increase the size if it is too small.
6. To add color in where the software missed it, just add a New Layer on top, set it to Color blend mode – then sample the color needed and paint.
To finalize this image, Luminar 4 (see sidebar at my Tidbits Blog for website link) and Viveza were used on stamped (CTRL+ALT+SHIFT+E) layers. Also two Color Lookup Adjustment Layers were added – one using Foggy Night at 23% opacity and another using a Heat Waver LUT from On1 at 87% opacity to really warm it up. Then some spotlight effect layers were used to add in that additional dodge and burning effect to really add the depth to the image. (See my How to Add a Spot of Light blog. Used White, Black, Yellow and Blue layers to paint in the colors where needed. Also on a separate layer, texture was added to give the water more of a flowing look using Grut NM Tack Ranker brush. The real trick was to add in a blue sky so a Gradient set to yellow and the Difference blend mode was added – just dragged down from the top and used a mask to remove from the sides but left a little light in the distance.
I attempted using Image Colorizer on a black and white low res image of some children, and found using a Frequency Separation method for the skin worked the best. Unfortunately it was taking a long time to get the results that looked good, so it is definitely a work-in-progress. This technique works great as a starting point, but PS filters need to be added to get the great color needed. On the other hand, this is a free program and it does look pretty good considering. Hope everyone has a chance to try it out – enjoy the hot summer days we are having!…..Digital Lady Syd
Digital Lady Syd Related Blogs:
How to Colorize an Old Photo
How to Convert Black and White Images to Colorful Painting with Topaz Studio 2
Giving a Vintage Young Lady a New Appearance
How to Hand Tint a Vintage Image and Create a Brush to Do This
Contemplating Life

It’s extraordinary what a program can do – and reminds me of using Marshall’s photo oils to colour black and white prints back in my darkroom days. (It was quite fun but I wasn’t all that good at it!)
07/25/2020 at 8:42 pm
I never did the darkroom post work so I am not sure how you did this. Sounds pretty cool though. The Image Colorizer uses AI technology so I figure it might get a lot better as they improve the software. Could turn out to be really good.
07/26/2020 at 8:40 am
The photo oils were very fiddly to use. I can remember that you had all these tiny tubes of paint and used a wooden cocktail stick with a little bit of cotton wool twirled around the end to apply the colours. (Nothing as sophisticated as a brush!) Messy too – never really got far with it – but it was fun trying! AI technology is amazing, so it will be interesting to see what improvements come.
07/26/2020 at 6:10 pm
It is amazing how far we have come in photography! AI certainly does add a whole new aspect to post-processing!
07/27/2020 at 7:45 am
Pingback: » Fisherman’s Cabin Digital Lady Syd's Tidbits Blog