
HOW TO ADD A SPOT OF LIGHT
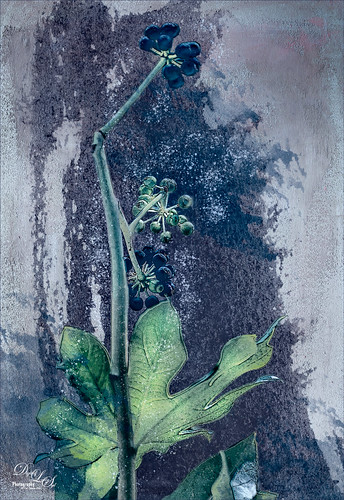
This week I just wanted to share a quick tip learned from Photoshop Guru Corey Barker in his Master FX Trick Shots video recently (it is now available for sale). In one section on Abstract Shape Effects, he showed how to easily add a little lighting effect to your image. As a last step on the above, I wanted to emphasize the focal point at the center of the lower leaf and add just some subtle color to enhance that area.
- A New Layer was added on top and changed to Overlay blend mode.
- With a large soft white brush, the leaf was painted over to just pop the lighting in that area and a little on the upper center berries.
- Optional Step: Since this slightly desaturated the color, a light green Solid Color Fill Adjustment Layer was added (clicked on the black & white circle icon at bottom of Layer Panel and selected Solid Color in pop-out menu) and clipped to the New Layer with the white paint by ALT+clicking between the two layers.
- The white paint layer’s opacity was set to 63% so the whole effect was not too much.
Now the leaf is definitely in the spotlight with just a little added color. White works nicely in most cases. This is a very similar technique as in my The Best Dodging and Burning Technique! Fun Photoshop Blog – this I use all the time! Well hope you liked the quick tip – give it a try if you just need to add a little extra light to an area! For more post-processing info for this image, check out my Some Blue Berries Tidbits Blog. …..Digital Lady Syd

Enlightenment this way has come!
04/24/2016 at 5:47 am
This is a great technique, more subtle and natural looking than just dodging. Beautiful photograph!
04/25/2016 at 5:54 pm
Pingback: DOUBLE EXPOSURE PHOTOSHOP ACTION | Digital Lady Syd's Fun Photoshop Blog
Pingback: HOW TO USE THE FREE SPECTREL ART PLUG-IN | Digital Lady Syd's Fun Photoshop Blog
Pingback: HOW TO GET A FANTASY FEEL IN PHOTOSHOP | Digital Lady Syd's Fun Photoshop Blog
Pingback: HOW TO CREATE A SUBTLE DODGE AND BURN EFFECT | Digital Lady Syd's Fun Photoshop Blog
Pingback: » Harvesting Orange Digital Lady Syd's Tidbits Blog
Pingback: COMPARING RAW PHOTO PROGRAMS | Digital Lady Syd's Fun Photoshop Blog
Pingback: HAPPY VALENTINES DAY (WITH A FEW TIPS)! | Digital Lady Syd's Fun Photoshop Blog
Pingback: ENJOYING SOME SPRING BUTTERFLIES | Digital Lady Syd's Fun Photoshop Blog
Pingback: HOW TO DO A BASIC DODGE AND BURN WITH A TWIST | Digital Lady Syd's Fun Photoshop Blog
Pingback: » Trying to Eat Your Roommate for Lunch! Digital Lady Syd's Tidbits Blog
Pingback: GETTING THE JOEL SARTORE LOOK ON YOUR ZOO IMAGES | Digital Lady Syd's Fun Photoshop Blog
Pingback: HOW TO GET A SOFT BLACK AND WHITE LANDSCAPE EFFECT | Digital Lady Syd's Fun Photoshop Blog
Pingback: HOW TO GET A SOFT TEXTURED FLOWER EFFECT | Digital Lady Syd's Fun Photoshop Blog
Pingback: HOW TO COLORIZE USING IMAGE COLORIZER | Digital Lady Syd's Fun Photoshop Blog
Pingback: Trying Some Creative Art | Digital Lady Syd's Fun Photoshop Blog
Pingback: A DAY TO NIGHT QUICK CHANGE | Digital Lady Syd's Fun Photoshop Blog