
Digital Lady Syd Reviews Topaz Detail 3

The above was my first attempt at trying out Topaz Detail 3 and I am not disappointed. (For Topaz website link see my Tidbits Blog sidebar.) To sharpen an image I usually use the High Pass filter, Unsharp Filter or convert to LAB and do localized sharpening on the L channel. Detail 3 makes sharpening so much easier and gives several ways to adjust your sharpening to get the detail effect you want. This upgrade was definitely needed – and what I like most is that you can now localize the detail. All I can say is Love It! Love It! Love It!
Since I am such a big fan of Topaz anyway, I decided to use several of their plug-ins on this image from the 39th Annual Daytona Turkey Run Car Show, the largest in the US. If you look close at this guys face, you can see a slight smile – Detail really brought that out. I first started processing this image in Lightroom (see the RAW image below) with just the Basic sliders. In Photoshop I went immediately into Topaz photoFXlab, their new plug-in interface that I love. (See my Digital Lady Syd’s Review of Topaz photoFXlab v1.1 blog.) Next the Black and White Effects plug-in (this plug-in does things like no other filter I have seen) and from the Opalotype Collection the Hand-Tinted Chiffon preset was applied. The only change was to the Vignette which I centered on the car and adjusted the vignette sliders. Back in photoFXlab, Adjustment tab settings using the Dynamics slider (my favorite), Sharpness, Highlights and Shadows were applied. On a +From Stack layer (composite), the new Detail 3 plugin setting using just the Large Detail set to 0.53 was selected. Then in the Effect Mask tab, I lightly painted out the grill so as not to overdo the sharpening effect on it. The Overall Effect slider was set to .78 and that was it. In Photoshop the last step was to add French Kiss’s free Glorious Grunge Edging Overlay with grunge removed from center. It turned out beautifully!

What I Like about Topaz Detail 3!
1. Totally love the localized detailing that can now be done – the Effect Mask can be used to either paint in or paint out areas of the image so just what you want sharpened is affected.
2. The effect is usually pretty subtle but makes an incredible difference when viewing the image! There is an Overall Opacity slider in the Effect Mask tab that can be reduced to lower the detail globally if it appears to be overdone.
3. The Cyan-Red, Magenta-Green, and Yellow-Blue Tone sliders where you can enhance a single color have always been a favorite, even in Detail 2. Also Color Temperature and Tint sliders are now available. These sliders all use the IntelliColor feature that keeps unwanted color shifts under control.
4. What I just learned is that the Detail plug-in can also be used as a final sharpening for printing your images. Topaz did a You-Tube video called Output Sharpening for Print with Topaz, presented by Hal Schmidt using this process with Detail 2. I am planning on checking this out when I get a chance.
5. Details can actually just be added to the Shadows or the Highlights of your image or both with different settings. Really handy when you have a difficult image to work on.
6. New Deblur technology from Detail 2 that brings out micro details – great for macro photos. I have not had a chance to really use it yet but it sounds like a very promising feature.
What I Do Not Like!
1. I have a bit of a problem with the Effect Mask – I have a hard time making sure I am covering everything I need covered and at the correct amount. It would be nice if they had a colored overlay, as with Lightroom’s Adjustment Brush, that would give you a feel as to where you were going out of the edges.
2. I wish the Undo/Redo buttons would work on the Effect Mask. The only way you can erase an area you accidentally painted over is to move the brush to a different amount and hope it covers. This works okay if using Brush Strengths of either 0 or 1.00, but when in between, it gets hard to fix. Sometimes it is easier to just start over by resetting the mask. The other plug-ins, like Adjust and photoFXlab, have these buttons working. (A request on Technical Problems has been posted in their Forum on this matter.)
3. This is a small nag, but when you apply an effect, you need to make sure you press Reset button in the Effect Mask to clear the mask window or it stays on even after pressing the Apply button. When you start to make other effect changes, the mask is still there. This is also true if you have painted out an area, for a certain preset and then change your mind about that preset, press Reset All in the Adjustments tab, the mask is still in the window. Sometimes this is good if you still want the mask, but sometimes it is frustrating until you realize what happened. Most of the other plug-ins will retain the mask before you apply an effect, but clear it after applying.
4. Another small nag, but often the program gets confused and opens up on my second monitor instead of over Photoshop or photoFXlab – not sure why it happens but just some of the time.
Overall the negatives are not that big a deal although I hope they do fix No.2. The revamping of this plug-in has made it so much more useful – I am looking forward to having it in my workflow!
…..
These beautiful little miniature mums are once again my subject. This time a little processing in Lightroom, but not much. (See image below as it was brought into Photoshop.) DeNoise 3 was applied with just an overall Strength of .11 – now you do not need to adjust the Recover Detail slider if you are going to use Detail 3. Next Detail 3 was opened and applied 3 times! Yep – First in the Creative Detail Collection, the Overall Detail Strong II preset was applied and it really sharpened the flower petals and center. Next from the Stylized Detail Collection the Desaturated Blush II was applied and that beautiful texturized background appeared. Finally from the same collection the HDR Enhancement I was applied – in the Effect Mask the mask was inverted to black and with a brush set to 1.00, the center of the flower was painted back. Now to get just the right effect for the center, back in the Adjustments tab the Saturation Boost was set to .44. That is all that was done to this image to get this beautiful effect other than adding my B&W Border Frame Layer Style. I was totally surprised by how much detail was in the image that you could not see originally and by how beautiful a texture could be created by playing around with the presets and applying different ones.

…..

This image of one of the Haunted Houses at for the Halloween Horror Night at Universal Studios Orlando was created very quickly – below is what the image looked like after just basic Camera Raw corrections were done in Lightroom. It is not bad but Topaz added those subtle changes that really improve the image. First Topaz photoLabFX was opened and the layer duplicated. Since the image had quite bit of noise in it as it was taken at night and without a tripod, I felt it needed to have Topaz DeNoise 3 applied first – just a little Strength set to .11 and Detail Recovery set to .26 (did this before I realized that it could be done in Detail 3) – the noise was cleared. (I love DeNoise!) Then I went into the new Topaz Detail 3 plug-in and applied the Architectural Detail II preset. Exit and a Stamped layer was created where Adjustment tab settings for the Temperature to -8 (for a more blue tone), Saturation to -23 (it was really bright and the light was coming from everywhere), Dynamics to 27 (my favorite slider in all of Topaz – just works!), Highlights to -89 and Shadows to -23 were applied. French Kiss Glorious Grunge Edging free overlay (see link above) was applied and that was it. I was amazed how much the Detail 3 and the Dynamics slider together made this image pop. I have to say this picture reminds me of one of my kids favorite childhood books, the Berenstain Bears and the Spooky Old Tree!

…..
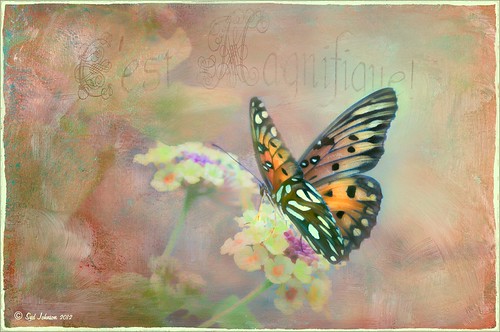
This is another example of the creative aspect of this plug-in – this image turned out very different than what I thought it would look like. This beautiful Monarch butterfly was not very happy with me taking her picture and it took off about two seconds after I captured this image. I got exactly two pictures! (See RAW image below.) After doing my Camera Raw work in Lightroom, the image was brought into Photoshop and Topaz Detail 3 opened. I applied this plug-in twice to get this effect on the butterfly and background. First application used the Stylized Detail Collection Abstraction I preset – then in the Color Section changed the Temperature and Saturation sliders. In the Effect Mask, at Strength 0.64 on a black inverted mask, the butterfly was painted in so the changes were made to just the background, but a little to the butterfly. This created the very soft background. Then Topaz Detail 3 was opened again and this time Creative Detail Collection Feature Enhancement I preset was used. This time it was applied just to the butterfly and not the background. Changes were made to the Tone sliders,including the Cyan-Red (0.82), Magenta-Green (0.68), and Yellow-Blue (-0.30) sliders – these are unique to this plug-in for Topaz and they can make an incredible difference in an image. These are not new to Detail 3 but are still one of my favorite parts of the plug-in. In Photoshop French Kiss Artiste Collection Charmante texture was added and the butterfly painted out, some text typed in and warped, and that wonderful grunge overlay applied again – I must be on a grunge kick?

…..

I decided to try a little different effect for this image from the top of the Sky Tower of the Kraken Roller Coaster (check out the link for crazy roller coaster video) at SeaWorld Orlando. This image was pretty complicated as I used 4 different Topaz plug-ins to get the final effect. First my normal workflow in Lightroom. Next Topaz photoFXlab was opened and the Adjustment tab was used to adjust almost all the sliders including Dynamics that was set to 50. On a stacked layer Black and White Effect was opened and from the Albumen Collection, Chocolate preset was applied with Film Grain turned off and the Transparency set to .49. Topaz Detail 3 was applied – there were areas on the image that had been slightly lightened and blurred due to reflections from a window in the Sky Tower. To get rid of these reflection marks and make them blend into the rest of the image, I selected the Creative Detail Collection – Texture Enhancement II preset. This really over detailed the image as it was pretty sharp due to the wonderful Dynamics slider. In the Effect Mask, it was inverted and with a brush set to Strength .55, I painted over the light areas in the black mask. Then went into Adjustments tab and changed the Exposure to -.08 and Contrast to 0.45 to make the changes blend in. This is a terrific use for this filter and makes its value so much better than Detail 2. Topaz Detail 3 was applied again using just a change to the Cyan-Red slider – it was set to -1.00 to bring out the cyan roller coaster track. Finally Topaz Len Effects Vignette – Selective was set to draw the eye to the highest point of the coaster – very subtle. My Thin Double Edge Frame Layer Style was applied sampling frame colors from the image.
…..
I love Topaz products and Detail 3 is no exception. I actually purchased Detail 2 as my first Topaz product – I did not use it to the extent I could have but I did use it at times for the detail and color toning I needed. Detail 3 is definitely a big step up and it does create that extra bit of sharpening and detail that is usually needed at some point in your post-processing workflow. And don’t forget that once you buy a plug-in from Topaz, the upgrades are free! I got this version for just owning Detail 2! You should definitely check it out!…..Digital Lady Syd

Pingback: Topaz Adjust 5 « Raven Photography UK
fascinating … I’m definitely going to look into this one!!!! t hank you!!!
01/31/2013 at 6:43 pm
Glad you liked it. Digital Lady Syd
02/04/2013 at 11:19 pm
Beautiful..I want to check this out.
02/04/2013 at 12:14 pm
Thx for the kind comment. Digital Lady Syd
02/04/2013 at 11:19 pm
Usando una Sigma, que tienen sensor Foveon, no hace falta enfocar por “software”: el detalle sale ya impresionante desde la cámara.
02/11/2013 at 9:05 am
Thanks for the comment Joserri. If I understand you correctly, your camera actually does a great job of sharpening and you do not need to do more when post-processing your pix – all I can say is you are very lucky. My camera shoots in RAW and most of the time it is far from complete in the details. Therefore, I find I am using Detail as my first step in processing an image after applying my Camera Raw processing to get the really good detail. Usually the Overall Medium Detail II preset is perfect. If it is too much, I either reduce the opacity or add a black layer mask and paint back locally what needs more sharpening. Maybe sometime down the road I will have a camera that does not need much detail improvement! Digital Lady Syd
02/13/2013 at 9:49 pm
Pingback: » Thing One Thing Two – Hum! Digital Lady Syd's Tidbits Blog
Pingback: SOME OF THE BEST PHOTOSHOP “WORK-HORSE” PLUG-INS | Digital Lady Syd's Fun Photoshop Blog
Pingback: HOW TO CREATE AN ILLUSTRATIVE TEXTURED IMAGE FROM A PHOTO | Digital Lady Syd's Fun Photoshop Blog