
HOW TO GET BLEND IF SLIDER SETTINGS TO APPLY TO A LAYER
 It seems like I have been using these Blend If sliders a lot recently. (See my How to Use Those Handy Blend-If Sliders! blog.) For this blog I used a little known tip from the brilliant Ben Wilmore who explained a while back how to apply the blend-if sliders permanently (see his Photoshop Mastery: Retouching and Collage videos – this is a great course on CreativeLive BTW). Probably the first question is why would you want to do this? Firstly, it is one of the easiest ways to remove the white (or black) pixels from an image. It is a simple way to indirectly select and turn transparent the white or black pixels in a the background or complicated image areas for creating collages or adding textures. And secondly, it is a way to add texture to an image without it covering up all parts of the image – it keeps lines sharp as shown in the last image. This can be a major problem when adding textures.
Here is a quick reminder of what the Blend If sliders do. Double click on the layer to open up the dialog box shown below. By moving the This Layer white tab to the left, all the corresponding white tones (as seen in the black to white strip) to the right of the tab are removed from the the image and turned clear or transparent in the layer. For example if you moved the white tab left to 159, all the white pixels between the 159 and the 255 tone values will be removed. If you further split the tab (ALT+drag on tab to split) to say 124, then the gray tone pixel values between 124 and 159 will be partially deleted. The rest of the tone values will stay the same. These numbers correspond to the same values that are very visible under the histogram in the Levels Adjustment Layer – same concept here. See the screenshot below demonstrating the Blend If Slider dialog box info.
 The individual Layer Style Blending Options on the left side can be applied by going to Layer -> Layer Style -> Create Layers. Each effect is lined up and clipped to the original layer so they only affect that layer. But when just the Blend If Sliders are changed, the Create Layers option is grayed out or ignored if some affects are checked on the left. Layer Styles cannot be Rasterized into one layer like Smart Object or Text layers. So here is the tip on how to apply those Blend If Slider settings and all other affects checked into one layer. Once you have the Blend If Sliders set up the way you like (and the Blending Options wanted checked), duplicate this layer. Next Create a New Layer Underneath the duplicate layer. Highlight the top layer and press CTRL+E or right click and select Merge Down. Voila! the layer is now free of its layer style limitations and shows an image with transparent areas that correspond to the deleted pixels. The workflow below goes into more detail.
On the resulting layer, textures can be added under this layer, the layer can be set to different blend modes and opacities, and new Layer Styles options can be added. My workflows below show how I achieved the results in the images in this blog. You are not limited to just the Blend If Gray channel (which is equivalent to the RGB channel), but in the drop down the Blue, Green and Yellow channels can be used alone or together to get some different results. Ben says to look at these channels if there is a big difference in colors in your image such as a blue sky and a green foreground. Also by selecting the resulting image layer (CTRL+click on the layer thumbnail) and adding a layer mask to the original layer or to a texture, some more very interesting effects can be created easily – and without a lot of hand-selection going on, which I always like.
Workflow For Using Blend If Sliders to Remove White From a Texture
1. Open up the texture and duplicate Background layer.
2. Add a New Layer between the two texture layers and fill with a bright colored color. This is so you can tell if you are getting the right effect with your slider adjustments and can be deleted when finished with the effects.
3. Take the top texture layer and make the tab slider adjustments to get rid of the white areas. In my image the white tab on This Layer was set to 124/159. (See screenshot above.) If you want to remove black, just move and split the black tab, and if you want both black and white removed, use both tabs.
4. Duplicate top layer with settings.
5. Create a New Layer underneath the top duplicated layer and leave it blank.
6. Highlight the top texture layer and merge it down by clicking CTRL+E or right click and selecting Merge Down now there is only one layer which contains image with Layer Style including Blend If settings applied.
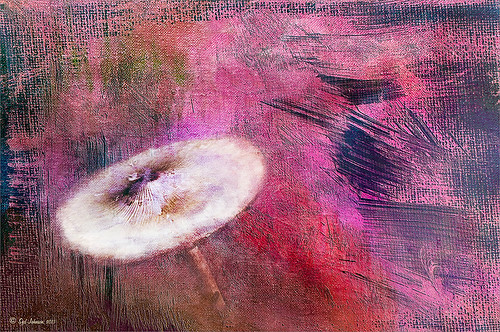
The texture overlay applied to the Meadow Mushroom image above used Painted Texture‘s Taupe Canvas texture, The screenshot below shows the blue layer that lets me see what parts of the texture is still there and what were removed. Notice that I got a white result – this was done by following the workflow steps above and changing the black tab to a split 157/237 (instead of the white tab) – just a little of the colored tone highlights showed up and the darker areas were deleted.

You now have a basic overlay layer with just the parts you want from the texture or image. This layer can be added into another image (highlight layer, CTRL+A to Select All, CTRL+C to copy, and go to other document and CTRL+V to paste into new image) or saved as an overlay PNG file. (Turn off all layers but this one and go to File -> Scripts -> Export Layers to File and save in a 24-PNG format and add to your textures and overlay files.) To get some different results, try selecting this layer by CTRL+clicking on thumbnail and adding a Layer Mask to another layer. More Blend If slider settings can be applied to the result. There are all kinds of options. Try inverting the Layer Mask (CTRL+I on Layer Mask) to see how it might look on different backgrounds.You can now get really nice embossing on the edges as shown in the image above. And you can save different versions using the same texture.
Remember that if you are getting some color shifts on composite (merged layer using all the layers underneath – CTRL+ALT+SHIFT+E) after using the Blend If Sliders on a layer, the work-around is to just set the Fill Opacity to 0% on the composite layer. Also another little thing I noticed is that if one of the check boxes for Channels R, G, or B is unchecked, you get some really odd color shifts when you merge the layer down so don’t mess with these unless you like the results. Also, don’t get discouraged if it does not work out on the image you are trying it on – it does not work for all images.
Using Blend If Sliders to Remove White in Image to Let Texture Show Through
 This image was one I used in a previous blog (see my Flickr Image for original). Just showing you a slightly different way of doing what was done to the texture example above. I decided to remove the white in the original image using the Blend If sliders and to place a texture under the resulting transparent layer to add a painterly look. The same workflow as above was used – this time it was used on the image instead of a texture and of course it is not saved down as a PNG file (unless you wanted to use it that way). I really liked the how the texture showed through the transparent areas in this image. Basically by converting the RAW file to a pretty monochromatic (see my Get Great Results with Alien Skin Snap Art 3 and Topaz ReStyle Together!! blog) image and then removing the whites, the texture shows through very nicely.
You can paint more in the Layer Mask using different brush opacities to hide more or less of the underlying texture that you added. You can also add another Layer Style to the layer that contains the transparent image. All kinds of possibilities are present including changing the blend modes.
*****
Here is another image that uses the same workflow steps as the Belarusian Countryside image. In this case the image was turned into a sepia tone in Lightroom before opening in Photoshop. Three textures were combined to get this effect after creating a layer mask of everything except the sky basically. The This Layer Blend If settings in this case were split Black tab 56/78 and White tab 102/161. As you can see, quite a few black tones and white tones were removed from this image. I really liked the final result which added a lot of texture throughout the image without covering up the actual details in the image. (See Image 3 for more info on settings.)
 This is such a great way to get some wonderful and unique effects that can be reused on other images. The reason this is major cool is that you can add layer styles to these resulting layers and even more Blend If sliders. And it really is not that hard once you try it a couple of times. It seems we are always looking for ways to add something just a little different to our images and this may be one to keep in your arsenal just for that purpose. And it is so much fun to try on different images – and that is what it is all about!…..Digital Lady Syd
Digital Lady Syd Related Blogs:
My Version of Photoshop Tennis! -Sixth Image is another good example of using the Blend If Sliders
IMAGE NOTES
Image 1: This is another shot of a large Meadow Mushroom that appeared in my yard recently. In Photoshop the image was processed in Nik Color Efex Pro 4 where the B/W Conversion filter was set to Dynamic Control and an opacity of 56%; Film Efex/Vintage was set to Film Type 11 and 85% opacity; and Bi-Color Filters set to Color Set 3 with a control point placed on a mushroom at 39% opacity and an overall opacity of 20%. Next French Kiss Collections Artiste May Roses texture was applied. The mushrooms were lightly painted out in a layer mask. A New Layer was added where I added a little white cloud in the upper right of image at 89% layer opacity. Next Painted Textures Taupe Canvas was added to image – but I used the one created from the texture with the white removed from the texture and inverted. It was set to a Difference blend mode and a pink Solid Color Fill Layer was added to turn the remaining texture to a pinkish color. The Blend Mode made the color actually look dark blue which I really liked. A Bevel and Emboss Layer Style Effect was added to the layer. Some of this effect was removed from the mushroom with a layer mask. A composite layer was created on top (CTRL+SHIFT+ALT+E) . The background was darkened and the mushroom brightened.
Image 2: For this image, French Kiss Collection Tableaux WindSong 2z was applied on top. Next the composite layer (which was the charcoal image posted previously) was duplicated and the Layer Style opened up. This Layer Blend If White tab was split and set to 102/184 and in the Underlying Layer the Black tab was split and set to 191/194. Since this image had the texture underneath, the Underlying Layer tabs could also be manipulated. The Blend Mode was set to Vivid Light. A Brightness/Contrast layer was added with no settings and set to Multiply at 28% layer opacity – to darken image just slightly. A Curves Adjustment Layer was added next to add contrast to the midtones and darker areas. The Blend If layer was duplicated and placed above – a blank New Layer was set underneath – then the layers were merged together to apply the Blend If sliders to make transparent some of the white and black tonal areas. A selection was made by CTRL+clicking on the thumbnail and adding a Layer Mask to the original Blend If layer. Since all this did was select the structures, and I wanted the transparent areas preset, it was inverted by clicking CTRL+I in the Layer Mask so the texture will show through this layer. A white border was created using Photoshop’s Natural Brush Spray 41 pixels in a white color to create the white edging. Another Curves Adjustment Layer was added just for brightening up the image to emphasize the white a little more. A composite layer was added on top and the Fill Opacity was set to 0% to reduce the color shift.
Image 3: As described above, a sepia tone preset was used on this image in Lightroom. Painted Textures Confetti texture was set to 12% on top of the original image. Next 2 Lil’ Owls Mosaic Set Benoit texture (see my Tidbits Blog sidebar for website link) was added at 12% opacity also. A Hue/Saturation Adjustment Layer was added and clipped to the top texture and set to Hue 57 and Saturation 12. Next the original background layer was duplicated and placed on top where the Blend If sliders were set as described above. The steps were followed with the a duplicate copy merged down, a selection created, and a Layer Mask added to the layer above the textures and to the Confetti texture. A Curves Adjustment Layer was added and contrast was added by pulling down on the curve. Next 2 Lil’ Owls Light It Up Mini Set 1 texture was added and set to Color Burn blend mode. French Kiss Collections free Glorious Grunge Edging was added and the Color Fill Layer was clipped to the edging and set to a light yellow. On a composite on top, the Fill Opacity had to be set to 0% to stop the color shift.

Pingback: WHAT DOES THE DIFFERENCE BLEND MODE DO? | Digital Lady Syd's Fun Photoshop Blog
Pingback: HOW TO USE THE PUPPET WARP TOOL CREATIVELY | Digital Lady Syd's Fun Photoshop Blog
Pingback: HOW TO MERGE LAYER STYLE BLEND IF SETTINGS TO A LAYER FOR ARTISTIC EFFECTS | Digital Lady Syd's Fun Photoshop Blog
Pingback: HOW TO USE THE PUPPET WARP TOOL CREATIVELY – RECYCLED | Digital Lady Syd's Fun Photoshop Blog