
HOW TO USE TEXTURE TO REMOVE DISTRACTING NATURE BACKGROUNDS
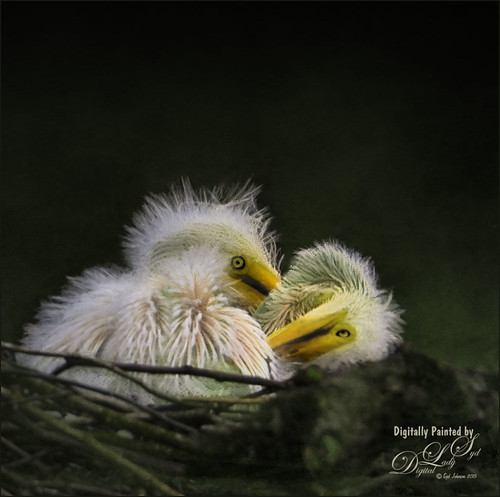 Well, these two little guys were just adorable. This shot was taken at the St. Augustine Alligator Farm‘s famous Rookery. I was surprised how newborn they looked. If you get in the St. Augustine area in the April/May time slot and you love bird photography, there is just no better place to go. It is crazy with birds, people, tripods, and did I say kids, but you can still get some really nice shots.
This blog is about getting rid of the ugly natural backgrounds that often surround these beautiful creatures and totally distract the eye. One of the first things you need to think about is getting a texture that sort of matches what you are trying to block out. You want the texture to fit in seamlessly so that you do not notice when looking at the photo that a texture is even there. Below is what my image Background layer looked liked after the tone was adjusted a little and a huge crop was done in Lightroom. The mother egret’s leg is actually just to the left of the crop.
 I found the large branch behind the birds along with the over-sharpened next branches to be a bit overwhelming for this image. I wanted a bit of a painterly look to the image, but too much would just take away from the subjects which were so natural and nice already. Therefore there is one person who has the most beautiful natural textures for images that you can find and her name is Jai Johnson. She has several that can be downloaded for free, including the one that was used in this image, and it is definitely worth your time to look at all of her collections. She takes the most incredible bird and nature images and almost always blends in one of her beautiful textures to enhance the images. The one used in this image is called emeraldgreen-canvas and it matched the background and green colors of the original image very nicely.
Once the texture is placed into your image, put the texture underneath the image and add a layer mask to the image. Jai says there is more control by putting the texture under the image and then removing the image background in the layer mask. In my case, I like filling the mask with black by CTRL+I inside the mask and just painting back what I want showing. Since you cannot see where the objects are with a black mask, go to the Properties Panel and reduce the Density slider until you see what you need (I used 82%). TIP: To keep from accidentally painting on your image instead of your layer mask, click on the image thumbnail and click on the Lock Image Pixels icon, 2nd Lock icon at top of Layer Panel. Now you are unable to paint in the image. Just Unlock to open it up if you need to. Do some painting with white in the mask and then put the Density back up to 100%. Any brush can be used to add the paint into the layer mask where you want a little painterly effect. The Brush Opacity and Flow on the Options Bar can be adjusted to get really nice blended fits into the image. For the mask above, I painted with a My Chalk Brush around the birds. (Photoshop’s Chalk 60 brush and in the Brush Panel set size to 200 pixels and in the Shape Dynamics section set the 19%.) Then used a Brush Opacity of 100% and Flow of 3% to paint around the bird feathers in the layer mask. I use a very tiny brush size to do this – definitely under 10 pixels and sometimes just 1 or 2 to get the coverage I want. Lightly paint over the feather’s edges. Set Brush Opacity to 30% and Mode to Multiply for painting in nest area in front so the white feathers are not painted over but the nest twigs picked up the slight color texture color and were softened. Since this texture was similar to what was really in the original background, it blended very nicely.
Next Mixer Brushes were used on New Layers above to just blend the bird hairs back into the background. I like to use separate layers for each brush I use – just be sure that Sample All Layers is checked. Many people just paint directly on top of a duplicated image to give it the painterly feel. I like to have the option to adjust the painted layer or erase if something looks bad. In this case a Chalk brush mixer was used as a blender so no color was added (Load Brush after each stroke is turned off), a Soft round brush blender mixer, and a Wax Crayon mixer brush used to add paint back in were used to create the effect. I am working on creating some good Mixer brushes to share, but I would suggest you try some of Photoshop’s mixers for now as some of them are very nice.
An Exposure Adjustment Layer was used to sharpen the eyes by first selecting the eyes (I used the Quick Selection Tool or Q), and then opened the Exposure Adjustment Layer – the selection goes right into the mask. The Gamma slider and Exposure sliders were used to sharpen the eyes just a bit. Next a Curves Adjustment Layer was added to add contrast. The last step was using Nik Viveza 2 to draw the eye to the babies.
 This image is of a scene that was set up at the Native American Festival in Ormond Beach earlier this year. Before adding the texture, Topaz Clarity was used to give some detail in my subjects. (Settings for SJ Good Bird Preset: Clarity Dynamics Micro Contrast 0.80, Low Contrast 0.91, Medium Contrast -0.62, and High Contrast -0.80.) The layer mask was once again used to start the painterly brush effect. Next Jai Johnson’s subtlenature-canvas layer was placed in the image. This texture technique Jai Johnson explained very nicely in her Peach Blush Texture Demonstration video. She uses Topaz (see my Tidbits Blog sidebar for website link) FXLabs interface but the principles can still be applied on a Photoshop layer mask. Once again adjusting the Brush Opacity and Flow was used to create the more painterly looking edges. In this layer mask, a Soft (same as Hardness at 0) Round Brush set to 100% Brush Opacity and a Flow of 1.00 was used to do the large brush strokes in the layer mask to remove the image background. I keep painting back and forth between the black and white colors using the Brush Opacity at 96% and the Flow at 5%. Need to keep flow under 6 or 7% to soften the hard edges on the image. Already the image had a very nice soft look and you could stop here. I also found that I liked the Density slider at 82% in the Properties Bar so it was left there. Jai duplicates the texture layer and puts it on top with a different blend mode. Once you get the background the way you want, there are many other choices you have to finish up the image. In my case New Layers were added again to add even more of a painterly effect. Above the eyes were sharpened with the Exposure Adjustment Layer, applied Nik Viveza 2 to even out the color, and added a vignette using the Curves Adjustment Layer.
I hope this gave you some ideas on how to blend in those backgrounds really nicely – the Flow is a major player when getting that natural look in your images along with a good Mixer Brush. I appreciate Jai shared her insights on how to do this. Have a very Happy Holiday – I may take a few weeks off to try and catch up. See ya soon!…..Digital Lady Syd
Digital Lady Syd Related Blogs:
What Does the Flow Slider in the Options Bar Do?
Taking Off From the Rookery Runway

Perfect timing. I just took pictures of a mother robin teaching her baby to fly. Not happy with the background so I can’t wait to try your technique. Thank you.
05/24/2015 at 3:43 pm
Thanks for the comment Lynn. I have not seen too many people talking about blending the subject edges into the texture with a layer mask and a brush set to a low Flow amount. It makes for a very natural result. Good Luck!….Digital Lady Syd
05/24/2015 at 9:33 pm
Thank you for the lesson and for the links! These two babies are adorable, and the texture looks so natural!
Have a nice week!
Inese
05/25/2015 at 9:53 am
Thanks for the kind words Inese. I just love to photograph birds!
05/26/2015 at 9:08 am
Just read about some people in the war zone who hid the last two male and one female bald ibises and an egg. They didn’t think to save their life but cared about the birds that are going extinct. I was crying. What wonderful humans!
05/26/2015 at 12:22 pm
Pingback: » Heron Checking Out the Gathering Crowds Digital Lady Syd's Tidbits Blog