
HOW TO USE GOOGLE (NIK) HDR EFEX PRO 2
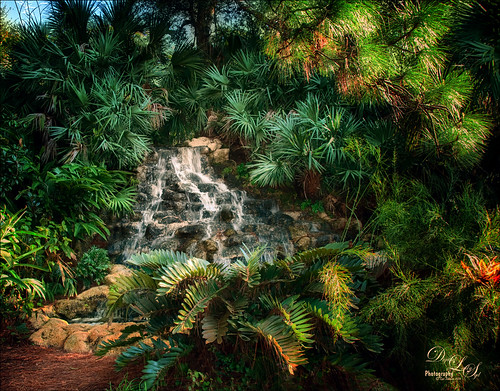 This week I thought I would just show a quick image that used Nik HDR Efex Pro 2, one of the 7 plug-ins in the now free Google (Nik) Collection. I do not do much HDR shooting anymore, but here is an image taken a few years ago that used 5 bracketed shots. If you like to shoot HDR, I would definitely check out this software – it is different from both Lightroom’s and Photomatix Pro’s HDR results. I had done a previous review years ago (see my Digital Lady Syd Reviews Nik HDR Efex Pro 2 blog) and still love the plug-in as much as before. So here were the quick steps that got this effect:
- From Lightroom, all the images were selected and opened in Photoshop as individual files.
- Next the plug-in was opened in Photoshop by going to File -> Automate -> Merge to HDR Efex Pro2 – press the “Add open file” and then the Merge Dialog button. You can click the check box for Create Smart Object so you can go back in and adjust effect. (Can apply plug-in from LR by going to File -> Export with Preset -> Merge to HDR Efex Pro2.)
- Check Alignment if images not shot on a tripod. Same with Ghost Reduction – move slider at bottom to show image that shows image with movement that looks best as in clouds or trees. Always check Remove Chromatic Aberration.
- Now just presss Create HDR – a tiff file is created.
- The Default preset is automatically applied to the image. Now the fun is going through all the presets and see which one(s) look best on the image. Experiment with the sliders on the right. Tone Compression is the amount of HDR effect seen – set all the way left there is no HDR effect. Method Strength slider goes from very weak to very crunchy looking. All the other sliders can create some nice effects. If you find a combination you, just create a preset by pressing the (+) sign in the Custom section on the left. The above image used the Deep 2 preset to start.
- Note this image is now set to 32-Bits/Channel – this is a huge file and lots of PS effects and actions will not run on it. I change it to 16 or 8 bit mode so I can do things as in the next step. Go to File -> Mode -> 8-Bits/Channel. This causes the file to be merged down and the Smart Object is rasterized. (If you duplicate the Smart Object and rasterize the layer, turn the eye off the bottom Smart Object layer, and now change the mode, select Don’t Merge Layers, the Smart Object info can be retained in the layer that is turned off – sort of a hassle, but it can be done.)
- Here is a tip from one of my favorite Photoshop people, Scott Kelby, which he offered in his videos on this plug-in. Apply the HDR effect and then take the resulting effect into Nik Color Efex Pro 4 (another wonderful plug-in and is included in the download bundle) and select the Glamour Glow filter set to the default preset. He says it is the magic that really pulls the realistic HDR effect together and does not look over-the-top. That is what was done above.
To finish up the image, the waterfall was blurred so it looks a little more like a long exposure. (See my Smoothing Out Those Waterfalls blog on how to do this.) In this case, two Motion Blur layers were created since the water flows in a couple different directions. Also the slight blue chromatic aberration edging in the small sky in the upper left was removed by using the technique in my A New Look at Chromatic Aberration blog – worked beautifully. That is all that was done.
********
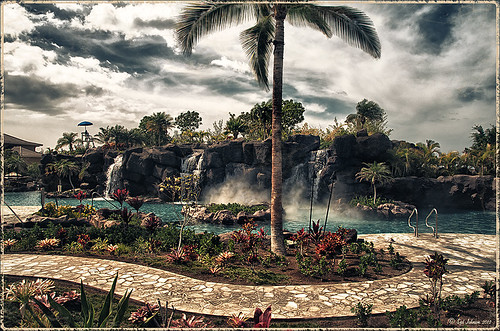
Here is an image that used the Nik HDR Efex Pro 2 plug-in that was done a while back. Just another good example of how this looks. I really like the effect in the skies. This image used Grannys Attic preset.
 ********
The London of Parliament image taken several years ago used both the free Nik HDR Pro Efex 2 and free Nik Silver Efex Pro 2 (see my Make an Ordinary Image Interesting Tidbits Blog for info on how to do this.)
 ********
Here is another example using the previous version, Nik HDR Efex Pro – I really liked how this image turned out – it the used Grannys Attic preset, but it had some different parameters in the first edition, which was also very nice.
 Hope you will download this Google (Nik) collection of plug-ins – you will not be disappointed. As far as the HDR Efex Pro 2 goes, as Scott Kelby says, try it as it has a little different look from other HDR software and you might really like it. This is true of all their plug-ins – give them a try. I have always loved the Nik plug-ins – they run very smoothly even on older computers. When used with a Smart Object, the settings are preserved, even the control points that are used to localize the effects, so you can go back and adjust later. Sad to see this is probably the end of this plug-in but at least everyone now has a chance to use it. Have a great week experimenting!…..Digital Lady Syd

These turned out wonderfully, Syd!
I especially love the first one. The details in the pine needles are fantastic.
Wishing you a wonderful day!
05/08/2016 at 5:56 am
Thanks for the kind comment Lisa.
05/09/2016 at 8:58 am
The last two are my favorites. Thank you for the tips!
05/09/2016 at 11:05 am
Hi Syd, I love these edits. I just downloaded the Nik software and am trying it out in Lr. It is very cool. Thanks for doing this blog.
05/15/2016 at 7:28 pm
Hi Kerry – think you will love all the Nik software. Lots of fun experimenting with them!
05/16/2016 at 9:10 am
Glad to hear from you!
05/16/2016 at 11:19 am
Pingback: » Sunrays At the Beach Digital Lady Syd's Tidbits Blog
Pingback: HOW TO APPLY FILTERS INDIVIDUALLY ON LAYERS | Digital Lady Syd's Fun Photoshop Blog
Pingback: TRYING OUT ON1 PHOTO RAW 2018’S NEW HDR FILTER | Digital Lady Syd's Fun Photoshop Blog