
HOW TO USE THE FREE SPECTREL ART PLUG-IN

Had a blog glitch but finally got this one up. I have to thank Corel Master Elite Karen Bonaker for this wonderful find – a really fun free plug-in called Spectrel Art from JixiPix. My initial impression was this can’t be that good if it is free. I was pleasantly surprised. What is really cool about this plug-in is that it uses a brush where you can either localize the effect by brushing it in or erasing it.
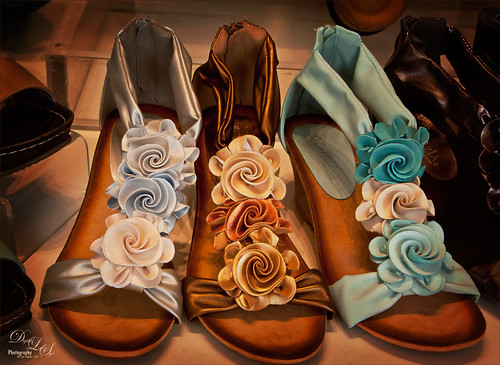
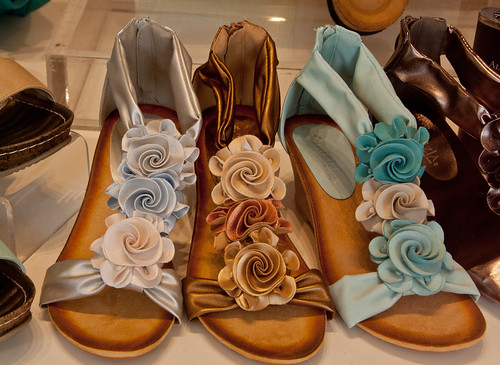
This is very similar in effect to Topaz Glow which is one of my favorite special effects plug-ins. Both plug-ins usually need a blend mode change. Once in Photoshop, the above Spectrel Art layer was set to Luminosity Blend Mode at 44% layer opacity. In the Topaz Glow image below, the layer was set to Soft Light blend mode at 50% layer opacity. The effect can be way too strong if left at 100% layer opacity – add layer masks if you want to further localize the effect in Spectrel Art. Topaz Glow does not have a brush to localize the effect in the plug-in so a layer mask must be used in Photoshop to do this. Below it can be seen how similar the results were with Topaz Glow using the same vignette and spotlight effects.
This is not to say this plug-in will replace Topaz Glow – Glow has a lot more sliders and presets for a lot more choices (see my Digital Lady Syd Reviews Topaz Glow blog) , but for a free plug-in, Spectrel Arts does a pretty nice job. For comparison, below is the original show image after doing basic changes in Adobe Camera Raw.
To finish up this image, a white spotlight layer was placed on all the flowers (see my How to Add a Soft Spotlight Light blog) on the shoes and a soft vignette was placed around the outside of the image.
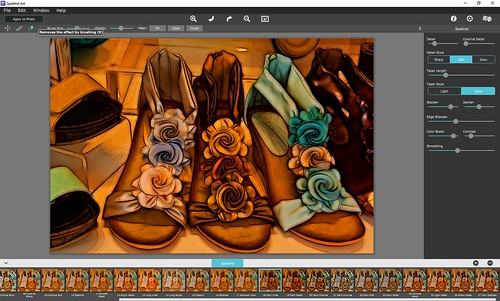
Spectrel Art has 27 presets that seem to be a really nice assortment of settings. There are also several sliders that can adjust the effect. In the top image and the screenshot below, the preset 18 Dark Lines was selected and the Detail Style changed to Soft.
 According to JixiPix’s website:
- The Detail slider increases the amount of intersecting lines and Colorize Detail adds color to the lines. The Detail Style buttons deal with the amount of glow color and light applied to the image.
- Taper Length creates an abstract style to the longer intersecting lines. Use Light Taper Style for white highlights and outlines effect – can use Lighten slider to illuminate the whole scene and Brighten to illuminate the outlines; and use Dark for stark contrast of black intersecting lines – can use Blacken to strengthen the overall dark areas and Blacken to increase the dark outlines.
- Edge Sharpen defines and emphasizes the lines.
- Color Boost enhances overall color.
- Contrast darkens shaded areas and brightens the light ones.
- Smoothing softens the curves in the lines.
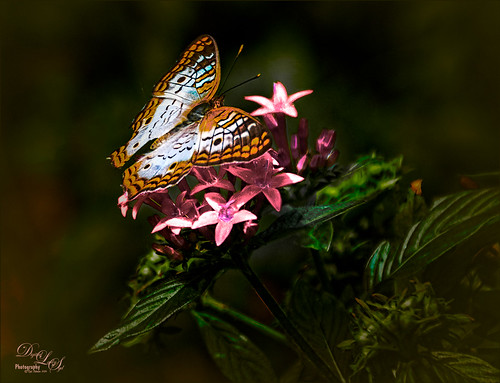
That about sums up all the controls – very easy to use. Below the image of a white orchid butterfly taken at the West Palm Beach Zoo is another example using this plug-in. (Here are the settings used: Detail 64-just press the dot on the slider to get the amount, Colorize Detail 81, Detail Style Soft, Taper Length 50, Taper Style Light with Lighten set to 50 and Brighten 40, Edge Sharpen 98, Color Boost 21, Contrast 60, and Smoothing 68.) The layer was set to Color Burn at 51% layer opacity. A Hue/Saturation Adjustment Layer was placed on top and Greens was set to Hue -31/Sat -70/Lightness -61 to reduce the really bright green in the background. On a New Layer a Mixer Brush was used to smooth over the sharp edges of the colors. Topaz Lens Effects was opened and a dark olive green vignette was used. That was it. The Spectrel Art plug-in made the butterfly really pop!
 Hope you will try out this plug-in – it is a lot of fun and you can’t beat the price! I hope to have time to really see what it will do. JixiPix seems to have a lot of other plug-ins that I might try out as they look interesting. Anyway, have a great week!…..Digital Lady Syd
Digital Lady Syd Related Blogs:
Coming At You!

What a beautiful effect, Syd!
Thank you for sharing here.
P.S. I WANT those shoes!!!! 🙂
05/16/2016 at 6:58 pm
I wanted those shoes too!
05/18/2016 at 4:03 am
I love the shoes! 🙂 Thank you for sharing the tips!
05/17/2016 at 12:12 am
I think the shoes are a bigger hit than the plug-in! Thanks Inese and thanks for sharing the blog on Twitter.
05/18/2016 at 4:05 am
Pingback: » Coming At You! Digital Lady Syd's Tidbits Blog
Jixipix are some of my favorite apps on my iPhone. These are great, Syd. Love the effects you got. I downloaded the free one for PS and played with it a bit.
05/21/2016 at 6:18 pm
This plug-in is a lot of fun! Biggest problem I see is there is no way to change to blend modes in the plug-in. Can’t have everything – just takes a little extra experimenting. Glad you like the filter!
05/21/2016 at 9:27 pm
Pingback: HOW TO CREATE AN ILLUSTRATIVE TEXTURED IMAGE FROM A PHOTO | Digital Lady Syd's Fun Photoshop Blog
Pingback: » Enjoying the Morning Digital Lady Syd's Tidbits Blog
Pingback: » Busy As a Bee! Digital Lady Syd's Tidbits Blog
Pingback: HOW TO USE MOTION BLUR FOR ARTISTIC EFFECT | Digital Lady Syd's Fun Photoshop Blog