
Digital Lady Syd Reviews Topaz ReStyle
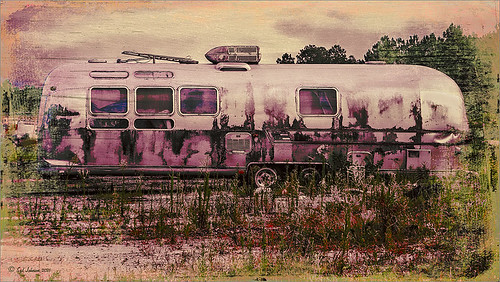 Topaz has once again come up with a very innovative plug-in that can quickly transform an image that is missing a certain look into something quite spectacular. I am finding it more and more fascinating the longer I work with it. The top image is what I call my psychedelic bus – would never have thought to add this color scheme to this vintage RV image without Topaz (for website see sidebar at my Tidbits Blog) ReStyle, but I really love the final look – much better than the original flat grungy colors and tones.
 This image of some crafts at an Old Belarusian Village outside Minsk is a great example of the easy, dramatic change that can be made in an image to give a totally different look and feel. I love both images – the one on the left is the correct color scheme, but the one on the right is my favorite. The Muted Apricot preset was applied as a last step – and adds the contrast to pull the puppet out from the background and I like the color scheme better.
What I Like about Topaz ReStyle
1. The best thing about using Topaz ReStyle is that you can take an image into the program and see if you can find a little more interesting or better color scheme. Sometimes an image just needs a bit of punch with some different colors to get a really fabulous result. Also, you will be able to see if the image color and tone is correct just as it is. NOTE: To start with the original image color scheme, follow the work-around steps in the comments at end of blog.
2. When you find a color scheme you think you like, you can click on the little camera icon and add it to a preview group where several different schemes for comparison. This can be handy as there are so many choices and so many categories to choose from. This can be quite addictive going through all the presets!
3. You can search for presets that are similar by clicking on a preset on the left that you would to find similar preset styles, and then click the fourth icon over on the Presets bar on the left. Can also search for dominant colors in presets by hovering over the color bar below the preview and clicking on the color you are interested in finding in other styles. This is a lot of fun to do and very easy.
4. There is a Texture slider in the Color section and in the Structure and Sharpness sliders in the Details section that are very handy. Just by adjusting these three sliders you can get some interesting results.
5. You can copy a layer mask from one section to the other – great new feature that would make a great addition to the Topaz Clarity plug-in.
What I Don’t Like about Topaz ReStyle
1. I wish there was a way you could tell which blend mode you are using once applied. I know they are working on a solution to this issue, like adding a letter in the icon or something else, but it is very difficult to tell if you have added a blend mode, and if so, which one. In their defense, it is highlighted when you open up the blend mode icon.
2. There are times on my system when the my preset settings do not look quite like what was applied – in my case a little over-saturated. I am still trying to figure out if this is my problem or the plug-ins problem. Not a major issue, but I would suggest checking out your preset results to make sure it is applying the colors correctly. Also be sure to give the program time to save the preset – it takes a while to create.
3. No Apply button. Since there is this great masking capability and are blend modes that can be used, it really needs an Apply button so a couple different effects could be locally stacked and masked.
Bottom Line
Topaz ReStyle is very easy to use and a very unique plug-in so if you like to give your images unique looks, this definitely is a plug-in you want in your arsenal of tricks. If you are a purist, this is probably not a good match – it definitely changes the feel and look of an image from what the camera captures. I would think anyone into graphic design would love this plug-in – the creative possibilities are incredible! Needless to say, this is definitely a plug-in I will use frequently.
….. The image above is an excellent example of how a basic HDR image was changed into a heavily vintage feel by adding a different color palette to the major colors represented in the image. Below see how the image progressed from HDR to Painterly look to the above final image. That is what ReStyle does!
  Right at the start you can tell that the highlights are much more accentuated by slightly changing the color palette from a cooler original version to a warmer look. Of course the HDR image is what the actual shot looked like, the painted version adds some color and softness to a rather cold image, but Topaz ReStyle really popped the shot! The actually interface that was used to create this effect is shown below (click on image to see large view in Flickr) where you can see what colors were substituted for the the ones in the image.
  …..
…..
This flower image below shows another comparison of what ReStyle can do – it is really amazing with just a few clicks what you can get. It is very similar to the InstaTone function in Topaz photoFXlab – one of my favorite features of that program. (See my Tidbits Blog InstaTone in photoFXlabs – Great Fun and Great Results! for more info on this.)  …..
…..
I have been taking some of my earlier images I thought looked pretty nice and trying them out. This image below is one of my favorites from my trip to Belarus and it used Topaz Simplify (click to see in Flickr). After applying the Soft Pearl preset with some slider adjustments, I got this completely different looking image – and still very charming!
 …..
…..
Many people are finding using this on a black and white image can give some wonderful results. Since I was intrigued by this suggestion, I tried one as shown below. This is an image of a little private cove on Spanish Cay in the Outer Banks of the Bahamas. The Peppermint Gray preset was applied – it gives the black and white treatment a bit of a cross-processed look. I really liked the effect. And applying them to a favorite texture can also make a major change in compositing an image.
 …..
…..
Topaz is a really great plug-in company that is always trying to give us Photoshop nuts new options for making our images interesting and beautiful. And, as always, they give you free upgrades once you have bought the plug-in – I don’t know of any other Photoshop company that does this! They have very reasonable prices and often run great specials on their software. And check out their webinars – some of the best photographers are presenting for them and the videos are on their site.
If you are at all intrigued by this plug-in, it is definitely worth a download to try it out. I am finding it fits nicely in with other plug-ins as shown in my photos above, and not just Topaz plug-ins. It works best for me as a last step, but there are times I use it first to get a different feel before adding other effects. I especially like using it with Topaz Clarity – for some reason the natural sharpness from Clarity and then the color shaping with ReStyle makes a nice combination. Have fun trying this one out!…..Digital Lady Syd

Pingback: » Topaz ReStyle on a Black and White Image Digital Lady Syd's Tidbits Blog
I’ve been trying it too, what I would like is a way to apply ajustments to the original image rather than having to apply a preset first. I haven’t for a way to do this.
08/16/2013 at 11:42 am
Wayne – This is an excellent question and Photon in the Beta testing group got an answer from one of the software engineers that worked on the plug-in. Here is copy from what Photon wrote: “The technique suggested by Albert Yang is quite easy, as follows:
Open an image in ReStyle and immediately Save a Preset. You will be given the opportunity to name the Preset and place it in a Collection, just like any other Preset. More importantly, that Preset will have the color scheme of your just-opened image! You can apply that Preset to any image, including your present image.
When you apply it to your present image, you will have a starting point based on your present image, and, as you move the various ReStyle sliders, you will be making changes to your present image, based on your present image as the starting point. Perfect. When you get a modification to your present image that you like, you can save that as yet another Preset. And then do an OK to make the changes to your image.
This method lets you make controlled changes to your image, without doing too much violence to it. And it also provides an easy way to transfer the color scheme of one image onto other images.”
I tried this and it works great! Hope this helps!….Digital Lady Syd
08/16/2013 at 3:37 pm
Pingback: Get Great Results with Alien Skin Snap Art 3 and Topaz ReStyle Together!! | Digital Lady Syd's Fun Photoshop Blog
Pingback: TOPAZ ReSTyle — A few exemple | Photography thru my lenses
Pingback: A FEW PAINTERLY TRICKS! | Digital Lady Syd's Fun Photoshop Blog
Pingback: Digital Lady Syd Celebrates 3 Years Of Blogging! | Digital Lady Syd's Fun Photoshop Blog
Pingback: TOPAZ RESTYLE WITH COREL PAINTER & NIK ANALOG EFEX PRO | Digital Lady Syd's Fun Photoshop Blog
Pingback: » Four Picture Triptych with Topaz ReStyle Digital Lady Syd's Tidbits Blog
Pingback: » Young Warrior Digital Lady Syd's Tidbits Blog
Pingback: HOW TO COMBINE ALL THOSE TOPAZ PLUG-INS FOR AN ARTSY LOOK! | Digital Lady Syd's Fun Photoshop Blog
Pingback: PAINTERLY PLUG-INS – SO MANY CHOICES, SO MANY CHOICES! | Digital Lady Syd's Fun Photoshop Blog
Pingback: HOW TO USE A TOPAZ RESTYLE TRICK FOR IMPROVING YOUR IMAGE | Digital Lady Syd's Fun Photoshop Blog
Pingback: DIGITAL LADY SYD REVIEWS LUCIS PRO 6.0.9 (NOW AFFORDABLE!) | Digital Lady Syd's Fun Photoshop Blog
Pingback: HOW TO RANDOMIZE SOME COLOR WITH THE GRADIENT MAP ADJUSTMENT LAYER | Digital Lady Syd's Fun Photoshop Blog
Pingback: LET’S NOT FORGET TOPAZ RESTYLE – ONE OF THE BEST FILTERS YOU CAN GET! | Digital Lady Syd's Fun Photoshop Blog
Pingback: Airstream RV – Truck & RV Electronics