
HOW TO USE THE PIXELSQUID ADD-ON IN PHOTOSHOP
 This week I spent some time playing with a Photoshop plug-in that is in beta testing called PixelSquid. It allows you to add various items to create realistic composite images. Each element has 225 pre-rendered images shot from various angles and with shadow layers that can be adjusted in different ways. It has a fairly large learning curve, but the website covers all aspects of the program and overall it is not that difficult to do. The elements are kept in a Pixel SquidPanel Panel or Extension in Photoshop. (It does take a few moments to fill the panel with your items when Photoshop is opened each time and sometimes you have to log-in to their site to see your items and get new ones – a bit cumbersome.) They will be offering elements for sale, but at the moment you are allowed to download up to 100 objects. The best description of what they are doing is demonstrated in this short 3-minute video that covers the basics called PixelSquid: Getting Started on Vimeo. For an excellent example of how this program works, check out a blog called A Little Compositing Inspiration by Pete Collins at KelbyOne which introduced me to this Add On (see his original post called Check Out Pixel Squid). If you try it as a beta program, you will be allowed to keep the elements you have chosen, and they will let you download them from the site for free any time you want to use them again. This is a really nice thing they are doing.
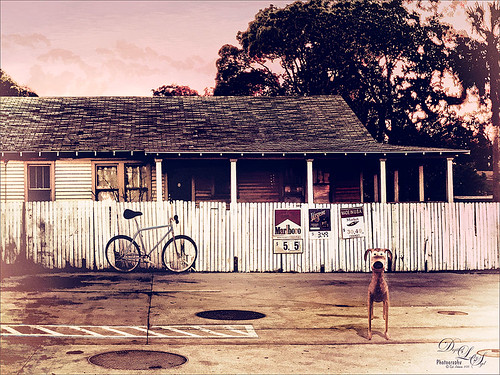
In the image above, the elements added were the rather cartoon looking dog and the bike. For me the main hurdle was to try and get a natural look so the elements blend into the original image. I could not get the items to go on the blank layer the program creates but had to use PSD and “Open As Another Document,” move in the layers I wanted to use, and then delete the blank layer in my image. I am assuming they are working on this aspect of the Beta program. They offer a Depth Layer to help with this, but for me, I just painted on the objects and used the Blur Tool to soften edges. Really a lot of fun. For other info on post-processing of this image, see my Image 1 Notes at end of blog (this was a really long workflow but it will give you idea of what was done). Also, be sure that you have your Adobe Creative Cloud running, or it takes a work around to add the Extension and elements into Photoshop. This plug-in extension only works in Photoshop CC2015, but there are PNG , JPG and PSD files that can be downloaded and used in the other versions. Just adjust the object view you want on their website and download it to your computer to place in Photoshop. The PNG files come in very nice with shadows already set. (It seems almost easier than using the Extension if you like the way the object will fit in your image.)
*****
 This image is of a beautiful park in Savannah, Georgia, on a gorgeous Fall day. Several elements were added with PixelSquid – two trees, bushes, fountain, park benches and a little butterfly. This was really fun to create. Just remember it is rather tricky to do a composite that looks real-life, but there are numerous tutorials on the internet on how to do this. My goal was just to add some interesting lighting and correct shadows without doing a lot more. For more on post-processing, check out Image 2 at end of blog.
If there is a problem with this add on it is the issue discussed above that elements appear to need to be opened as PSD files in another document since I could not get the Low Res and High Res choices to open anything but a blank white layer. Then layers or the PSD group must be duplicated into your original document. (Highlight what you want to copy, be it layer or group or both, right click on the layer(s) and select Duplicate Layer (or Group)… In dialog, choose Document drop-down and select your image to place them in. Use the Move Tool to adjust location and Free Transform (CTRL+T) to adjust the size of the object(s).
I hope you will give it a try if you like to do this kind of thing in Photoshop. I can see a lot of uses for objects like this. It really is a lot of fun to try compositing, and since it is free right now, definitely worth looking into. Hope you all have a great Halloween and weekend!…..Digital Lady Syd
Notes for Images:
Image 1: This image needed a lot of manipulation to get to this point. First Topaz (see sidebar at my Tidbits Blog for website link) Clarity was used (used these settings: Dynamics Micro Contrast 0.19, Low Contrast 0.64, Medium Contrast 0.44, and High Contrast 0.25; Tone Level 0.30, Midtones 0.03, and White Level 0.19; and Hue Yellow -0.56, Sat 0.20, and Lum Orange 0.09). Next the Bike was added. The dog was added in next and it was duplicated to make a shadow as I did not like the way PixelSquid’s shadow looked for my lighting. The dog on the bottom layer was selected (CTRL+click on layer) and the dog was filled with black – then it was Free Transformed (CTRL+T) to look like the dog shadow, and the layer opacity was set to 22%. Two Curves Adjustment Layer was created – one for darkening the image and one for lightening. A stamped layer (CTRL+ALT+SHIFT+E) was created and Topaz Simplify was opened. (The Simplify settings are: Simplify – Colorspace RGB, Simplify Size 0.28, Details Strength 0.67, Details Boost 1.75, Details Size 0.20 and Remove Weak 0.10; Adjust Brightness -0.16, Contrast 1.00, Sat and Sat Boost 1.00, Dynamics 0.27, Structure 0.85 and Structure Boost 1.36; Edges – Edge Type Mono Line Fine, Edge Strength 2.35, Simplify Edge 0.29, Reduce Weak 10.00, Reduce Small 0.20, and Fatten Edge 0.66; and Vignette centered on dog, Vignette Strength -0.20, Vignette Size 0.30, Vignette Transition 0.65, and Vignette Curvature 0.83; and Overall Transparency 0.20.) These settings created a cartoon-like effect in the image. (See Serge Ramelli’s video on How to Turn a Photo into a Cartoon or Painting with Topaz Simplify for more on this. ) On another stamped object Nik Viveza 2 was used to pinpoint the dog and bike to blend them into the image correctly. On another stamped layer, Color Efex Pro 4 was opened and three filters were applied. (Settings used: Film Efex:Vintage using Film Type 14, Old Photo using Style 3 and set to Opacity 31%, and White Neutralizer.) The Blue Tool was used on the white parts of the bike tire to soften the brightness and set to 73% layer opacity. On another New Layer the dog was blurred with the Blur Tool set to 53% Strength. On another New Layer, Gruts Brushes-Natural Media Brush Lead Thumb was used to enhance some of the shadows in the image. (These are really great brushes with lots of variety.) On another New Layer some clouds were lightly painted in the sky. Then I added one of my textures on top that gave the image the warmer color – set to Hard Light at 93% layer opacity. The dog was painted on another New Layer using another one of Gruts Oil brushes. Since there was some real chromatic aberration around the tree leaves, on a stamped layer a Gaussian Blur was added to soft those edges by setting the Radius to 2.5. Then a black layer mask was added to this layer (CTRL+click on the Add Layer Mask to make black or CTRL+I inside white layer mask) and just the edges of the trees were painted back to blur the outline of the trees – this was caused by the Simplify filter settings. The last step was to add a Curves Adjustment Layer to add a little needed contrast back into the image.
Image 2: After initial tone adjustments in Lightroom, all nine objects and their shadows were brought into the image using the Duplicate technique in Image 1. On a stamped layer converted to a Smart Object (right click and select Smart Object), the Filter -> Render -> Lighting Effects was applied where an Infinite Light was applied in the direction of the light using a yellow light color; this really lightened up the image. On a stamped image, Topaz Lens Effects was opened and the Reflector filter was applied (Type Golden, Strength 0.11, Transition 0.32, Position 0.52, and Angle 122.9) to lighten more. On a stamped layer, Topaz Lens Effects was opened again and the Single Tone Filter, Warm Tone 2 preset, was applied to keep lightening up the image subtlety. The park benches and fountain edges were too sharp so a Filter -> Blur -> Gaussian Blur was applied at Radius 2.5. A black layer mask was applied and just the areas to be softened were painted back with a low opacity soft brush. Next New Layers were added to create some leaves and grass to further soften edges under trees and around the base of the fountain. Two Selective Color Adjustments Layers emphasizing the Yellow and Red colors – wanted the right tree to show up more and the path through the image needed to be more colorful for the eye to follow. The layer masks were turned black and with a white brush, these areas were painted back in. Next two Curves Adjustment Layers were added – one for just brightening the water in the fountain (black mask and painted back water), and the second to darken the whole image for contrast. More New Layers were created and several brushes were used to paint in detail. A Curves Adjustment Layer was added to give a bit of a vignette effect, but in the layer mask, areas showing the lighter edges of the trees and fountain were painted back. That was all that was done, but it takes a lot of adjustments to do compositing.

Wow it is very complex, but I love the results!
11/06/2015 at 7:56 pm
Pingback: » Underwater Fantasy Digital Lady Syd's Tidbits Blog
Pingback: HOW TO MAKE A BASIC COMPOSITE IMAGE | Digital Lady Syd's Fun Photoshop Blog
Pingback: HOW TO CREATE A QUICK MONTAGE | Digital Lady Syd's Fun Photoshop Blog
Pingback: » BFF’s! Digital Lady Syd's Tidbits Blog
Pingback: A FEW COMPOSITING TIPS AND TRICKS! | Digital Lady Syd's Fun Photoshop Blog
Pingback: HOW TO ADD SOME LOCALIZED GLOW TO YOUR HOLIDAY IMAGES | Digital Lady Syd's Fun Photoshop Blog
Pingback: PSEUDO SCRAPBOOKING | Digital Lady Syd's Fun Photoshop Blog
Pingback: RELAXING AND HAVING FUN IN PHOTOSHOP! | Digital Lady Syd's Fun Photoshop Blog
Pingback: MY PERSONAL FANTASY MAP | Digital Lady Syd's Fun Photoshop Blog
Pingback: A FEW COMPOSITING TIPS AND TRICKS! – RECYCLED | Digital Lady Syd's Fun Photoshop Blog