
GET RID OF THAT COLOR!
 Just getting back into the swing of Photoshop. Decided to try and get a fine art feel from my images taken at the Philip Hulitar Sculpture Garden – a monotone feel was needed since the greenery around the sculpture was overwhelming the beauty of the actual sculptures.
For the above image, first on a duplicate layer the Refine and Place panel was used to select the sculpture and remove it from the background. It was added as a layer mask to the layer. Then two texture were stacked underneath the texture.
Texture: The first one was one of my textures and was actually made in Photoshop using Just Jaimee 2012 Summer Brush Sampler Freebie – painted with her Texture Brush using a light gold color, on New Layer another Texture Brush layer used a light grayish blue around the sides a little, and on a third layer the Misty Brush created an upper right lighter goldish area. Then on another New Layer, blended around the edges with a mixer. Once saved as a JPG, it was brought into the image set to Normal blend mode at 100% layer opacity. Very simple to create. The second texture was by Kim Klassen called Pinit 11, which was a white and slightly gray cement texture – very easy to do photograph a similar texture yourself. It was set to Pin Light blend mode at 55% layer opacity.
Google (Nik) Silver Efex Pro 2: On a stamped layer (CTRL+ALT+SHIFT+E) on top, applied the now free Silver Efex Pro 2 to the image using the High Structure (harsh) preset which really emphasized the texture in the background. Global Adjustment Structure section was changed to 33% and the Midtones to 27%. The only other change from the original preset was to change to Toning to No. 13, which give the beautiful color in the image.
Did a little Dodging and Burning using Curves Adjustment Layers to emphasize the sculpture properly. (See my How To Use Curves Adjustment Layers to Dodge and Burn and Image blog.) Last step involved creating a Red Channel Luminosity Curves Adjustment Layer to just blend the whole image together by pulling slightly down. (See my How To Use a Red Channel to Create a Nice Blended Image Effect blog.) Used Photoshop’s Lighting Effect Filter with a Spot light to slightly lighten up behind the sculpture – set to 63% layer opacity. The font is called Gadugi from Microsoft. That is all that was done other than cleaning a few areas that did not blend correctly including the sculpture stand. I really enjoyed working on this image!
******
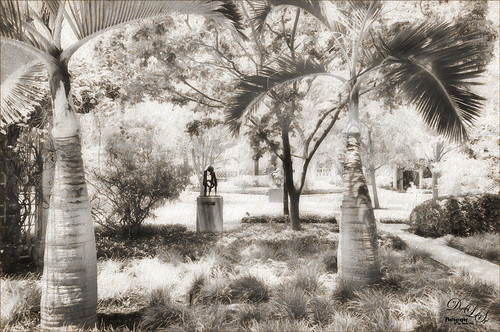 The palm trees above reminded me of nature’s sculptures versus the beautiful Gardens sculptures. I wanted a dreamy effect and it turned out to look a little like an infrared shot. The sculpture is called Forgotten World III by Norman Sunshine. Lucis Pro 6.0.9 (no long available) was used to sharpen up the image first. Silver Efex Pro2 was used again but this time the Fine Art High Key preset was applied without the frame and some contrast adjustments to start getting that dreamy feel – played with the Soft Contrast to get that feel. On a stamped layer Topaz (for website, see my Tidbits Blog sidebar) Lens Effects and applied the Moderate Diffusion filter as is. Topaz Impression 2’s Cave Dweller I was applied as is on another stamped layer. Used On1 Effects 10’s (for website, see my Tidbits Blog sidebar) Strong Vignette as is and set it to 62% layer opacity in PS. Did a little dodging and burning around the palm trees to differentiate them from the background. (See my The Best Dodging and Burning Technique! blog.) Some clean up was done and that was it!
If you have an image that is just overwhelming your subject, try going to a monochromatic effect to help isolate your subject better. It works really well with the green and yellow images. Hope you have a wonderful week!…..Digital Lady Syd

Hello Digital Lady Syd,
I have gone to your website almost daily, and have always been amazed at your grasp of things Photoshop. I use Photoshop CC and Lightroom CC, but I have not achieved your level of skill. Hopefully I’ll get there someday. This is yet another post that I hope to try out.
I hope it’s okay to ask a question in the comments. You mentioned Lucis Pro 6.0.9 in the post, and I’ve seen you use this before in other posts. I saw your review of this plug-in and by the time I got around to purchasing the Lucis Pro 6.0.9 they had extended the sale for 6 days. However, they would not accept a credit card, only PayPal. I don’t use PayPal. I contacted them and got a nice reply from Barbara Williams who informed me that even though the sale was still on until September 6th, that there was nothing she could do. I thanked her for her help.
So, do you happen to know, for those of use that missed out, how we can obtain a legal copy of Lucis Pro 6.0.9? I’m not expecting that you can, but I’ve be searching around looking for such a thing. I would be happy to pay more than $6.00.
Thank you very much,
Dean
10/15/2016 at 9:59 pm
Hi Dean – I just cannot seem to find anyone who has the software available to buy second-hand even, and the website is totally shut-down. I thought maybe E-bay or Amazon would have copies boxed that you might be able to buy. At one time the software came with a dongle that had to be attached to the computer to get the filter to work. That was back when it cost several hundred dollars to buy – it was too expensive for my taste. Many people feel they can get a similar effect with Topaz BuzSim or Adjust but I never thought it looked as good. You might try contacting some people with some weight in the Photoshop community like Scott Kelby at KelbyOne – they used to give a discount for the plug-in, or Calvin Hollywood in Germany who creates a similar effect in some of his images. They might be able to at least tell you how to emulate the effect. Unfortunately one reason why Lucis Pro stayed around for so long is that it really is a unique filter effect. If I hear of any way for people to obtain the plug-in again, I definitely will pass it on in my blog. It is odd that it has just disappeared. I am so glad Google (Nik) plug-ins did not do the same thing. Everyone should be able to share the software if it is not longer being sold and updated. Good luck on your search. Let me know if you find a place to get it and I will pass the world along!…..Digital Lady syd
10/16/2016 at 4:37 pm
Thank you greatly for the your reply and suggestions. I will continue to look for the Lucis Pro 6.0.9 plug-in, and if I find a legal version for sale somewhere, I will be happy to let you know.
Dean
10/17/2016 at 10:23 pm
Beautiful. The second image looks so dream-like.
10/16/2016 at 4:34 pm
Thanks Inese. I really like the diffusion filters but it is easy to overdo it!
10/16/2016 at 4:38 pm
I guess it is 🙂 but this second image looks so great in monochrome. It would be just a mess of green otherwise.
10/16/2016 at 5:15 pm
Pingback: » The Beautiful Snowbush Digital Lady Syd's Tidbits Blog