
COLORIZING NASA PHOTOS USING TOPAZ STUDIO (AND CHECK OUT UPDATED DETAIL)
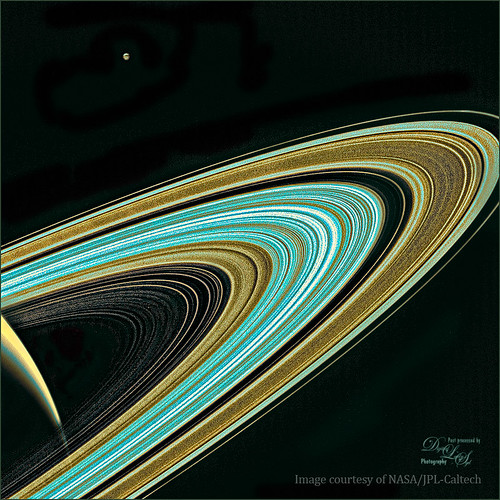
This beautiful image was originally a black and white taken on one of the last days of the NASA Cassini-Huygens Mission using its Wide Angle Lens. The Moon Tethys is in the upper left background. My original thought was to just try painting different colors into the rings to get an unnatural but pretty color effect. To my surprise, Topaz Studio using both Clarity and the new Detail adjustments were a quick answer to get the beautiful result.
Here is the workflow followed to get the above results:
- First downloaded the image from the NASA Cassini-Huygens Mission site – scroll halfway down to find image pia21342-1041 where both tiff and jpeg files can be downloaded. The image above used the tiff file, but the jpeg file worked out pretty good even though it had such a small resolution. (The bottom image of Mimas was two jpeg files that were 59 and 67 KB.)
- Open in Photoshop and go to Image -> Mode -> Grayscale and change image to RGB.
- Go to the Image -> Image Size – set resolution to 300 by unchecking the Resample box, enter 300, and recheck (the jpeg file is at 72 ppi but the tiff file is 300). Can now go in and change size in inches and set to Preserve Details (enlargement) in drop-down menu if needed. Can also Reduce Noise if noticeable at this point.
- Duplicate image and open Topaz Studio – apply my SJ Saturn Rings. The preset has been uploaded to the Topaz Community. The colors were set in the Color Theme Adjustment so the colors in the rings can be changed to any colors wanted by just clicking on each square in the New Color Theme settings swatches and selecting new colors.
- Added a Green Luminosity Curves Adjustment Layer to increase the contrast just in the green channel. (Same technique as using a Red Luminosity Curves Adjustment Layer – see my How to Use a Red Channel to Create a Nice Blended Image Effect blog.)
- Since Detail was just added to Studio, a composite image (CTRL+ALT+SHIFT+E) was created above and went back to Topaz Studio -> Detail. Since I am having trouble with my presets and am working with the Tech Team, the settings are just listed here (Detail in TSO – Overall-Overall Small Detail 0.34, Small Detail Boost 0.67, Medium Detail 0.51, Medium Detail Boost 0.31, Large Detail 0.53, and Large Detail Boost 0.31, Lighting Midtones 0.29 and Highlights 0.63. In layer mask painted out the rings and left the background dark to keep noise under control – used brush set to Mask Transparency 0.80. Channel Mixer Adjustment – Adjusted Lightness Channel-Red 1.73, Green -0.23, and Blue 0.34, then painted out background so only just the rings received the effect). Back in PS the layer was set back to 80%.
That is all that was done to this image. It was a lot of fun and I love the results, even though the rings are not quite those colors. The point is that it took only a few minutes to do this image – no hand painting – it just picked up the colors. The Color Theme Adjustment did most of the color work and then Detail’s new Color Mixer Adjustment tweaked it a bit.
 This updated Detail is much like the updated Clarity as it is also divided into two adjustments: Precision Detail and Color Mixer. Since it just came out, I do not have much experience working with all the sliders – the Channel Mixer Adjustment appears quite different from the original Topaz Detail 3 interface. But I am enjoying having the sliders available for quick use when needed. Here is a quick reminder of what some of the sliders do in the new Precision Detail Adjustment:
Small Details – Affects visibility of fine details in image
Small Boost – Weakens or strengthens the smaller details
Medium Details and Medium Boost – Affects visibility of the medium details with Boost weakening or strengthening the effect
Large Details and Large Boost – Adjusts visibility of the large details with Boost weakening or strengthening the effect
Sharpen – a new slider added – it does seem to add in more detail.
There is a new section called Lighting which contains sliders for Midtones, Shadows, Highlights, Black Point and White Point – same sliders from Detail 3 except the Midtones slider has been added and the Exposure and Contrast sliders are now removed.
The Channel Mixer Adjustment was also added to complete the update of the old Detail 3. It contains a totally new interface from the original Tone section that contained Cyan-Red, Magenta-Green, and Yellow-Blue sliders – these correspond to the Red, Green and Blue channels in this adjustment. There is also a Gray swatch which represents the Lightness of the image. I need to find out more on these sliders, but each have Red, Green, Blue, and Constant sliders. In the Adjustment Preset drop-down, there are several presets (Cloudy Evening, Faux Infrared Landscape, Red Contrast, and Red Green Switch) that can be tried out to see what happens with these sliders. A Maintain Brightness and Monochrome toggle switches were also added. Lot to explore here.
The image above is a composite of an upper and lower level NASA images taken in March 2017 from the same site. Topaz ReStyle was used to introduce the color palette. Topaz Studio’s Precision Detail Adjustment, Color Theme Adjustment, and Impression Adjustment were all used to get this almost poster like effect. For the Precision Detail Adjustment, a layer mask was opened and Luma was selected so just the moon was selected and the background was black – Luminosity slider 0.11 and Range 0.01. In PS Saturn was added in on separate layers with some brushes I had created a long time ago. On a final stamped layer on top, Nik Viveza 2 was used to soften the rough edges between the sharp shadow lines of the moon.
A couple of things I noticed – it appears that they are removing the older versions of the plug-ins in the Plug-ins drop-down and just adding them into the Studio Adjustment lists. Am checking on this as I would like to have the old ones still available. Also, there appears to be the original category preset choices on the left side that correspond to the plug-in being used by clicking on the drop-down menu under the Search field.
Try downloading some of the wonderful imagery from NASA and see if you can create a magical feel. Just remember all the beautiful Hubble images were originally black and white images and the colorization used is similar to what was created in this blog. Hope you have a wonderful weekend…..Digital Lady Syd
Digital Lady Syd Related Blogs:
Updated Impression Now in Topaz Studio
Updated Clarity Now in Topaz Studio
Introducing the Free Topaz Studio
Flowers Enjoying a Planetary Twilight Sky

Absolutely spectacular!
10/08/2017 at 4:50 am
Pingback: » The Beautiful Comet 67P Digital Lady Syd's Tidbits Blog
Pingback: HOW TO CONVERT BLACK AND WHITE IMAGES TO COLORFUL PAINTINGS WITH TOPAZ STUDIO 2 | Digital Lady Syd's Fun Photoshop Blog