
GETTING THE JOEL SARTORE LOOK ON YOUR ZOO IMAGES
This week I spent a lot of time working on my Jacksonville Zoo images. It is really hard to get that perfect shot when you are without a tripod and the animals and you are moving a lot, not to mention the weather aspects that can affect the final picture. Therefore it is sort of a hit or miss prospect and it takes a little manipulation to get the perfect image.
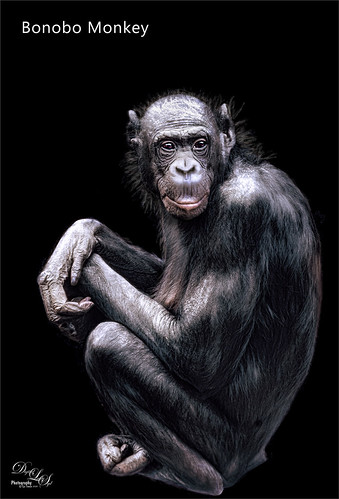
The above is an image using the effect that Joel Sartore (a National Geographic photographer) uses and is his images are currently being displayed throughout the Jacksonville Zoo. He mission is to photograph every live animal on the earth using this beautiful technique. He uses lighting and sharpness very effectively. I thought I would try to get a similar effect with some of my images and this Bonobo Monkey is one of my results. (This technique is also displayed in my Sneaking a Quick Snack image on my Tidbits Blog.)
So how do you create this effect? First the basic color work was done in Lightroom and the image was cropped once in Photoshop. A Solid Color Fill Adjustment Layer using the color black was added under a duplicate layer of the Background Layer. Joel uses white also as a background color, but I really like the black background effect.
Getting a Good Selection
A good selection is crucial – you do not want any discoloration from the original background where the animal was located. The Quick Selection Tool was used to select the monkey from his background. As you can see, the above had a lot of head hair and was easily discolored since his hairs were so thin. The Select and Mask panel was opened and the Refine Brush Edge Tool (2nd icon down on the left) was selected at the default 30-pixel size. An 8-pixel Edge Detection Radius was entered. With the Refine Brush Tool, the monkey was painted over his edges. Sometimes you do not get the best results with this tool, but it is a good start. At this point I usually look at the Black & White View and use the Brush Tool (3rd icon down) to clean up anything that looks bad. The Shift Edge was set to +37% to show up the hair on his head more. Exited using New Layer with Layer Mask (no decontamination used as it did not look good but always check to see). It totally depends on what is being selected as to whether all these sliders used on this image. The Eagle below used only the Refine Edge Brush. I personally find this panel to be very finicky as to how well it works. I would list a reference but so far I have not found any that are that great. I always do paint around the edges with the Refine Brush Edge Tool no matter what is being selected. Some experts say paint from the inside out over the edge – this works sometimes for me. The good news is that the layer mask can be painted in directly once out of the panel to further tweak the image. This is where a some special brushes can really help. This also may be a case to use Topaz (see my Tidbits Blog sidebar for website link) Mask AI if you own the filter – it does give a better selection sometimes.
Finding a Good Fur or Feather Brush
Back in Photoshop, a good Fur Brush is necessary to use inside the layer mask since so many hairs might be missed in the Quick Selection Panel. They need to be added in at this point. There are several places where you can get fur brushes. My best set is free to use from Coyotemange called Wildlife Texture Brushes on DeviantArt – great for painting in missing areas on all kinds of animal fur. Aaron Blaise also has some great animal brushes for sale. The one used a lot on the monkey image (and is one of my favorite brushes) was created from watching a short free brush video (No. 21) by Karen Alsop included in her class called Using Composite Photography to Create a Fantasy World on Creative Live. It has been very useful for all kinds of rough edges and I use it as a Clone Stamp Tool brush and Eraser also. By alternating between black and white on the edges, the hairs can be added back in with a very realistic look. Another very handy brush was created by watching Aaron Nace’s How to Cut Out Hair with the Brush Tool in Photoshop video. You can download the brush from there – I use this brush a lot in the layer masks for individual fur hairs – just need to adjust the stroke angle in the Options Bar or the Brush Panel.
Color and Lighting
Next the color of the subject needs to be considered. The monkey used a Levels Adjustment Layer. The Red in the drop-down menu was opened and the white tab moved left (which added Red into the Highlights) and the Midtone (center) tab was adjusted for contrast. In the Blue both the white tab was moved left a little and on the Output Levels, the first field was set to 14 to add blue into the shadows a little bit. To understand how this works, check out Aaron Nace’s How to Use Levels & Curves in Photoshop – Day 6 video – it is an excellent explanation! A Curves Adjustment Layer was used for contrast.
Now I could see the hair did not look right so another Curves Adjustment Layer was selected and the layer mask was filled with black (CTRL+I in the mask). By painting over the hairs with a white brush, the hairs could be exposed. Then the Curve was adjusted by using the little hand tool in the top of the Curves Panel and getting just the right tone on the hair. A Hue Saturation Adjustment Layer was added and the layer mask from the Curves Adjustment Layer was copied over so the color of the hair could also be adjusted. The eyes were brightened using the Exposure Adjustment Layer (see my The Eyes Have It – How to Make Them Pop in an Image blog). The last step was to use a Spotlight Effect on the subject to enhance the light already on the monkey. (See my How to Add a Spot of Light blog.)
I used Viveza 2 to do final image adjustments but Photoshop’s Camera Raw Filter works just as well – mainly was adding a little focused structure to parts of his face for focus. Also a text layer was added.
*****

This Bald Eagle is located at the Jacksonville Zoo with his blind buddy eagle. I felt bad for him as he was extremely alert and really wanted to take off but he seemed content to watch all the visitors as we passed by and said Hi. His final image is not as dramatic as the monkey image since the lighting was essentially non-existent in this image. Since he was not moving much, it was pretty easy to get a really sharp image. It was also easy to select the Eagle just using the Refine Edge Brush in the Select & Mask Panel as he did not have all the little feathers or hairs that many birds and animals have sticking out. Basically did a little spotlight lighting on his face and neck areas. Used Luminar Flex (could have used Luminar 4) to add the sharpness to the image (used Accent AI Filter 2, Structure, Details Enhancer, Golden Hour to adjust color in the beak, and Microstructure filters). Popped his eye with an Exposure Adjustment Layer. That was it. This was a very easy image to use for this type of effect.
It really is not that hard to get the look – just have to be careful of the mask being used. An edge discoloration could really overall ruin the result. Love this look that Joel did with his wonderful pictures. Hope you give a try. Have a great one and will be back soon!…..Digital Lady Syd
Digital Lady Syd Related Blogs:
How to Add a Darker Background Image for a Different Effect

These are such good portraits – the end result (for both) is wonderfully detailed and dignified too.
02/18/2020 at 12:06 pm
Pingback: » Just Gulliver Saying Hi Digital Lady Syd's Tidbits Blog
Pingback: ENJOYING A LITTLE RELAXATION WITH SOME TEXTURE FUN | Digital Lady Syd's Fun Photoshop Blog