
HOW TO EASILY CREATE A PHOTOSHOP BRUSH FOR PAINTING
 I think most people are pretty much in a rut and do not even think about using anything other than a basic round brush in Photoshop. But Wow! There is so much more sitting in that Brush Panel that is not really that difficult to use and the results can do some amazing things to an image. This week I am going to give you some very basic settings for making a nice brush variation and how to use it as both a regular brush and a Mixer Brush without having to learn everything “under-the-sun” about them. So here we go.
I have decided I must see things differently since I seem drawn to shooting these sort of close-ups of funny things I see at theme parks. They do such a good job with color and expression that it is hard not to enjoy them. So once again a Universal Studios Orlando image close up of a couple of the characters to ride on from the Caro-Seuss-el in Seuss Landing.
Getting Started
I decided I wanted a painterly feel to this bright colored image. Most people will over-saturate an image in Camera Raw or Lightroom as the painting can make the image lose its contrast. In Photoshop first do any cropping, straightening and clean up of distractions and convert your image to 8-bit mode to help speed up the painting process (Image -> Mode -> 8-bit).
This step does not have to be done – you can just go on to Creating the Brush step and then start painting on a New Layer without an underpainting effect. For this image, on a duplicate layer (CTRL+J), Topaz (see website link in sidebar at my Tidbits Blog) Simplify 4 plug-in was opened to create an underpainting before beginning to add my personal painting brush strokes. This is the same process as traditional painters do when they paint large blocks of color on their canvas before they begin painting the details. Especially for these bright contrasty images, it is a great way to start. Simplify does a great job of doing just that, simplifying your picture so you can take time working on your details. A preset I created back in version 3 was used (here are the settings used: Simplify section: Size 0.60, Feature Boost 0, Details Strength 0.80, Details Boost 1.28, Details Size 0.60, Remove Small 0.10, and Remove Weak 0.47; and Adjust section: Brightness 0.02, Contrast 0.82, Saturation, Saturation Boost 2.31, Dynamics 0, Structure and Structure Boost 1.00; no other settings used. ) This creates a rather bright flat image, but perfect for painting on the image. There are other ways to create an underpainting – the copy of the actual image could actually be blurred so only the basic shapes and colors are distinguishable and the detail removed. Alien Skin’s Snap Art 4 is another plug-in that creates a great underpainting effect. (See the first image in my More Plug-in and Painting Effects blog for an example using Snap Art 4.)
Creating the Brush
Next a New Layer was added on top and a watercolor Regular brush was created from the set I am always talking about – Creative Toons Watercolor Brushes – these were free from Photoshop Creative Magazine No. 113. (See next section for some other choices.) The brush used was Sample No. 15 but in the Brush Tip Shape in the Brush Panel, I set the size to 90, Roundness 100%, and the Spacing to 55%. Then added these brush sections by clicking on the words (not just check boxes or the settings don’t show up): Shape Dynamics was set to an Angle Jitter of 19% – no other settings on; Scattering with Scatter slider turned on and set to 30% and Count to 1 – no other settings on; Texture was turned on and the Gauze Pattern in Photoshop’s Artists Surfaces set was selected – Scale 100%, check Texture Each Tip, Mode Multiply, Depth 100% and Depth Jitter 40%; and of course Smoothing. (To locate pattern, click on side of pattern in Texture brush section, then click on the cog in upper right corner and select Artist Surfaces in list and Append – newly loaded patterns appear at bottom of already loaded patterns.) All the Control settings are turned off in all the sections. Be sure to save down as a Brush Preset so you do not lose your settings by clicking on the third icon over at the bottom of either the Brush Panel or the Brush Preset Panel. These were all settings I figured out since I really liked the shape of the original brush from Creative Toons, a brush that originally had a Size of 2500 px and Spacing of 25%. When painting, the 90-pixel size is as large as you want to use, especially when used as a Mixer brush. I believe any nicely shaped watercolor brush would work with these settings. Please try different settings and different types of brushes, not just watercolor, as you can get some very different but equally beautiful effects – I just happen to think this brush is very versatile and blends so beautifully. When using as a Regular brush, I usually set the brush opacity in the Options Bar to 30% and leave the Flow at 100%. If painting on a layer mask, may want the brush opacity set to 100%. For info on Flow, check out my blog called What Does the Flow Slider in the Options Bar Do?
Where to Find Some Nice Starter Watercolor Brushes
If you are unable to create this brush since the set is not free without the magazine, try downloading this large set of brushes from Env1ro watercolor brush and select Brush 3-697 pixels using exactly the same settings – when tested it creates the same effect as the brush used above since the shapes are very similar. It is also used in image below. Some other similar results were obtained using SwimchickWatercolours – brush no 480 which gave a little softer result. Kahara has a nice 8-brush set and the third one made a beautiful brush with these settings and a different pattern, a concrete pattern from Photoshop’s Texture Fill set (click on side of pattern in Texture brush section, then click on the cog in upper right corner and select Texture Fill in list – new patterns appear at bottom of loaded patterns). Changing up the patterns can give a brush new life. For a great list of free brush downloads, check out 45 Watercolor Brushes For Photoshop by Petshopbox Studio.
Turning it into a Mixer Brush
The real trick is to get your new Regular brush to work as a good Mixer Brush, and that is determined by what is up in the Options Bar – these settings are all sticky so when using your Mixer brushes, check them out if the brush is not working correctly.
So here are the options to make this really easy:
- To blend the colors (creating a blender Mixer brush), in the Options Bar turn off the “Load the brush after each stroke” icon by clicking on it and always leave “Clean the brush after every stroke” clicked on, and selecting the Very Wet, Heavy Mix in the drop-down – have Sample All Layers checked. Now you have a pretty nice blending Mixer brush. If some color shows up, you left the “Load” icon turned on.
- But what if you need to add some color to an area (creating a painting Mixer brush)? Turn On the Load the brush after each stroke icon (or no color will be painted) and flip the drop down to Dry, Light Load. Dab a few times to add your color and go back and turn off the Load icon and set to the Very Wet Heavy Mix to blend some more.
Really not that hard at all if you know where to look. And that is what I did on this image. Photoshop does try to make it easy. I blended areas where Simplify left a rough edges between color and added color to areas that were blown out as highlights or needed a more solid color added. Be sure to use dabs as well as longer strokes to get a nice painterly feel. If your brush gets much bigger than 90-pixels, the computer may slow down considerably so reduce the brush size – I usually paint at 20 pixels or less anyway. If still having problems, resize your image smaller – it will not matter if you are creating a painting – it can always be increased again after the image is finished. This was just too much fun to do! I love happy characters to work on!
NOTE: For painting with the Mixer brush – to sample colors that are under a brush stroke where you are painting, just press ALT+ click to add the(ose) colors to the “Load the brush after each stroke” icon which shows what is being painted by the brush. If you want to use a pure color from the Color Picker, you will need to use the Eyedropper Tool or double-click on the foreground swatch. I find this very time-consuming, so I do two things. First I have set up a keyboard shortcut for the letter “n” to open up the Color Picker. (Go to Edit -> Keyboard Shortcuts) Since I do not use the letter “n” for the 3D Camera Rotate Tool, I changed it in the Shortcuts For: Tools and scrolled to Foreground Color Picker, clicked Add Shortcut button, and typed in the letter “n” – it said it was in use and do I want to do this and I said yes. There you have it – very handy! Also my Wacom Stylus pen is set up so that the top of the long button opens up the Color Picker by selecting my “n” shortcut key, and the bottom is for Enter to accept the new color. This speeds up the painting process immensely! As a Regular brush – to sample an image color, just ALT+click on the color in image and the Eyedropper Tool pops up and selects it. The “n” shortcut key will bring up the Color Picker no matter what brush tool you are using.
Finishing up Your Painted Photo
I decided that the image needed a few lines showing, especially on the faces to draw the eye a little better. Again, this does not have to be done with a plug-in. One of the best ways to do this is to add a New Layer and select a Pencil Ink pen and add them in yourself – adjust the layer opacity so it is not over-whelming. For my painting the original bottom layer was duplicated and Simplify was opened again. This time the Black Line Only preset was chosen and just the Reduce Weak slider was set to 1.00 – all other settings were left. In Photoshop the layer was moved up to the top and set to Overlay blend mode. A black layer mask was added and just the eye areas and a few other details were painted back with the lines showing using a low opacity white brush. Many painted images have some lines in them and there are various actions around that add lines to your images, but by using just the Edges section in the Simplify plug-in is by far the fastest way to do this. The Reduce Weak slider controls a lot of the lines in the image but also check out the Edge Strength and Simplify Edge sliders for getting the illustrated look you want. This layer was set to Overlay blend mode so the white disappeared and a black layer mask was applied – painted in lightly with white brush where just the eyes and a few other areas had lines added for a little additional definition. A Curves Adjustment Layer was added for contrast. The Camera Raw Radial Filter was added to draw focus to the eyes , especially the center figure (Inside Radial Filter settings: Exposure 0, Contrast +5, Highlights +44, Shadows -4, Clarity +41, Sat 0, and Sharpness +33). And finally OnOne’s (see website link in sidebar at my Tidbits Blog) Perfect Effects plug-in was used to add the pretty border – they have always had the best borders. This one was called Antique Rounder Border. This turned out to be quite a lot of effort, but when you are painting an image, it usually does take some extra effort – even with the underpainting already added.
Here is another example using the same settings on a new brush.
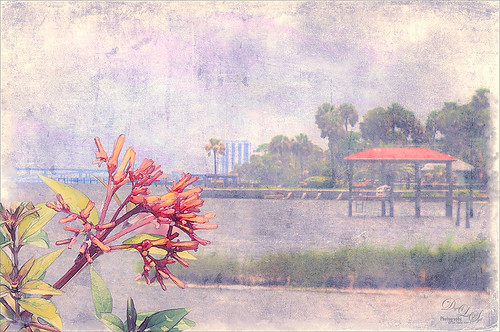 This image is of some Dwarf Firebush tubular flowers growing in my front yard and the Halifax River (aka Intracoastal Waterway) at Ormond Beach, Florida, is the background. Not sure how I came up with this combination, but it turned out kind of nice and definitely different. The reason it fits in this blog is that the flowers were painted using the same settings as the Mixer Brush in the above image, but with a similar brush I created. Wanted to show you that applying these settings to any brush is totally easy and the results can be very nice. But first I had to select just the flowers from the background using Photoshop’s Color Range Command. I needed to put them on something, so I added a Pattern Adjustment Layer and found this image of the river that looked kind of nice behind it since the roof on the pier is so similar to the flower colors. The pattern was left at a Scale of 100%. I wanted to add a little grunge to the image so Kim Klassen’s Make Grunge Set Allard texture was added and set to Luminosity blend mode at 54% – any grunge texture would be fine but I like really like Kim’s textures as most of them are very subtle. Next Env1ro watercolor brush 697-3 was loaded with the same settings that were used on the Creative Toons brush. Unfortunately due to an electrical storm that knocked out electricity and totally busted my Photoshop preferences, workspace, brushes, and image, I lost the layers for this image – what a mess! But since I did have my History in Preferences set to Metadata and Edit Log Items Detailed, and all my steps were listed in the File -> File Info and the History tab. Pretty nice extra-back up to have, especially in this case! Another Simplify Black Line Preset was added on a duplicate background layer and placed on top, set to Overlay blend mode, and a black layer mask added to paint back the flower details. Topaz ReStyle was applied to a stamped (CTRL+ALT+SHIFT+E) on top with my favorite Cream and Plum preset (here are my settings: ReStyle blend mode set to Color. In Basic blend mode set to Luminosity; Temperature was set to -0.75, Tint 0.20, and Saturation 0.13; Tone Black Level -0.37 and White Level 0.22; and Detail Structure -0.20 and Sharpness 0.64). This gave it a bit more of a soft look as opposed to a grungy effect. The last step was to use the new brush as a Mixer and blend the edges by painting around it. I am not sure this image has that much of a painterly look, but I still liked the results.
Hopefully this blog makes sense to you and you now have enough information to actually start painting on layers on top of your image. Also use the same brush to paint in a layer mask, to use with the Clone Stamp, and create borders. It really is not that hard. Experiment with the settings in the Options bar – try some of the other choices in the drop-down menu for the Mixer brush. Try different patterns in your brushes. It is all pretty easy – just keep saving your brushes as presets so you do not lose them. I would suggest going in to the Preset Manager (icon at bottom of the Brush Panel) and saving your new brushes down since I did lose all of the ones I had created when my electricity went off. And if you have Topaz Simplify, try out the line and flat painting presets. Hope you have a fun week experimenting – I know I will!…..Digital Lady Syd
Digital Lady Syd Related Blogs:
Digital Lady Syd Reviews Topaz Simplify 4

Hi Syd,
In following your instructions, “Texture was turned on and a the Gauze Pattern in Photoshop’s default set was selected,” I couldn’t find the Gauze Pattern in the Default set. I finally found it under Artistic Surfaces.pat. I thought I’d mention this in case anyone else had my same issue.
Thanks for all you give to your readers. Your efforts are so much appreciated.
Diana
07/26/2014 at 3:36 pm
Appreciate the comment – will correct blog right now. Think I had it in my patterns forever!
07/26/2014 at 8:46 pm
Great blog and I love the art work you did. I use Painter and know quite a bit about the brushes there. So far, I’ve not paid any attention to the brushes in Photoshop. But this blog gave me some good information I will use when I start using brushes. Thanks.
07/26/2014 at 5:23 pm
As always, thanks Kerry. The programs are different and the brushes seem different to me also. I think I will popping back and forth between them once I understand Painter’s brush engine better.
07/26/2014 at 8:56 pm
I do know quite a bit about Painter’s brushes. If you ever have any questions, I’d be delighted to be able to answer any questions. I recently got a great USB video from VLC just on brushes. I also have taken classes on Painter’s brushes. It is easier to work with them in Painter X3 than ever before.
07/27/2014 at 6:07 pm
You’re on my list now. Thanks for the offer of help. Slowly working through several resources on Painter – slowly getting the hang of it but those brushes – and what a brush engine! I must take notes! I must take notes! LOL
07/27/2014 at 9:17 pm
I have taken tons if notes on the brushes. It’s the only way. There is just so much. Do you know about the brush calibration panel to individually calibrate your brush? It makes a huge difference. I keep it open in my workspace.
07/30/2014 at 12:38 am
Pingback: » Painting Away in Photoshop! Digital Lady Syd's Tidbits Blog
Pingback: » A Little More Painting with a Texture Brush from Your Image Digital Lady Syd's Tidbits Blog
Pingback: » Just Painting! Digital Lady Syd's Tidbits Blog
Pingback: HOW TO USE THE PUPPET WARP TOOL CREATIVELY | Digital Lady Syd's Fun Photoshop Blog
Pingback: MORE COMBINING PLUG-INS FOR GREAT EFFECTS! | Digital Lady Syd's Fun Photoshop Blog
Pingback: HOW TO PAINT AN IMAGE USING REGULAR AND MIXER BRUSHES IN PHOTOSHOP | Digital Lady Syd's Fun Photoshop Blog
Pingback: HOW TO CREATE A WATERCOLOR AND/OR INK IMAGE IN PHOTOSHOP | Digital Lady Syd's Fun Photoshop Blog
Pingback: HOW TO USE PHOTOSHOP’S BRUSH TEXTURE SECTION FOR PAINTING CLEAN-UP | Digital Lady Syd's Fun Photoshop Blog
Pingback: WATERCOLOR FUN ON A SUNNY DAY | Digital Lady Syd's Fun Photoshop Blog
Pingback: HOW TO PUT A PICTURE TOGETHER FOR FUN | Digital Lady Syd's Fun Photoshop Blog
Pingback: HOW TO USE THE PUPPET WARP TOOL CREATIVELY – RECYCLED | Digital Lady Syd's Fun Photoshop Blog