
HOW TO GET A PAINTERLY EFFECT FOR WILDLIFE AND BIRDS
 For a few weeks I have been experimenting with some of the wonderful painterly techniques of Jai Johnson, a wildlife enthusiast who creates absolutely beautiful images. I am finally getting some results that are appealing to my personal taste as I love photographing wildlife in the natural habitat. I thought I would pass on what works for me. On her website she has several really nice videos. She uses Topaz (see website link in sidebar of my Tidbits Blog) photoFXlab as a stand-alone, but it is pretty easy to follow along and do the same steps in most versions of Photoshop. Lately I have been doing my painting in CS6 to increase the stroking speed especially with the Mixer Brushes, although all the CC versions will work fine.
Love the beautiful egrets that can be found in the rookery at the St. Augustine Alligator Farm in the Spring. This bird just seemed happy to me and was a lot of fun to paint. The background is one created in Painter for him. I believe you could create some nice watercolor backgrounds in Photoshop that would give a similar result. I needed a yellow warm light in the background to match the sunlight on his body. Used Jai’s basic workflow that puts him on top and then in a black mask, the original background is removed. She also uses Topaz Lens Effects Graduated Neutral Density filter – in this case used to lighten the bird up. The texture was duplicated two more times and placed on top – one used Multiply blend mode at 16% layer opacity and the other Color Dodge blend mode at 15% layer opacity. A Hue/Saturation Adjustment layer was opened and the Colorize button was checked with the Hue set to 48 and Saturation 25 – filled the mask with black (CTRL+I in mask) and painted back just lightly areas I wanted the warmer color to appear. Nik Viveza 2 was used to add emphasis to the head area. The Eyes and Beak were sharpened using two Exposure Adjustment Layers. (See my How To Do a Quick Eye Sharpening in Photoshop blog,) Then a stamped layers (CTRL+ALT+SHIFT+E) was created on top and opened in Topaz ReStyle using the Peppermint Gray preset (one of my favorites) to get a little different color balance. Back in PS the layer was set to 45% layer opacity and the bottom foreground was painted out in a layer mask to keep it slightly darker so the bird looks grounded. Last steps involved used New Layers to clean up distracting colors or areas.
*****

I totally love Wood Storks, the gentle looking birds that are everywhere down here in Florida. This one happened to be standing in the top of a tree at the St. Augustine Alligator Farm Rookery, but they are everywhere in my neighborhood. There were actually two other birds next to him doing some crazy things so I removed them. They seem to tolerate people very well also.
In this image he was placed on a new texture created just for him in Painter. I tried to use complementary colors to the bird. If you like this type of texture, check out Jai Johnson‘s inexpensive (and some really nice free ones) and beautiful textures that give similar effects. The usual steps were taken of putting the bird layer on top of the texture, adding a black layer mask, and painting just the bird back with a white brush in the mask so the texture shows through from below. One of Jai’s great tips is to try to match up the texture with the original background colors of your subject. Used the Properties Panel Density slider to reduce the mask opacity to be able to see where the subject is for the initial painting in the layer mask, then put the slider back up to 100% when blocked in a little. Duplicated the texture and placed it on top of the bird layer, set it to Soft Light Blend Mode at 62% layer opacity. Did some clean up layers to even out some of the edges.
I am finding Topaz Lens Effect’s Toy Camera filter is working well with my bird images. A stamped layer (CTRL+ALT+SHIFT+E) was created on top to apply this filter. Looked at the different presets and choose one, in this case the Yellow Green Low Contrast preset. The Vignette was set 0 and all the sliders in the Toy Camera Aberrations section far left to 0 since I really do not want the Toy Camera effect. The next Toy Camera sections should be adjusted for the individual image. (For the above the Region Size was set to 0.17, Transition 0.42 and Angle 55.25 – especially watch the Angle as it affects how the colors lay out on the image. Next adjusted the Region A Color Cast and Region B Color Cast to fit this image – mainly adding a little bit of Reds, Yellows and Blues to get the colors I liked.) I like how you can really adjust the colors around to get some nice blended effects. Finally adjusted the standard Image Adjustment sliders to add saturation and contrast. These presets, with some tweaking, can really give an image a beautiful soft and blended result.
The Eyes were again sharpened using the Exposure Adjustment Layer, and then another for just the beak. These two areas have to be sharp since the eye will look first at them with birds, but be careful not to over-sharpen so they do not blend into the image – reduce the opacity of the adjustment layer a little if this happens. Next I wanted to add just a little contrast around his head so a Curves Adjustment Layer was used to add some burning by pulling down on the curve to get the correct tone behind his head, filling the mask with black (CTRL+I), and painting back where I want the effect. (See my How to Use Curves Adjustment Layer to Dodge and Burn an Image blog). The last step added Nik Viveza 2 to really make the focal point, the head area, pop out. Since the background is competing with his white feathers, the feathers needed some punch and a little softening in this area.
***
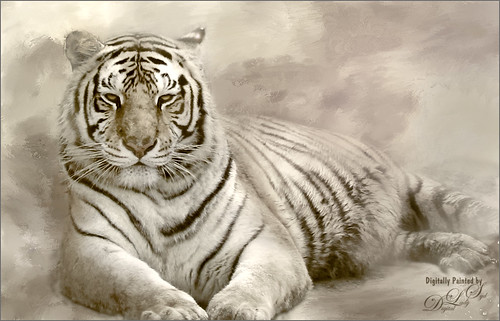 This beautiful photo was from FreeImages – wish I could take credit for taking this image. The photo was used to follow the steps in Jai’s last video called Working With Bold Colors and Abstract Textures. This image had a really bright colored texture like Jai was using as a background. In her video she suggested trying out Topaz ReStyle, and that is where this color effect was applied. Also Topaz Adjust’s Boost preset was used instead of the Bold preset she prefers on the tiger layer. Topaz Simplify’s BuzzSim preset was used on just the subject layer. On a stamped layer Topaz Lens Effects Graduated Neutral Density filter was applied, and then ReStyle’s Dusty Desert preset which gives the almost colorless result. To finish an Exposure Adjustment Layer for the eyes and then Nik Viveza 2 to even out the background just a little were applied. Wish I had taken this image. Sigh!
Well hope you get a chance to check out Jai Johnson’s techniques on your wildlife images. Like I said, all her techniques can be used in Photoshop without too many changes – just experiment with the brush opacity and Flow settings is about all I see that is a little different. And I really like the Topaz Lens Effects Toy Camera effects – something I had not even looked at before! Hope you are all having a great summer – I am!…..Digital Lady Syd
Digital Lady Syd Related Blogs:
Topaz Lens Effects For Some Image Fun
How To See If You Captured the Focal Point
A Little Birdie Told Me So!
Jumping Whales
Horses Checking Me Out

Beautiful work, Syd.
08/16/2015 at 10:13 am
I have no words how beautiful are these images!
08/17/2015 at 9:37 pm
Thanks for the kind words Inese.
08/20/2015 at 12:21 pm
Pingback: » Building a Home Digital Lady Syd's Tidbits Blog
Pingback: DIGITAL LADY SYD REVIEWS TOPAZ REMASK 5 | Digital Lady Syd's Fun Photoshop Blog
Pingback: HOW TO USE A TOPAZ RESTYLE TRICK FOR IMPROVING YOUR IMAGE | Digital Lady Syd's Fun Photoshop Blog